background image

11

10

11

10

2-in-1 Cordless Li-ion Grass Trimmer/Edger


EN

AssEMBLY

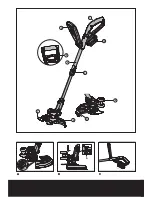
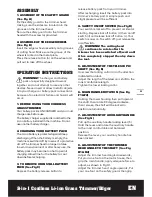
1. aSSEmBLy oF THE SaFETy GuaRd 

(See Fig a)

Fix the safety guard to the trimmer head 
making sure the sides are located into the 
grooves on the trimmer head.
Secure the safety guard onto the trimmer 
head with the screw (a) provided.

2. aSSEmBLE oF THE EdGER wHEEL 

(See Fig B)

Insert the edger wheel assembly onto grooves 
of cutting head. Make sure the groove of the 
wheel is locked in the metal plate.
Press the release button (b) on the wheel and 
pull out to take off the wheel.

oPErATIoN INsTrUCTIoNs

waRNiNG!

 The charger and battery 

pack are specially designed to work 

together so do not attempt to use any other 
devices. Never insert or allow metallic objects 
into your charger or battery pack connections 
because of an electrical failure and hazard will 
occur.

1. BEFoRE uSiNG youR CoRdLESS 

GRaSS TRimmER

Your battery pack is UNCHARGED and you must 
charge once before use.
The battery charger supplied is matched to the 
Li-ion battery installed in the machine. Do not 
use another battery charger.

2. CHaRGiNG youR BaTTERy PaCk

The Li-ion battery is protected against deep 
discharging. When the battery is empty, the 
machine is switched off by means of a protective 
circuit: The trimmer head no longer rotates.
In a warm environment or after heavy use, the 
battery pack may become too hot to permit 
charging. Allow time for the battery to cool 
down before recharging.

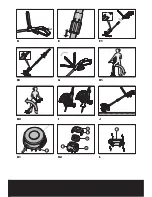
3. To REmovE oR iNSTaLL BaTTERy 

PaCk (See Fig C)

Depress the battery release button to 

release battery pack from your trimmer. 
After recharging, insert the battery pack into 
trimmer’s battery port. A simple push and 
slight pressure will be sufficient.

4. SaFETy oN/oFF SwiTCH (See Fig d)

Your switch is locked off to prevent accidental 
starting. Depress lock off button (c) then on/off 
switch (d) and release lock off button (c). Your 
switch is now on. To switch off, just release the 
on/off switch.

waRNiNG! The cutting head 

continues to rotate after the 

trimmer has been switched off; wait until 

it has completely stopped then lay down 

the tool.

5. adJuSTmENT oF THE TELESCoPiC 

SHaFT (See Fig E)

Unscrew the locking collar (4) in the direction 
indicated to unlock.
Adjust the length of the telescopic shaft to the 
most comfortable length.
Tighten the lower locking collar. 

6. maiN HaNdLE RoTaTioN (See Fig 

F1&F2)

Holding the lower housing then pull upward 
the shaft, then rotate 90 degree clockwise, 
then release, the shaft will be locked in 
position automatically.

7. adJuSTmENT oF auxiLiaRy HaNdLE   

(See Fig G)

Pull up the auxiliary handle locking lever (5).
Hold the lever and rotate the auxiliary handle 
to the most comfortable and balanced 
position.
Release the lever, your auxiliary handle has 
been locked.

8. adJuSTmENT oF THE TRimmER 

HEad aNGLE To THE SHaFT  (See Fig 

H1&H2)

Adjust the trimmer head angle downwards, 
Put your one foot on the motor house, then 
grip the main handle, apply adequate force to 
adjust, as shown in Fig H1.
Adjust the trimmer head  angle upwards, Put 
your one foot on the safety guard, then grip 

Summary of Contents for WG165

Page 1: ...PLiNE NumBER 1 866 354 woRx 9679 HELPLiNE NumBER 2 in 1 Cordless Li ion Grass Trimmer Edger EN Taille haie tondeuse 2 en 1 sans fil Li ion F Podadora bordeadora de c sped sin cables 2 en 1 con bater a...

Page 2: ......

Page 3: ......

Page 4: ...8 9 6 7 4 3 2 10 5 1 b a B A C...

Page 5: ...c d 16 11 12 13 14 15 17 F1 F2 B E G A D C H1 H2 I J K1 K2 L M...

Page 6: ...6 K1 K2 L M...

Page 7: ...Safety Guard 7 Flower guard 8 Edger wheel 9 Line Cutter 10 Battery pack 11 Trimmer head cover See Fig K2 12 Cap release latch See Fig K2 13 Spool See Fig K2 14 Trimmer head See Fig K2 15 Eyelet See F...

Page 8: ...ety guard 1 charger WA3733 1 battery pack WA3524 1 edger wheel 1 wall mount bracket 1 We recommend that you purchase your accessories from the same store that sold you the tool Use good quality access...

Page 9: ...ed have it repaired by an authorized service facility Inspect extension cords periodically and replace if damaged Keep handles dry clean and free from oil and grease 13 Check Damaged Parts Before furt...

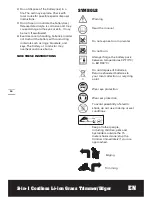
Page 10: ...as rings bracelets and keys The battery or conductor may overheat and cause burns SAVE THESE INSTRUCTIONS SYMBOLS Warning Read the manual Do not expose to rain or water Do not burn Always charge the...

Page 11: ...fore recharging 3 TO REMOVE OR INSTALL BATTERY PACK See Fig C Depress the battery release button to release battery pack from your trimmer After recharging insert the battery pack into trimmer s batte...

Page 12: ...tion the wheel on the ground for edge mode The guard has two white line guides to indicate the cutting line position Align these marks with the edge of your lawn While edging allow the tip of the line...

Page 13: ...scribed in To fit spool and line complete STORING your GRASS TRIMMER a Assembly of the wall mount brackets See fig L Tighten all the screws securely Carefully check the bracket after mounting to make...

Page 14: ...bordures 9 Coupeur de cordon de coupe 10 Bloc piles 11 Couvercle de la t te de coupe Voir Fig K2 12 M canisme de d verrouillage du couvercle Voir Fig K2 13 Bobine Voir Fig K2 14 T te de coupe Voir Fig...

Page 15: ...hine 2 5kg 5 6lb ACCESSOIRES Garde de s curit 1 Chargeur WA3733 1 Bloc piles WA3524 1 Roue de coupe bordures 1 Installation murale 1 Nous recommandons d acheter tous les accessoires dans le magasin o...

Page 16: ...ns N utilisez pas l appareil lorsque vous tes fatigu 11 Entreposez l int rieur les appareils qui ne sont pas utilis s fr quemment Lorsqu inutilis s les appareils devraient tres entrepos s l int rieur...

Page 17: ...feu La cellule peut exploser V rifiez les r glementations locales pour de possibles instructions sp ciales de disposition 3 N ouvrez pas et ne mutilez pas la les pile s L lectrolyte qui peut s en chap...

Page 18: ...e la machine s teint gr ce un circuit de protection La poign e de l outil s arr te de tourner Dans un environnement chaud ou apr s une utilisation prolong e le pack de la batterie est trop chaud pour...

Page 19: ...feront pas correctement dans la t te de coupe et pourraient causer de s rieuses blessures Ne jamais utiliser d autres mat riaux tels que fils ficelle ou corde parce qu ils peuvent casser durant la ton...

Page 20: ...le couvercle Pour embobiner le cordon de coupe manuellement AVERTISSEMENT Prenez approximativement 10 pieds 3 m de cordon de coupe Ins rez 5 8po 15 mm de cordon de coupe dans les trous de la bobine et...

Page 21: ...ent des pi ces et accessoires recommand s par le manufacturier Ne jamais utiliser d eau ou des nettoyants chimiques pour nettoyer votre outil Nettoyez propre avec un linge sec Toujours entreposer votr...

Page 22: ...rda espaciadora 8 Rueda bordeadora 9 Cuchilla del hilo 10 Paquete de Baterias 11 Cubierta del cabezal de corte Ver Fig K2 12 Pestillo para extracci n de la tapa Ver Fig K2 13 Bobina Ver Fig K2 14 Cabe...

Page 23: ...na 5 6libras 2 5kg Accesorios Guarda protectora de seguridad 1 Cargador WA3733 1 Bater a WA3524 1 Rueda bordeadora 1 Montaje de pared 1 Recomendamos que usted compre todos los accesorios en el mismo l...

Page 24: ...cerrados Cuando no se encuentran en uso las herramientas deben guardarse en un lugar seco elevado o cerrado con llave lejos del alcance de los ni os 12 Mantenga la herramienta con cuidado Conserve los...

Page 25: ...3524 WA3525 2 No tire las bater as al fuego Pueden llegar a explotar Consulte los c digos locales para obtener instrucciones especiales de desecho 3 No abra ni mutile las bater as El electrolito que s...

Page 26: ...mo para aceptar carga Permita que se enfr e antes de cargarla 3 PARA EXTRAER O INSTALAR LA BATER A Ver Fig C Presione la traba de liberaci n de la bater a y extr igala de la herramienta Luego de la re...

Page 27: ...unos 3 25 8 cm cm por encima del suelo Permita que s lo el extremo del hilo haga contacto No fuerce el hilo de corte en el rea de trabajo Bordeado Ver Fig J Sostenga la carcasa inferior tire hacia arr...

Page 28: ...asegurarse de que el hilo est prolijamente enrollado alrededor de la bobina De lo contrario se deteriorar la eficiencia del abastecimiento autom tico de hilo Luego instale la bobina tal como se descr...

Page 29: ...29...

Page 30: ......

Page 31: ......

Page 32: ...Designed in Italy Made in China Con u en Italie Fabriqu en Chine Dise ado en Italia Fabricado en China Copyright 2010 Positec All Rights Reserved...

Page 33: ...ordless Li ion Blower Sweeper EN Souffleuse Balayeuse sans fil Li ion 24V F Sopladora Barredora de 24V con bater a de iones de litio ES P06 P12 P18 HELPLiNE NumBER 1 866 354 wORX 9679 HELPLiNE NumBER...

Page 34: ......

Page 35: ......

Page 36: ...6 A1 A2 4 3 2 1 5...

Page 37: ...6 7 B D E1 E2 C...

Page 38: ...SSORIES battery WA3524 1 charger WA3733 1 wall mount bracket 1 We recommend that you purchase your accessories from the same store that sold you the tool Use good quality accessories marked with a wel...

Page 39: ...ord as a handle close a door on cord or pull cord around sharp edges or comers Do not run appliance over cord Keep cord away form heated surfaces 7 Do not unplug by pulling on cord To unplug grasp the...

Page 40: ...omply with the original manufacturer s recommendations or specifications ADDITIONAL SAFETY INSTRUCTIONS FOR YOUR TOOL 1 Do not charge appliance in damp or wet locations 2 Do not use battery operated a...

Page 41: ...be properly repaired or replaced by an authorized service center unless indicated elsewhere in this manual CHARGERS 1 Use your charger only to charge the battery in the tool which it was supplied Othe...

Page 42: ...longer rotates In a warm environment or after heavy use the battery pack may become too hot to permit charging Allow time for the battery to cool down before recharging 3 TO REMOVE OR INSTALL BATTERY...

Page 43: ...le serious personal injury 2 STORING YOUR BLOWER The blower can be stored into the wall mount bracket 7 as illustrated See E2 Store in a dry place where your blower can be protected from damage CLEANI...

Page 44: ...3524 1 Chargeur WA3733 1 Support de montage mural 1 Nous vous recommandons d acheter tous vos accessoires du m me magasin qui vous a vendu l outil N utilisez que des accessoires de bonne qualit de mar...

Page 45: ...les instructions d crites dans le manuel N utiliser que selon les pi ces jointes recommand es du fabricant 5 N utilisez pas de cordon ou de prise endommag s Si l appareil ne fonctionne pas comme il d...

Page 46: ...on u 1 2 Pr paration 1 Inspectez soigneusement le lieu dans lequel vous allez utiliser l appareil et retirez en les pierres les b tons les fils les os et autres objets 2 Utilisez l outil uniquement la...

Page 47: ...n 17 Ne forcez pas l appareil Il va faire un meilleur travail et avec moins de risques de blessure en travaillant au taux de charge pour lequel il a t con ut 18 N essayez pas d utiliser l appareil hor...

Page 48: ...e des objets m talliques soient introduits dans les bornes de connections de votre chargeur ou bloc pile parce qu une d faillance lectrique et un danger vont se produire 1 AVANT D UTILISER VOTRE SOUFF...

Page 49: ...s de d bris et de feuilles une fois qu il est rassembl Attention Ne soufflez pas des objets durs comme des clous des boulons ou des pierres N op rez pas la souffleuse proximit de spectateurs ou d anim...

Page 50: ...RIOS Paquete de Baterias WA3524 1 Cargador WA3733 1 Soporte para el montaje en la pared 1 Le recomendamos que compre todos los accesorios en la tienda donde adquiri la herramienta Use accesorios de bu...

Page 51: ...se utilice el aparato como un juguete Preste atenci n si se utiliza por o en las cercan as de ni os 4 Utilice el aparato nicamente como se describe en el manual Utilice s lo los componentes recomenda...

Page 52: ...s que no fue dise ada 1 2 Preparaci n 1 Inspeccione por completo el rea en la que se utilizar la herramienta y extraiga todas las piedras ramas cables huesos y otros objetos extra os 2 Utilice la herr...

Page 53: ...rabajo mejor y m s seguro a la velocidad para la cual fue dise ada 18 No se extralimite Mant ngase firme y con buen equilibrio en todo momento 19 Permanezca alerta Ponga siempre atenci n en lo que est...

Page 54: ...de modo que no debe utilizarse ning n otro dispositivo Nunca inserte objetos met licos en las conexiones del cargador o del pack de bater a pues incurrir a en peligro de aver a el ctrica 1 ANTES DE U...

Page 55: ...ojas residuos ser m s f cil deshacerse de la pila Precauci n No realice el soplado de objetos duros como clavos pernos o rocas No utilice el soplador cerca de personas o mascotas Tenga sumo cuidado cu...

Page 56: ...Designed in Italy Made in China Con u en Italie Fabriqu en Chine Dise ado en Italia Fabricado en China Copyright 2010 Positec All Rights Reserved...

Reviews: