background image

2-in-1 Cordless Lawn trimmer / Lawn edge trimmer  EN

13

12

13

12

unit from contacting the ground. Take extra 
caution while edging as objects can be thrown 
from the trimmer line.

AUToMATIC LINE FEED SySTEM

When initially switching on the trimmer, a 
small length of line is fed out.
A ‘clattering’ noise will be heard when the 
lines hit the line cutter. DO NOT BE ALARMED 
this is quit normal. After about 5 seconds the 
line will be cut to the correct length and the 
noise will reduce as the motor receives full 
speed.
If the noise of the line being cut can’t be heard, 
more line will be fed out.
To feed more line, it is first necessary to allow  
the trimmer to stop completely, then restart, 
allowing the motor to reach full speed.
Repeat above until you hear the lines hitting 
against the line cutter. (Do not repeat this 
procedure more than 6 times)

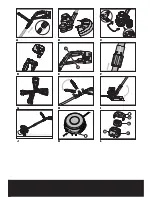
To MANUALLy FEED THE LINE (See Fig 

K)

If required line can be feed out manually
To operate, press and release manual line feed 
button (13), while gently pulling out the lines 
until the lines reach the line cutter.
If the line extends past the line cutter, too 
much line has been fed out.
If too much line is fed out, remove the spool 
cap and turn spool counter-clockwise until the 
line is at the desired length.

To REMovE THE CAP

Press and hold in the two latches (15) (See Fig 
L).
Pull cap away from the spool holder
When refitting the spool cap.
Keep all areas of the cap and spool holder 
clean.
Replace the cap, pressing firmly down towards 
the spool holder to ensure cap is fully located.
Check that the cap is correctly fitted by trying 
to remove it without depressing the two 
latches.

To REPLACE CUT LINE.

For your convenience it is recommended you 
buy spool and line complete.

To fit spool and line complete:

Remove old spool.
Place new spool into cap with 

cut out areas 

of the spool in line with eyelets.


Release line from cleat and feed line through 
eyelet .
Refit the cap.

To fit nylon line only:

wARNING! 

Take approximately 10ft(3m) 

of line. Insert 5/8”(15mm )of line into the 

spool holes and wind line in the direction of 
the arrows on the top of the spool.
Your Trimmer is designed to use only line with 

maximum diameter of 0.065”

IMPoRTANT: 

Leave approximately 

4”(100mm) of line unwound and place into 
cleat. 
Care should be taken to ensure that the line is 
neatly coiled on the spool. Failure to do so will 
impair the efficiency of the automatic line feed.
Then fit spool as described in 

“To fit spool 

and line complete”.

maiNTENaNCE

After use, disconnect the battery from the 
mains and check for damage. Your power 
tool requires no additional lubrication or 
maintenance. There are no user serviceable 
parts in your power tool. Mains powered 
trimmers should only be repaired by an 
authorized repairer use only manufacturers 
recommended replacement parts and 
accessories.
Never use water or chemical cleaners to 
clean your power tool. Wipe clean with a dry 
cloth. Always store your power tool in a dry 
place out of the reach of children. Keep the 
motor ventilation slots clean. Keep all working 
controls free of dust. If you see some sparks 
flashing in the ventilation slots, this is normal 
and will not damage your power tool.

Summary of Contents for WG166

Page 1: ...trimmer Lawn edge trimmer EN Taille bordure Mini tondeuse sans fil 2 en 1 F Recortadora de c sped inal mbrica 2 en 1 Bordeadora para c sped ES Pag 06 Pag 13 Pag 21 WG166 HELPLINE NUMBER 1 866 354 woRx...

Page 2: ......

Page 3: ......

Page 4: ...10 11 12 1 9 8 7 6 2 3 4 5...

Page 5: ...14 15 16 17 18 A B 13 A B C D E F G H I J K L...

Page 6: ...guard 7 Telescopic Shaft 8 Auxiliary handle 9 Main Handle 10 Edger wheel 11 Line Cutter 12 Auxiliary handle locking lever 13 Line feed button See Fig K 14 Cutting head cover See Fig L 15 Cap release...

Page 7: ...essories Battery pack WA3182 2 Auxiliary handle 1 Edger wheel 2 Charger WA3714 1 We recommend that you purchase your accessories from the same store that sold you the tool Use good quality accessories...

Page 8: ...ve hair covering to contain long hair 5 Use Safety Glasses Always use face or dust mask if operation is dusty 6 Use Right Appliance Do not use appliance for any job except that for which it is intende...

Page 9: ...eparable battery shall contain the following or equivalent instructions a Use only the following type and size battery ies Worx 24V Ni Cd battery WA3182 b Do not dispose of the battery ies in a fire T...

Page 10: ...two locations OPERATION INSTRUCTIONS NOTE Before using the tool read the instruction book carefully 1 CHARGING YOUR BATTERY PACK Warning The charger and battery pack are specifically designed to work...

Page 11: ...position The ratchet mechanism will make a heavy clicking sound which is normal and not a defect See Fig I Operation Warning Always wear the eye protection Never lean over the trimmer head Rocks or d...

Page 12: ...pool holder to ensure cap is fully located Check that the cap is correctly fitted by trying to remove it without depressing the two latches To replace cut line For your convenience it is recommended y...

Page 13: ...ique 8 Garde de s curit 9 Poign e arri re 10 Roue de coupe bordures 11 Coupeur de cordon de coupe 12 D gagement de poign e 13 Bouton d alimentation du cordon de coupe Voir K 14 Couvercle de la t te de...

Page 14: ...oc piles WA3182 2 Garde de s curit 1 Roue de coupe bordures 2 Chargeur WA3714 1 Nous vous recommandons d acheter tous vos accessoires du m me magasin qui vous a vendu l outil N utilisez que des access...

Page 15: ...ir loign s de l aire de travail 4 Habillez vous convenablement Ne portez pas des v tements l ches ou des bijoux Ils peuvent se prendre dans des pi ces en mouvement L utilisation de gants de caoutchouc...

Page 16: ...ins r es ou invers es peuvent provoquer une fuite ou une explosion s applique aux produits fonctionnant avec plus d une batterie primaire rempla able e Enlevez ou d connectez les piles avant l entreti...

Page 17: ...quise tournez la garde d espacement sous la garde de s curit de fa on ce qu elle clique en place INSTRUCTIONS D OP RATION NOTE Avant d utiliser l outil lisez le livre d instruction avec soin 1 Chargem...

Page 18: ...7 Ajustement de la poign e auxiliaire Tirez le levier de rel chement 12 tournez la poign e auxiliaire la position d sir e et rel chez Voir H 8 Ajustement de la t te de coupe Saisissez la t te de coupe...

Page 19: ...pas cette proc dure plus de 6 fois Alimentation manuelle du cordon de coupe Voir K Pressez et rel chez le bouton d alimentation manuelle du cordon de coupe tout en tirant doucement sur le cordon de c...

Page 20: ...er Les taille borduress lectriques devraient tre r par s seulement par un d p t de service qualifi utilisant seulement des pi ces et accessoires recommand s par le manufacturier Ne jamais utiliser d e...

Page 21: ...uarda espaciadora 7 Mango telesc pico 8 Mango auxiliar 9 Mango trasero 10 Rueda bordeadora 11 Cuchilla del hilo 12 Liberador del mango 13 Bot n de abastecimiento del hilo Ver Fig K 14 Cubierta del cab...

Page 22: ...bs 3 3kg Accesorios Bater a WA3182 2 Mango auxiliar 1 Rueda bordeadora 2 Cargador WA3714 1 Le recomendamos que compre todos los accesorios en la tienda donde adquiri la herramienta Use accesorios de b...

Page 23: ...ya que pueden quedar atrapadas en las piezas m viles Cuando se trabaja al aire libre se recomienda el uso de guantes de goma y calzado resistente Emplee protecci n adecuada para contener el cabello l...

Page 24: ...bater a principal sustituible de forma independiente e Saque o desconecte la bater a antes de reparar limpiar o remover material del artefacto de j ardiner a 2 El manual de instrucciones de cualquier...

Page 25: ...gire la guarda espaciadora por debajo de la guarda de seguridad y eng nchela en los lugares correspondientes INSTRUCCIONES DE FUNCIONAMIENTO NOTA Antes de usar la herramienta lea detenidamente el manu...

Page 26: ...go 12 gire el mango auxiliar a la posici n deseada y suelte V ase Fig H 8 Ajuste del ngulo del cabezal de corte Sujete el cabezal de corte con una mano y el mango telesc pico con la otra Modifique el...

Page 27: ...ud de hilo deseada Remoci n de la tapa Presione y sostenga los dos pestillos 15 V ase Fig L Retire la tapa del soporte de la bobina Mantenga la tapa y el soporte de la bobina libres de deshechos Para...

Page 28: ...por el fabricante Nunca emplee agua o productos qu micos para limpiar su herramienta Use simplemente un pa o seco Guarde siempre su herramienta en un lugar seco y fuera del alcance de los ni os Manten...

Page 29: ...29...

Page 30: ......

Page 31: ......

Page 32: ...Designed in Italy Made in China Con u en Italie Fabriqu en Chine Dise ado en Italia Fabricado en China Copyright 2010 Positec All Rights Reserved...

Reviews: