background image

13

12

Cordless li-ion hedge trimmer   

EN

13

12

to be pressed for the hedge trimmer to start. 
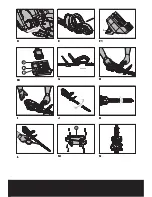
Depress and hold the front switch lever (5) and 
press the rear switch lever (6) (See h).

to Stop your hedge trimmer

Move hedge trimmer away from cutting area 
before stopping.
To stop, release one of the switch levers (See 
I).

warning: if any parts are missing, 

damaged or broken, do not operate 

your hedge trimmer until all damaged 

parts have been replaced or repaired. 

Failure to do so could result in serious 

personal injury. do not uSe without 

handle and guard

9. how to uSe your hedge trimmer

Note that the switch lever can be activated 
on three sides, giving you many choices for 
a comfortable grip. Before cutting an area, 
inspect it first and remove any foreign objects 
that could become thrown or entangled in 
the blades.  Always hold the trimmer with 
both hands and with the blade away from you 
before turning it on. 
When trimming new growth, use a wide 
sweeping action so that the stems are fed 
directly into the blade. (See J & K)
Allow the cutting blades to reach full speed 
before cutting.  When operating, keep the 
cutting blades away from people and objects 
such as walls, large stones, trees, vehicles, etc.
If the blade stalls, immediately stop the 
trimmer. Release the two switch levels (5 & 6) 
before attempting to clear jammed debris from 
the cutting blades. 
Wear gloves when trimming thorny or prickly 
growth.
Do not attempt to cut stems that are too thick 
for the cutting blade.

top cutting

Use a wide sweeping motion (See J). A slight 
downward tilt of the cutting blades in the 
direction of motion gives the best cutting 
results.

Side cutting

When trimming the sides of the hedge, 
begin at the bottom and cut upwards (See 
K), tapering the hedge inward at the top. This 
shape will expose more of the hedge, resulting 

in a more uniformed growth.

10. cleaning

ReMoVe The BATTeRY PACK. Use a soft brush 
to remove debris from all air intakes and 
cutting blade.
Wipe the surface with a dry cloth.

warning:

 Never use water for 

cleaning your trimmer. Do not clean with 

chemicals, including petrol, or solvents as this 
may damage your trimmer.

luBricating the cutting Blade

For easier operation and longer life, lubricate 
the cutting blades before and after each use. 
Before lubricating, make sure the battery is 
removed from the trimmer. Apply oil between 
the two blades periodically (See L). 

at the end oF the cutting SeaSon

Clean your trimmer thoroughly.
Check that all nuts and bolts are secure.
Visually inspect the trimmer for any worn or 
damaged parts.

11. Storing your hedge trimmer 

1) aSSemBly the wall mount 

Bracket (See Fig m)

Attach the wall-mount bracket to the wall with 
the screws provided.
Tighten all the screws securely. Carefully check 
the bracket after mounting to make sure that 
no movement can occur during use.

warning:

 Always make sure your 

wall-mount bracket is securely mounted 

to the wall. Failure to do so could result in an 
accident, resulting in possible serious personal 
injury.

2) Storing your hedge trimmer

Insert the hedge trimmer into blade sheath, 
and then store the hedge trimmer into the wall 
mount bracket as illustrated (See Fig N)
Store in a dry place where your trimmer can 
be protected from damage.

Summary of Contents for WG251.5

Page 1: ...p06 p14 p23 WG251 5 helpline numBer 1 866 354 worX 9679 helpline numBer cordless li ion hedge trimmer en taille haie li ion sans fil F cortasetos inal mbrico con bater a de iones de litio eS...

Page 2: ......

Page 3: ......

Page 4: ...9 8 4 3 2 1 7 5 6 B A C...

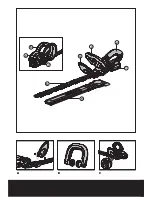
Page 5: ...a 12 10 11 13 F1 F2 B E G A D C H I J K L M N...

Page 6: ...handle 4 Safety guard 5 Front switch lever all around switch function 6 Rear Switch lever 7 Battery pack release latch 8 Blade 9 Blade sheath 10 Charger see F2 11 Charging indicator light red see F2...

Page 7: ...hat sold you the tool Use good quality accessories marked with a well known brand name Choose the type according to the work you intend to undertake Refer to the accessory packaging for further detail...

Page 8: ...f operation is dusty 6 Ground fault circuit interrupter gfci protection should be provided on the circuit s or outlet s to be used for the hedge trimmer Receptacles are available having built in gfci...

Page 9: ...per polarity or direction must be observed Reverse insertion of batteries can result in leakage or explosion Applies to product employing more than one separately replaceable primary battery 5 Remove...

Page 10: ...perate the hedger trimmer without proper guards plates or other safety protective devices in place 5 Do not wash with a hose avoid getting water in motor and electrical connections 1 4Maintenance 1 Ch...

Page 11: ...o cool down before recharging 5 INSTALL THE CHARGER STANDS See Fig F1 Slide the two charger stands a into the both grooves on back of the charger The charger can stand as shown in Fig F1 6 HOW TO CHAR...

Page 12: ...ion See J A slight downward tilt of the cutting blades in the direction of motion gives the best cutting results SIDE CUTTING When trimming the sides of the hedge begin at the bottom and cut upwards S...

Page 13: ...o fair wear and tear Only genuine WORX accessories and parts have been used on or with the product The product has not been used for trade professional or commercial purposes The product has not susta...

Page 14: ...onnement avant Fonction de commutateur sur 360 6 Levier d actionnement 7 Cran de d gagement du bloc piles 8 Lame 9 Gaine de lame 10 Chargeur voir Figure F2 11 T moin d indication de recharge rouge voi...

Page 15: ...t que celui d o provient votre outil Utilisez des accessoires de nom r put et de bonne qualit Pour plus d information r f rez vous l emballage de l accessoire Le personnel du magasin peut aussi vous a...

Page 16: ...loign s Tous les visiteurs devraient se tenir loign s de l aire de travail 4 Habillez vous convenablement Ne portez pas des v tements l ches ou des bijoux Ils peuvent se prendre dans des pi ces en mou...

Page 17: ...les Instructions de s curit importantes 2 Le taille haie ne doit pas tre utilis pour couper les tiges faisant plus de 9 16 pouces d paisseur 3 Lorsque vous utilisez le taille haie gardez le cordon de...

Page 18: ...ts ainsi que les animaux distance de votre lieu de travail 4 N utilisez pas l outil pour effectuer une t che autre que celles pour lesquelles il a t con u 1 2Pr paration 1 Utilisez l outil uniquement...

Page 19: ...alors ne tentez pas d utiliser d autres dispositifs Ne jamais ins rer ou permettre que des objets m talliques soient introduits dans les bornes de connections de votre chargeur ou bloc pile parce qu...

Page 20: ...batterie de l outil Une fois recharg e replacez la batterie dans son emplacement Une simple pression d insertion sera suffisante 8 MARCHE ET ARR T AVANT DE FAIRE D MARRER VOTRE TAILLE HAIES Retirez l...

Page 21: ...sation Assurez vous de retirer le bloc piles du taille haies avant de faire la lubrification de la lame Injectez p riodiquement de l huile entre les deux lames voir Figure L LA FIN DE LA SAISON DE COU...

Page 22: ...r des objets trangers des substances ou accidents La garantie WORX ne couvre pas Les composants qui sont soumis l usure naturelle caus e par l utilisation conform ment aux instructions de fonctionneme...

Page 23: ...seguridad 5 Palanca del interruptor delantero Funci n de interruptor vers til 6 Palanca del interruptor 7 Pestillo para la remoci n del bloque de bater as 8 Cuchilla 9 Funda de la cuchilla 10 Cargador...

Page 24: ...sus accesorios en el mismo comercio donde compr la herramienta Utilice accesorios de buena calidad y de marca reconocida Consulte el embalaje de los accesorios para m s detalles El personal del comer...

Page 25: ...eden quedar atrapadas en las piezas m viles Cuando se trabaja al aire libre se recomienda el uso de guantes de goma y calzado resistente Emplee protecci n adecuada para contener el cabello largo 5 Uti...

Page 26: ...s el seto que est cortando Etiquetas de seguridad ADVERTENCIA CON EL FIN DE ELEVAR EL NIVEL DE PROTECCI N FRENTE A POSIBLES LESIONES RESPETE LAS SIGUIENTES SUGERENCIAS LEA EL MANUAL DE USUARIO ANTES D...

Page 27: ...cotas 4 No utilice la herramienta para trabajos para los que no fue dise ada 1 2Preparaci n 1 Utilice la herramienta s lo a la luz del d a o con una luz artificial adecuada 2 Nunca utilice la herramie...

Page 28: ...tivo Nunca inserte objetos met licos en las conexiones del cargador o del pack de bater a pues incurrir a en peligro de aver a el ctrica Su bater a est DESCARGADA y debe cargarla antes de usarla El ca...

Page 29: ...r a en el puerto para la bater a de la herramienta Basta con deslizarla y ejercer una leve presi n 8 ENCENDIDO Y APAGADO ANTES DE ENCENDER SU CORTASETOS Retire la funda 9 de la cuchilla PONER EN MARCH...

Page 30: ...su cortadora Aplique aceite entre las dos cuchillas en forma peri dica V ase L AL T RMINO DE LA TEMPORADA DE PODA Limpie a fondo su cortasetos Compruebe que todas las tuercas y pernos permanezcan aseg...

Page 31: ...a os provocados por objetos extra os sustancias de cualquier tipo o accidentes Su garant a de WORX no cubre Aquellos componentes sometidos al desgaste y deterioro naturales derivados de su funcionamie...

Page 32: ...Designed in Italy Made in China Con u en Italie Fabriqu en Chine Dise ado en Italia Fabricado en China Copyright 2009 Positec All Rights Reserved...

Reviews: