background image

12

Cordless Hedge Trimmer

EN

OPERATING INSTRUCTIONS

NOTE: 

Before using the tool, read the 

instruction book carefully.

Intended Use

The machine is intended for cutting and 
trimming hedges and bushes in domestic use.

Warning! Do not use the product 

without attaching the guard and 

front handle.

ASSEMBLY & OPERATION

ACTION

FIGURE

BEFORE USING YOUR 
CORDLESS HEDGETRIMMER

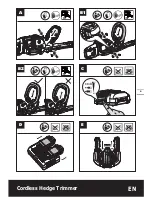
Assembling the safety guard

See Fig. A

Assembling the front handle

NOTE :

 The handle is designed to 

prevent being assembled in wrong 
direction . If you find it cannot be 
installed, please turn it around.

See Fig. 
B1, B2

Checking the battery charge 
condition

NOTE :

 Fig. C only applies for 

the battery pack with battery 
indicator light.

See Fig. C

Charging the battery pack

NOTE :


•    The batteries are shipped 

uncharged. Each battery must be 
fully charged before the first use.

•    Always fully charge the 

two batteries at same time. 
More details can be found in 
charger’s manual.

See Fig. D

Installing and Removing the 
battery pack

NOTE :

•    

This machine will only 
run when 2 batteries are 
installed. It is recommended 
to use the same two batteries 
and charge the two batteries 
at the same time.

•    Using two different sized 

batteries or if one battery 
isn’t fully charged then 
the machine will only run 
to the lowest common 
denominator.

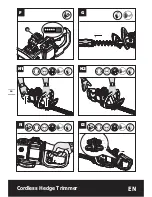
See Fig. E

OPERATION 

Power indicator light
See details in BATTERY STATUS part

IMPORTANT:
When only one light is 
illuminated, your battery 
is overly discharged, even 
though the trimmer may still 
be capable of hedge trimming. 
Continuing to operate your 
trimmer with the battery in 
this discharged condition 
may reduce the life and 
performance of your battery.
When no light is illuminated, 
at least one battery is not 
fully installed or battery may 
be defective, please double 
check the batteries are fully 
seated into position.

See Fig. F

Remove the blade sheath

See Fig. G

Starting and stopping

See Fig. 
H1, H2

Rotating rear handle

NOTE :


•    Unlock the locking switch 

before rotating.

•    After rotating the handle to the 

desired position, adjust it a little 
until a click can be heard. 

WARNING: 

•   Always make sure that 

the handle is locked in the 
desired position before 
operation.

•   Always make sure the locking 

switch is locked before 
starting the hedge trimmer.

•   Do not rotate the handle 

when the trimmer is being 
operated.

See Fig. 
I1, I2

Top cutting

WARNING:

 If any parts are 

missing, damaged or bro-

ken, do not operate your hedge 
trimmer until all damaged parts 
have been replaced or repaired. 
Failure to do so could result in 
serious personal injury. DO NOT 
USE WITHOUT FRONT HANDLE 
AND SAFETY GUARD.

See Fig. J

Summary of Contents for WG284

Page 1: ...WG284 WG284 9 P02 P14 P24 Cordless Hedge Trimmer Taille Haie Li Ion Sans Fil Cortasetos Inal mbrico EN F ES...

Page 2: ...Do not operate power tools in explosive atmospheres such as in the presence of ammable liquids gases or dust Power tools create sparks which may ignite the dust or fumes c Keep children and bystanders...

Page 3: ...power tool before making any adjustments changing accessories or storing power tools Such preventive safety measures reduce the risk of starting the power tool accidentally d Store idle power tools ou...

Page 4: ...the hedge trimmer Using one hand could cause loss of control and result in serious personal injury 6 Only use with handle and guard properly assembled to hedge trimmer The use of the hedge trimmer wi...

Page 5: ...hen not in use 16 Prevent unintentional starting Ensure the switch is in the off position before connecting to battery pack picking up or carrying the appliance Carrying the appliance with your nger o...

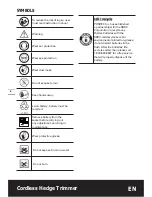
Page 6: ...et before carrying out any adjustment servicing or maintenance Wear protective gloves Do not expose to rain or water Do not burn POSITEC Inc has established a partnership with the RBRC Corporation to...

Page 7: ...7 Cordless Hedge Trimmer EN 7 6 5 4 3 2 1 10 9 8...

Page 8: ...acity 2 0Ah WA3575 Battery type Lithium Ion Charger model WA3878 Charger rating Input 120V 60Hz Output1 20V 2 0A Output2 20V 2 0A Charging time approx Battery pack 2 0 Ah 1pc 2 0 Ah 2pcs 1 hr 1 hr Mac...

Page 9: ...9 Cordless Hedge Trimmer EN 100 0 2 2 2 2 1 1 1 1 B1 B2 D E A C...

Page 10: ...10 Cordless Hedge Trimmer EN 0 45 90 135 180 11 F H2 I2 G H1 I1...

Page 11: ...11 Cordless Hedge Trimmer EN J K1 K2 M L...

Page 12: ...tery isn t fully charged then the machine will only run to the lowest common denominator See Fig E OPERATION Power indicator light See details in BATTERY STATUS part IMPORTANT When only one light is i...

Page 13: ...This shape will expose more of the hedge resulting in a more uniformed growth BATTERY STATUS See Fig F Before starting or after use press the button beside the power indicator light on the machine to...

Page 14: ...es instructions pour pouvoir s y reporter ult rieurement Le terme outil dans les avertissements fait r f rence votre outil lectrique aliment par le secteur avec cordon d alimentation ou votre outil fo...

Page 15: ...ne position et un quilibre adapt s tout moment Cela permet un meilleur contr le de l outil dans des situations inattendues f S habiller de mani re adapt e Ne pas porter de v tements amples ou de bijou...

Page 16: ...causer des irritations ou des br lures 6 Maintenance et entretien a Faire entretenir l outil par un r parateur quali utilisant uniquement des pi ces de rechange identiques Cela assurera le maintien d...

Page 17: ...TTERIE DOIT TRE RECYCL E 9 Les bornes de contact d une pile cellulaire ou d une batterie ne doivent pas tre mises en court circuit Ne placez pas en vrac les piles ou les batteries dans une bo te ou un...

Page 18: ...tissement Portez une protection auditive Portez un protecteur oculaire Portez un masque antipoussi res Ne pas exposez pas la pluie et l eau Gardez les mains et les pieds hors de l aire de coupe Batter...

Page 19: ...19 F Taille Haie Li Ion Sans Fil 7 6 5 4 3 2 1 10 9 8...

Page 20: ...a batterie 2 0Ah WA3575 Type de batterie Lithium Ion Mod le de chargeur WA3878 Valeurs nominales du chargeur Entr e 120V 60Hz Sortie 1 20V 2 0A Sortie 2 20V 2 0A Temps de recharge environ Bloc pile 2...

Page 21: ...ux batteries en m me temps Des informations suppl mentaires sont disponibles dans le manuel du chargeur Voir Sch ma D Installation et d sinstallation de la batterie REMARQUE Cette machine ne fonctionn...

Page 22: ...t objet tranger qui pourrait se prendre dans la lame ou tre projet Pour la mise en marche du taille haies tenez le toujours des deux mains en gardant sa lame loign e de vous Pour la taille de nouvelle...

Page 23: ...charg e Veuillez vous r f rer la section Niveau de charge de la batterie veuillez recharger les deux batteries imm diatement avant la r utilisation ou le stockage Un seul voyant clignote trois fois pa...

Page 24: ...a futuras consultas El t rmino herramienta el ctrica en todas las advertencias siguientes corresponde a la herramienta el ctrica con o sin cable 1 Zona de trabajo a Mantener su lugar de trabajo limpio...

Page 25: ...ilibrio en todo momento Esto permite un mejor control de la herramienta en situaciones inesperadas f Vestirse apropiadamente No usar ropa suelta ni alhajas Mantener su cabello ropa y guantes alejados...

Page 26: ...contacto con los ojos consultar a un m dico El l quido presente en las bater as puede causar irritaciones o quemaduras 6 Reparaci n a Permitir que el mantenimiento de su herramienta el ctrica sea efec...

Page 27: ...a seg n corresponda 8 LA BATER A DEBE RECICLARSE 9 Evite cortocircuitos de celda o bater a No guarde las celdas o bater as en forma peligrosa en una caja o caj n donde puedan hacer cortocircuito entr...

Page 28: ...pies lejos del rea de corte Bater a de iones de litio Recolecci n por separado La bater a deber reciclarse Extraiga el enchufe de la toma el ctrica antes de llevar a cabo cualquier reparaci n o ajuste...

Page 29: ...29 ES Cortasetos Inal mbrico 7 6 5 4 3 2 1 10 9 8...

Page 30: ...575 Tipo de bater a Litio Modelo del cargador WA3878 Clasi caci n de voltaje del cargador Entrada 120V 60Hz Salida 1 20V 2 0A Salida 2 20V 2 0A Tiempo Normal de Carga aprox Paquete de Bater a 2 0Ah 1...

Page 31: ...ntrar m s detalles en el manual del cargador Vea la Fig D Instalaci n y desinstalaci n de paquete de bater a NOTA Esta m quina s lo funcionar cuando se instalen las 2 bater as Por favor siempre use do...

Page 32: ...ortasetos con ambas manos y con la cuchilla alejada de Ud Cuando corte c sped nuevo h galo mediante un movimiento de barrido amplio de modo que los tallos entren directamente en la cuchilla Deje que l...

Page 33: ...dos bater as a la vez antes de Volver a usar o guardar S lo una luz parpadea tres veces por ciclo Por lo menos una bater a est caliente espere que se enfr e antes de Volver a comenzar S lo una luz pa...

Page 34: ......

Page 35: ......

Page 36: ...www worx com Copyright 2018 Positec All Rights Reserved Copyright 2018 Positec Tous droits r serv s Derechos reservados 2018 Positec Todos los derechos reservados AR01344400...

Reviews: