Hover Mower
WG701E
ASSEMBLY
IMPORTANT!
Before you assemble the
hover mower, check the accessories ac-
cording above information, make sure the ac-
cessories are completed.
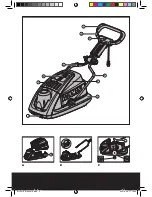
FITTING THE LOWER HANDLE.
Note: The cable can move through the
cover(21), adjust it to help you fit the
lower handle easily.
1. Remove the grassbox (8) from the deck (See A).
This can help you to assemble the lower handle
(5) on deck (9) easily.
2. Insert the lower handle into the handle slot of
the deck (See B).
Note: Make sure that the screws on the
centre cover -item 21 are facing down ,to-
wards the deck.
Ensure the lower handle hole is aligned with the
deck hole, insert the pivot pin (10), Check that the
pivot pin is firmly secure (See C).
Put the grassbox (8) on deck (9). Make sure there
is no abnormal gap between them.
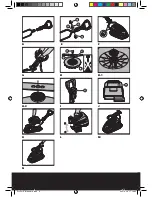
FITTING THE UPPER HANDLE (See D&E)
Lift the Upper handle into position as shown D.
Align the holes in the upper and lower handles
and secure with part (11),(12),(13) , tighten upper
handle knob (11) clockwise (See E). Check that the
upper and lower handles are firmly secure. En-
sure the cables do not become stuck when fold-
ing/unfolding Lower Handle.
FIT THE CABLE CLIPS
Fit the cable clips (4) as shown F. Ensure that
the cable clips (4) are used to fix the cable to the
Lower handle (5). Attach the cable clips and make
sure there is enough cable slack.
OPERATION
STARTING AND STOPPING (See G)
STARTING
Connect the female extension cable connector
to the pigtail (See G). Connect the plug to the
mains a switch ON.
THE SWITCHBOX IS PROVIDED WITH A
SAFETY BUTTON TO PREVENT ACCIDEN-
TAL STARTING.
With one hand press and hold the safety but-
ton (3), with the other hand squeeze the switch
lever (1) towards the handle, and release the
safety button. The machine is now started, wait
until the product is at full speed before cutting
the grass.
Then use both your hands to hold the switch
lever to keep it running.
STOPPING
Release the switch lever (1)
ADJUSTING THE CUTTING HEIGHT (See
H)
Warning : Before adjusting the mow-
er height, wait for the mower to
completely stop. Mower blades continue
to rotate after the machine is switched off
and a rotating blade can cause injury. Wait
until all machine components have com-
pletely stopped before touching them.
1. Turn the mower on its side.
2. Put on a pair of sturdy gloves to protect your
hands.
3. Hold the fan(18) firmly and use the span-
ner(14) to unscrew the blade bolt15) in an anti-
clockwise direction (view from underneath).
4. Remove the blade bolt(15), blade (16), and
blade spacers (17).
5. Use below chart to see how to adjust the
blade spacers to get the desired cutting height
of the grass.
No. of blade spacers
between fan and blade
Cutting height
(approx.)
0
33mm
1
26mm
2
19mm
3
12mm
6. Place the spacers onto the fan ensuring the
pegs have located into the holes (See H.1)
Place the blade onto the spacers ensuring the
pegs have located into the holes on the blade
(See H.2)
Place the blade bolt through the centre hole of
WG701E-M-060818.indd 9
2007-3-28 17:20:02
Summary of Contents for WG701E
Page 1: ...WG701E WG701E M 060818 indd 1 2007 3 28 17 19 20...
Page 2: ...WG701E M 060818 indd 2 2007 3 28 17 19 20...
Page 3: ...A B C WG701E M 060818 indd 3 2007 3 28 17 19 28...
Page 4: ...D E F G H H 1 H 2 I J K L M N WG701E M 060818 indd 4 2007 3 28 17 19 45...
Page 13: ...WG701E M 060818 indd 13 2007 3 28 17 20 03...
Page 14: ...WG701E M 060818 indd 14 2007 3 28 17 20 03...

