15
Cordless Lawn Mower
EN
2. Place the mower in stand up storage mode.
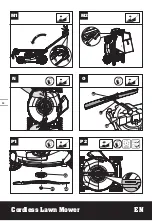
BLADE BALANCING (See Fig. O)
Check balance of blade by placing center hole in blade O-1
over a nail or screwdriver shank O-2, clamped horizontally
in a vise O-3. If either end of the blade rotates downward,
file that end. Blade is properly balanced when neither end
drops.
BLADE MAINTENANCE (See Fig. P1, P2)
Replace your Mower Blade after 50 hours mowing or 2
years, which ever is the sooner-regardless of condition.
Follow these procedures to remove and replace the
Blade. You will need garden gloves (not provided) and a
spanner wrench (not provided) to remove the Blade. Make
sure batteries are not installed. Wedge a block of wood
between the blade and the mower deck to prevent the
blade from turningand unscrew the Blade Bolt counter-
clockwise using a spanner wrench, and then remove the
Blade.
To re-assemble, position the Blade with the cutting edges
towards the ground. Then securely tighten the Blade Bolt.
STORAGE (SEE FIG. M1, M2)
Stop the mower and remove batteries. Clean the exterior of
the machine thoroughly using a soft brush and cloth. Do not
use water, solvents or polishes. Remove all grass and debris,
especially from the ventilation slots.
Turn the machine on its side and clean the blade area. If grass
cuttings are compacted in the blade area, remove with a
wooden or plastic implement.
Store the machine in a dry place. Do not place other objects on
top of the machine.
To aid storage, release the Handle knobs, and rotate or fold the
Upper Handle.
FOR BATTERY TOOLS
The ambient temperature range for the use and storage of tool
and battery is 0
o
C-45
o
C (32
o
F-113
o
F).
The recommended ambient temperature range for the
charging system during charging is 0
o
C-40
o
C (32
o
F-104
o
F).
TROUBLE SHOOTING
Problem
Solution
1. Mower doesn’t run
when Operating Bail
is activated.
A. Release Operating Bail to turn
mower off. Remove batteries.
Turn mower over and check that
blade is free to turn. If not free,
return to an authorized servicer.
Blade should turn freely.
B. Has battery been fully
charged? Plug in charger and
wait for green light to come on.
2. Motor stops while
mowing.
A. Release Operating Bail to turn
mower off. Remove batteries.
Turn mower over and check that
blade is free to turn. If not free,
return to an authorized servicer.
Blade should turn freely.
B. Raise cutting height of wheels
to highest position and start
mower.
C. Has battery been fully
charged? Plug in charger and
wait for green light to come on.
D. Avoid overloading the mower.
Slow down the cutting pace by
pushing mower slower or raise the
cut height. Or both.
3. Mower runs
but cutting
performance is
unsatisfactory, or
does not cut entire
lawn.
A. Has battery been fully
charged? Plug in charger and
wait for green light to come on.”
B. Release Operating Bail to turn
mower off. Remove batteries.
Turn mower over and check:
Blade for sharpness - Keep
blade sharp. Deck and discharge
chute for clogging.
C. Wheel height adjustment
may be set too low for grass
condition. Raise cutting height
4. Mower is too hard
to push.
A. Raise cutting height to reduce
deck drag on grass. Check each
wheel for free rotation.
5. Mower is
abnormally noisy
and vibrates.
A. Release Operating Bail
to turn mower off. Remove
batteries. Turn mower on side
and check blade to ensure it
has not been bent or damaged.
If blade is damaged, replace
with a replacement blade. If
the underside of the deck is
damaged return mower to an
Authorized service center.
B. If there is no visible damage
to the blade and the mower still
vibrates: Release Operating
Bail to turn mower off, Remove
batteries and remove blade.
Rotate blade 180 degrees
and retighten. If mower still
vibrates, return the mower to an
authorized service center.
6. Battery charger
LED’s not on.
A. Check plug connection.
B. Replace charger.
7. Battery charger
LED does not flip to
green.
A. Battery needs to be
diagnosed. Take to authorized
service center.
Summary of Contents for WG753
Page 6: ...6 Cordless Lawn Mower EN 1 2 3 4 5 6 7 8 15 10 11 12 9 13 14 ...
Page 9: ...9 Cordless Lawn Mower EN 2 1 1 SIDE DISCHARGE C3 D1 A1 B A2 C2 C1 D2 ...
Page 10: ...10 Cordless Lawn Mower EN 16 17 1 2 1 2 18 100 0 E1 SIDE DISCHARGE G2 E2 F1 G1 F2 ...
Page 12: ...12 Cordless Lawn Mower EN 2 N 1 N 2 N 3 22 23 21 1 1 P1 P2 M1 M2 O N ...

