background image

11

10

Cordless Li-ion handy saw 


EN

11

10

changing direction on slopes.   

2.  Watch for holes, ruts, bumps, rocks, or 

other hidden objects.  Uneven terrain could 

  cause a slip and fall accident.  Tall grass 
  can hide obstacles.   
3.  Do not mow on wet grass or excessively 

steep slopes. Poor footing could cause 

  a slip and fall accident.   
4.  Do not mow near drop-offs, ditches, or 
  embankments.  You could lose your footing 
  or balance.

iii. ChildrEN


Tragic accidents can occur if the operator is 
not alert to the presence of children.  Children 
are often attracted to the machine and the 
mowing activity.  Never assume that children 
will remain where you last saw them.   
1.   Keep children out of the mowing area and 

under the watchful care of a responsible 
adult other than the operator.   

2.  Be alert and turn mower off if a child enters 
  the area.   
3.  Never allow children to operate the 
  machine.   
4.  Use extra care when approaching blind 

corners, shrubs, trees, or other objects that 
may block your view of a child.

iV. SErViCE


1.   Keep all nuts and bolts tight to be sure the 

equipment is in safe working condition.   

2.  Never tamper with safety devices. Check 

their proper operation regularly.   

3.  Keep machine free of grass, leaves, or 

other 

  debris build-up. 
4.  If you strike a foreign object, stop and 
  inspect the machine. Repair, if necessary, 
  before starting.   
5.  Never make any adjustments or repairs 

with the engine (motor) running.    

6.  Check grass catcher components and the 
  discharge guard frequently and replace 

with manufacturer’s recommended parts, 

  when necessary.   
7.   Mower blades are sharp. Wrap the blade or 
  wear gloves, and use extra caution when 
  servicing them.      
8.  Maintain or replace safety and instruction 

  labels, as necessary.

SaVE thESE iNStrUCtioNS

SaFE oPEratioN PraCtiCES For 

walk-bEhiNd mowErS

1. SaFEty iNStrUCtioNS

1.1 training

a)  Read the operating and service instruction 
  manual carefully. Be thoroughly familiar 
  with the controls and the proper use of 
  the equipment.
b)  Never allow children to operate a power 
  mower.
c)  Keep the area of operation clear of all 
  persons, particularly small children, and 
  pets.
d)  Do not use a mower for any job except that 
  for which it is intended.

1.2 Preparation

a)  Thoroughly inspect the area where the 
  equipment is to be used and remove all 
  stones, sticks, wires, bones, and other 
  foreign objects.
b)  Do not operate the equipment when 

barefoot or wearing sandals. Always wear 

  substantial footwear.
c)  Disengage the self-propelled mechanism 
  or drive clutch on units so equipped before 
  starting the motor.
d)  Never attempt to make a wheel height 

adjustment while the motor is running.

e)  Mow only in daylight or in good artificial 
  light.
f)  Never operate the equipment on wet grass. 

Always be sure of your footing. Keep a firm 
hold on the handle and walk, never run.

1.3 operation

a)  Do not put hands or feet near or under 
  rotating parts. Keep clear of the discharge 
  opening at all times.
b)  Stop the blade(s) when crossing gravel 
  drives, walks, or roads.
c)  After striking a foreign object, stop the 
  motor, unplug, thoroughly inspect the 
  mower for any damage, and repair the 
  damage before restarting and operating 
  the mower.
d)  If the equipment should start to vibrate 

abnormally, stop the motor and check 
immediately for the cause. Vibration is 

Summary of Contents for WG783

Page 1: ...24V Cordless lawn mower EN F ES Pag 07 Pag 18 Pag 31 WG783 hElPliNE NUmbEr 1 866 354 worx 9679 hElPliNE NUmbEr ...

Page 2: ......

Page 3: ......

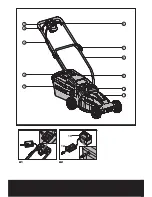
Page 4: ...1 11 10 9 8 7 6 2 3 4 5 10 12 A1 A2 ...

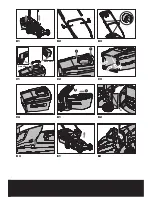
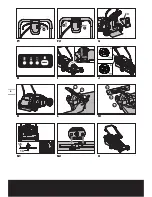
Page 5: ...Front Part Back Part 1 2 3 1 2 a B1 B2 C2 B3 C3 C1 D1 D2 C4 E1 E2 D3 ...

Page 6: ...6 1 1 2 PRESS 13 15 14 1 2 a b L 1 L 2 L 3 M 1 M 2 M 3 F1 F2 I G J H L M K N2 O N1 ...

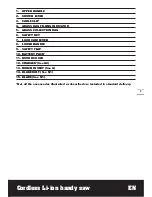
Page 7: ...illing indicator 5 Grass collection bag 6 Safety key 7 Lock cam lever 8 Lower handle 9 Safety flap 10 Battery pack 11 Motor cover 12 Charger see A2 13 Mulch insert see G 14 Blade bolt see N1 15 Blade see N1 Not all the accessories illustrated or described are included in standard delivery ...

Page 8: ...3216 Charging time 5 7hrs Charger model WA3720 Charger rating Input AC 120V 60Hz 45W Output 29 5V 1 0A Machine weight 31lbs 14kg ACCESSORIES Battery pack 1 Charger 1 Grass collection bag 1 Mulch insert 1 Lock cam lever 2 We recommend that you purchase your accessories from the same store that sold you the tool Use good quality accessories marked with a well known brand name Choose the type accordi...

Page 9: ...mower with care keep cutting edges sharp and clean for best and safest performance Follow instructions for lubricating and changing accessories Inspect lawn mower cord periodically and if damaged have it repaired by an authorized service facility Inspect extension cords periodically and replace if damaged Keep handles dry clean and free from oil and grease 12 Keep guards in place and in working or...

Page 10: ...e area is clear of bystanders before operating Stop machine if anyone enters the area 6 Do not operate machine barefooted or while wearing sandals Always wear substantial footwear 7 Do not pull machine backward unless absolutely necessary Always look down and behind before and while moving backward 8 Never direct discharged material toward anyone Avoid discharging material against a wall or obstru...

Page 11: ...ecessary 7 Mower blades are sharp Wrap the blade or wear gloves and use extra caution when servicing them 8 Maintain or replace safety and instruction labels as necessary SAVE THESE INSTRUCTIONS Safe Operation Practices for Walk Behind Mowers 1 Safety Instructions 1 1 Training a Read the operating and service instruction manual carefully Be thoroughly familiar with the controls and the proper use ...

Page 12: ...ginal manufacturer s recommendations or specifications d Replace the blade if it is bent or cracked An unbalanced blade causes vibration that could damage the motor drive unit or cause personal injury e Sharpen a dull blade equally at each end to maintain the balance f Clear the blade thoroughly and check its balance by supporting it horizontally on a thin nail through its centre hole The mail sho...

Page 13: ... approximately 5 7 hours to charge a fully discharged battery 6 After the battery is fully charged the green light will turn on and stay it for 5 seconds to indicate a full charge After 5 seconds the green light and charges will turn off to save power NOTE If the battery is defective the red light will flash The lights will only function when the charger is connected to both the battery and wall r...

Page 14: ...alled 4 REMOVING EMPTYING Hold the grass bag lift the safety flap 9 and hold up Remove grass bag 5 WARNING Always check the safety flap can close the discharge outlet tightly before using Never lift the safety flap 9 when the lawn mower is being used without fitted grass bag 5 FITTING REMOVING BATTERY See E1 E2 Removing battery Pull out the battery with the battery handle directly See E1 NOTE Be c...

Page 15: ...st cut adjust the mower cutting depth to the desired position The lawnmower can be set to 3 cutting heights between 1 8 45mm and 3 3 85mm Grip one wheel and pull it out of the groove and reposition it in the required height ALL other wheels should be positioned at the same height 6 GRASS BAG FILLING INDICATOR See J To remind you immediately to empty when the grass bag is full the mower provides an...

Page 16: ... stick wipe out any accumulation of grass in the blade area Be careful of the sharp edges of the blade Clean often in wet new grass and always after every use 4 Certain types of grass or grass conditions may require that an area be mulched a second time to fully disperse the grass throughout the lawn If cutting a second time it is advisable to cut perpendicular across the first cut pattern DO NOT ...

Page 17: ...TENANCE See N1 N2 Renew your metal blade after 50 hours mowing or 2 years which ever is the sooner regardless of condition Follow these procedures to remove and replace the blade You will need garden gloves not provided and a spanner wrench not provided to remove the blade Hold the blade 15 and unscrew the blade bolt 14 counter clockwise using a spanner wrench and then remove blade To re assemble ...

Page 18: ... de l herbe 5 Sac à herbe 6 Clé de sécurité 7 Levier de blocage 8 Poignée inférieure 9 Bavette de sécurité 10 Blocs 11 Couvercle du moteur 12 Chargeur voir A2 13 Dispositif de paillage voir G 14 Boulon de la lame voir N1 15 Lame voir N1 Les accessoires illustrés ou décrits ne sont pas tous compris dans le cadre de la livraison standard ...

Page 19: ...recharge normal 5 7hrs Modèle de chargeur WA3720 Valeurs nominales du chargeur Entrée AC 120V 60Hz 45W Sortie 29 5V 1 0A Poids de la machine 31lb 14kg Accessoires Blocs piles 1 Chargeur 1 Sac à herbe 1 Dispositif de déchiquetage 1 Levier de blocage 2 Nous vous recommandons d acheter tous vos accessoires du même magasin qui vous a vendu l outil N utilisez que des accessoires de bonne qualité de mar...

Page 20: ... faire un meilleur travail et avec moins de risques de blessure en travaillant au taux de charge pour lequel il a été conçut 8 N essayez pas d utiliser l appareil hors de votre portée normale Gardez votre équilibre et les pieds bien ancrés en tout temps 9 Restez alerte Faites attention à ce que vous faites Utilisez le bon sens N utilisez pas l appareil lorsque vous êtes fatigué 10 Entreposez à l i...

Page 21: ...r électrique et il est corrosif Observez les procédures de sécurité suivantes a Portez des lunettes et des vêtements de protection b Si l électrolyte venait en contact avec la peau lavez immédiatement à l eau claire c Si l électrolyte venait en contact avec les yeux rincez immédiatement et abondamment à l eau claire Consultez un médecin sans tarder INSTRUCTIONS DE SÉCURITÉ POUR LES TONDEUSES POUSS...

Page 22: ...es De mauvaises chaussures peuvent entraîner un accident par glissade et par chute 4 Ne tondez pas à proximité de fossés de rigoles ou de remblais Vous pourriez perdre appui ou perdre l équilibre III ENFANTS Des accidents graves peuvent survenir si l opérateur n est pas alerté de la présence d enfants Les enfants sont souvent attirés par la machine et par l activité de tonte Ne supposez jamais que...

Page 23: ...endommagée puis réparez les dommages le cas échéant avant de redémarrer et d utiliser la tondeuse d Si l appareil commence à vibrer de façon anormale arrêtez le moteur et tentez immédiatement d en déceler la cause Les vibrations indiquent généralement qu un problème existe e Arrêtez le moteur chaque fois que vous quittez l appareil et également avant de réparer ou d inspecter l appareil f Arrêtez ...

Page 24: ...tendez que toutes les pièces de la tondeuse se soient arrêtées avant de les toucher N exposez pas à la pluie et à l eau Ne pas jeter au feu Ne jetez pas les piles au rebut Retournez les au service de recyclage ou de collecte de votre localité Contient une batterie au Pb La batterie doit être recyclée ou disposée de façon adéquate Pente glissante Étiquettes de danger CPSC Sectionnement d orteils ou...

Page 25: ...ge doit s allumer pour indiquer que le chargeur est alimenté et que la charge de la batterie est en cours 5 Le témoin rouge s éteint et le témoin vert s allume lorsque la charge est terminée il faut compter environ 5 7 heures pour charger une batterie vide 6 Une fois la batterie rechargée le témoin vert s allume et reste allumé 5 secondes pour indiquer que la batterie est pleine Une fois le délai ...

Page 26: ...GE DE L HERBE Voir D1 D2 D3 1 Éteignez la tondeuse attendez que la lame s arrête complètement puis retirez la clef de sécurité 2 Soulevez et tenez la bavette de sécurité puis vérifiez que le dispositif de déchiquetage n est pas installé 3 Tenez le bac de ramassage par la poignée puis placez le sur les crochets inférieurs a du châssis Fig D2 4 Relâchez la bavette de sécurité pour bloquer le bac de ...

Page 27: ... Avant d utiliser la première fois votre nouvelle tondeuse nous vous recommandons de charger la batterie toute la nuit afin de bien la charger IMPORTANT Lorsqu un seul voyant est allumé votre batterie est trop déchargée même si la tondeuse peut encore être capable de couper l herbe De continuer à faire fonctionner votre tondeuse avec la batterie dans cette condition déchargée peut réduire la vie e...

Page 28: ...décompose rapidement afin de nourrir la pelouse Prière de relire les recommandations suivantes afin d optimiser le rendement du mode de déchiquetage 1 Éviter de tondre l herbe lorsqu elle est mouillée par la pluie ou la rosée Les brins d herbe mouillés forment des touffes difficiles à déchiqueter et leur coupe réduit la durée de fonctionnement Le meilleur moment pour tondre l herbe consiste en la ...

Page 29: ...de la lame en retirant une quantité égale de matériau aux deux extrémités AFFÛTAGE D UNE LAME DANS UN ÉTAU Voir L 1 S assurer du dégagement du levier de l interrupteur de l immobilité de la lame et du retrait de la clé de sécurité avant d enlever la lame 2 Enlever la lame de la tondeuse Consulter les rubriques relatives au retrait et à l installation de la lame 3 Fixer la lame L 1 dans un étau L 2...

Page 30: ...tes de ventilation Tournez la machine sur le côté et nettoyez l aire de la lame Les coupures de gazon sont compactées dans l aire de la lame enlevez les avec un bout de bois ou de plastic Entreposez la machine dans un endroit sec Ne placez pas d autres objets sur la machine Pour faciliter l entreposage enfoncez les leviers de blocage de la poignée puis tournez ou pliez la poignée supérieure ...

Page 31: ...sa de césped 5 Bolsa para pasto 6 Llave de seguridad 7 Palanca de bloqueo de leva 8 Mango Inferior 9 Tapa de Seguridad 10 Batería 11 Cubierta del Motor 12 Cargador Ver A2 13 Inserto para Mantillo Ver G 14 Perno de la Hoja Ver N1 15 Hoja Ver N1 No todos los accesorios ilustrados o descritos se incluyen junto con el producto estándar ...

Page 32: ...6 Tiempo normal de carga 5 7Hora Modelo del cargador WA3720 Clasificación de voltaje del cargador Entrada AC 120V 60Hz 45W Salida 29 5V 1 0A Peso de la máquina 31libras 14kg ACCESORIOS Baterías 1 Cargador 1 Bolsa para pasto 1 Inserto para mantillo 1 Palanca de bloqueo de leva 2 Le recomendamos que compre todos los accesorios en la tienda donde adquirió la herramienta Use accesorios de buena calida...

Page 33: ... postura y equilibro todo el tiempo 9 Manténgase Alerta Fíjese en lo que está haciendo Use el sentido común No use el artefacto cuando esté cansado 10 Guarde los Artefactos que no Utilice en el Interior Cuando no los use los artefactos deben guardarse en el interior en un lugar seco y alto o bajo llave fuera del alcance de los niños 11 Mantenga los Artefactos con Cuidado Mantenga los bordes de cor...

Page 34: ... y siga todas las instrucciones que aparecen en la máquina y en el los manual es antes de comenzar 2 No coloque las manos o pies cerca o debajo de la máquina Mantenga libre siempre el orificio de descarga 3 Sólo pueden utilizar esta máquina adultos responsables que conozcan las instrucciones 4 Limpie el área de objetos como rocas cables juguetes etc que podrían ser expulsados por la hoja Manténgas...

Page 35: ...ermanecerán en el mismo lugar donde los vio por última vez 1 Mantenga a los niños alejados del área de corte de pasto y bajo el cuidado alerta de un adulto responsable que no sea el operador 2 Esté alerta y apague la cortadora de pasto si un niño ingresa en el área 3 Nunca permita que los niños utilicen la máquina 4 Tenga sumo cuidado cuando se acerca a esquinas ciegas arbustos árboles u otros obj...

Page 36: ...f Apague el motor y espere a que la hoja se detenga por completo antes de extraer el receptor de césped o antes de quitar la obstrucción del tubo de descarga g Corte el césped desde el frente de las laderas nunca de arriba o abajo Tenga sumo cuidado al cambiar la dirección en las laderas No corte el césped en laderas excesivamente empinadas h Nunca utilice la cortacésped sin las guardas placas u o...

Page 37: ...s cortantes PROCEDIMIENTO DE CARGA 1 La carga debe realizarse con la batería INSTALADA Ver A1 o EXTRAÍDA de la máquina Ver A2 2 Inserte el conector del cargador en el receptáculo de la podadora Ver A1 A2 3 Conecte la clavija para cargador a la toma de corriente de pared 4 Presione el botón en el cargador y se deberá encender la luz roja para indicar que posee alimentación y se está cargando la bat...

Page 38: ...ad de corte máxima La batería no necesita mantenimiento PUEDEN CONSEGUIRSE BATERÍAS ADICIONALES por medio de la línea de asistencia al cliente 1 866 354 9679 MONTAJE IMPORTANTE Antes de armar la podadora verifique los accesorios con la lista anterior y asegúrese de que estén completos 1 MONTAJE DEL ASA Ver B1 B2 B3 1 Inserte el mango inferior 9 en los orificios de la plataforma proporcionados 2 As...

Page 39: ...ndo durante algunos segundos después de apagar la máquina Deje que se detengan el motor y las cuchillas antes de volver encenderla No apague la máquina y vuelva encenderla rápidamente Encendido 1 Inserte la llave de seguridad en el compartimento de arranque 2 Deslice la llave hacia la derecha y manténgala en la posición 3 Tire de la barra de la palanca hacia el mango y la cortacésped comenzará a f...

Page 40: ...mostrar el estado de recolección Puede comprobar el estado como se indica a continuación Estado de bolsa vacía aleta flotando a Estado de bolsa llena aleta hacia abajo b 7 DESCARGA POSTERIOR Ver K La cortacésped posee una función de descarga posterior a fin de que pueda cortar el césped sin la bolsa de recolección colocada Se descargarán los residuos desde el tubo de descarga posterior 8 RECOMENDA...

Page 41: ...lla con un objeto similar a una vara Tenga cuidado con los filos de la cuchilla Si utiliza un depósito para pasto durante la temporada de crecimiento rápido el pasto puede tender a tapar el canal de descarga Apague el interruptor y quite la llave de seguridad Quite la bolsa para pasto y haga que éste se vaya hacia el extremo de la bolsa Limpie también el pasto y cualquier otro desecho que se haya ...

Page 42: ...vo o sobre el vástago de un destornillador M 2 sujetado en una prensa M 3 Si cualquiera de los extremos gira hacia abajo afile ese extremo La cuchilla está balanceada correctamente cuando ninguno de los extremos cae MANTENIMIENTO DE LAS CUCHILLAS Ver N1 N2 Cambie la cuchilla metálica después de 50 horas de corte o 2 años lo que ocurra antes independientemente de la condición de las mismas Siga el ...

Page 43: ...43 ...

Page 44: ...Designed in Italy Made in China Conçu en Italie Fabriqué en Chine Diseñado en Italia Fabricado en China Copyright 2010 Positec All Rights Reserved ...

Reviews: