15
14
36V 19
”
Cordless lawn mower
EN
15
14
the mower will start.
4. Release the safety key.
SToPPiNg
Release the switch lever bar (2).
2. BaTTEry STaTUS lEd’S (See j)
NoTE:
Battery Status LED’s are not active in
charging mode. The Status LED’s will indicate
the battery condition when the button on the
battery is pressed.
The LED’s constantly senses and displays the
battery condition as follows:
Press the button “POWERTEST”, the light
button is illuminated.
When the three green lights are illuminated,
the battery is in a highly charged condition.
When two lights ( ) are illuminated, the
battery is in a moderately charged condition.
When only one green light ( ) is illuminated,
the battery charge is depleted.
Before using your new mower for the first
time, it is recommended that the unit be
charged overnight to ensure that the battery is
fully charged.
imPorTaNT
when only one light is illuminated,
your battery is overly discharged, even
though the mower may still be capable
of cutting grass. Continuing to operate
your lawnmower with the battery in this
discharged condition may reduce the life
and performance of your battery.
3. rEmoViNg mUlChiNg iNSErT
(See k1)
To remove the mulching insert (12) so that
you can bag the grass or discharge with the
optional discharge chute, follow the steps
listed below:
1. Shut the mower off, wait until the blade
stops and remove the safety key.
2. Raise the safety guard and hold it up.
3. Grasp the middle of the insert, lift and pull
out the mulching insert completely.
4. The safety guard is spring loaded. When
you release it, the guard will return to the
closed position.
4. iNSTalliNg mUlChiNg iNSErT
(See k2)
1. Turn the mower off, wait until the blade
stops and remove the safety key.
2. Raise the safety guard and hold it up.
3. Slide the mulching insert (12) into the
discharge opening until it is firmly in contact
with the deck.
4. Release safety guard and ensure it is
properly closed.
5. work modE dial (See l)
Status1: QUiET mode
Select
QUiET
mode (17) when mowing in
everyday conditions, removing approximately
1 inch of grass at a time.
Status2: PowEr mode
Set the dial to
PowEr
mode (17) when
cutting dense or overgrown grass.
6. iNSTalliNg SidE-diSChargE ChUTE
(See m1 & m2)
Using the mulching insert and side-discharge
chute (13), the grass can be discharged from
the side of the machine.
To assemble the side-discharge insert, raise
the side-discharge cover (9) and hold it up,
position the side-discharge chute (13) onto the
hooks, then release the cover to lock the side-
discharge insert into position.
7. mowiNg TiPS
NoTE: alwayS iNSPECT arEa whErE
mowEr iS To BE USEd aNd rEmoVE
all SToNES, STiCkS, wirE, mETal
aNd oThEr dEBriS whiCh mighT BE
ThrowN By ThE roTaTiNg BladE.
1. Mow across the face of slopes, never up-
and-down. Exercise extreme caution when
changing direction on slopes. Do not mow
excessively steep slopes. Always maintain
good footing.
2. Release switch lever to turn mower “OFF”
when crossing any graveled area (stones can
be thrown by the blade).
3. Set mower at highest cutting height when
mowing in rough ground or in tall weeds.
Removing too much grass at one time can
cause circuit breaker to trip, which stops
mower.
Summary of Contents for WG788
Page 2: ......
Page 3: ......
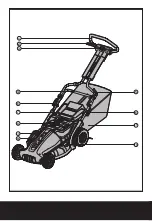
Page 4: ...1 2 3 4 6 7 8 17 9 5 6 11 10...
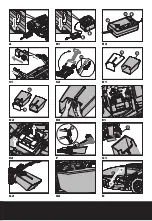
Page 5: ...14 15 16 e b 1 2 a 5 c d 2 1 a b 19 f 18 A B1 B2 C1 C2 D1 D2 D3 E1 E2 F G1 G2 G3 H...

