background image

12AMP 2-in-1 Lawn Edger/Trencher  EN

10

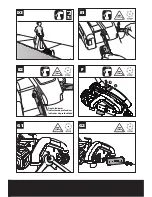
ASSEMBLY & OPERATION

Action

Figure

Assembly

Assembling the Shaft

See Fig. A

Assembling the Auxiliary Handle  See Fig. B

Attaching the Extension Cord

See Fig. C1 
& C2

Operation

Setting to the edging position

See Fig. D1

Edging

See Fig. D2 

&D3

Adjusting cut depth

See Fig. E1 
& E2

Setting to the trenching/

landscaping position 

See Fig. F

Trenching and landscaping 

operation

Removing and attaching the 
blade

See Fig. G1 
& G2

OPERATION INSTRUCTION

NOTE: 

The edger is a major appliance and 

should not be operated simultaneously 
with other major appliances on the same 
household circuit.

WARNING: Make sure that other 

persons and pets are at least 100 

feet away.

EDGING

1.   Before starting the edger, line up the tool 

so the edge guide rests against the edge 
of the paved surface. Both rear wheels 
should be on the paved surface when 
edging. (See Fig. D2)

2.   To avoid kickback of edger, tilt the handle 

down so the blade is above the ground 
(See Fig. D3).

3.  Turn switch ON and allow blade to spin 

without moving tool.

4.   Slowly lift the handle to lower the blade, 

finding the edge of the paved surface 
and start edging. Then move tool forward 
slowly along edge of paved surface, 
keeping the edge guide pressed lightly 
against the pavement edge. For the 
first edging each season, it is best to 
move forward slowly because grass is 
thickest then. Subsequent edging will be 
completed more rapidly. If the tool slows 
down, back it up an inch or two until the 
blade comes up to normal speed. During 
edging some sparks may be generated 
from hitting stones. This is normal. Do not 
attempt to edge when the grass or soil is 
wet or moist—for electrical safety and to 
prevent clogging of the blade chamber. 
If you must edge under conditions that 
cause the blade chamber to become 
clogged, release trigger, wait for blade to 
come to complete stop! UNPLUG TOOL! 
open door and remove clogged material 
with a stick. To continue to operate the 
tool in a clogged condition will seriously 
overload the motor.

CAUTION: Do not attempt to unclog 

the blade chamber by dropping or 

tapping the tool on the ground. This can 

damage the unit. Keep hands clear of 

edge guide and blade when cleaning as 

these wear to a very sharp point during 

edging.

TRENCHING AND LANDSCAPING 

OPERATION

The Edger can also be used for Trenching. The 
blade will leave a small trench for placing
Wire underground.
Because of the direction of the Blade rotation 
the Edger can kickback towards the operator 
if it hits an obstruction such as thick, matted 
grass. Keep a firm grasp on the Handle,
especially when trenching in thick, matted 
material.
The Edger can be used in Landscaping 
applications, including cutting along the edges
of flower and shrubbery beds, around trees, 
and cutting in preparation for sod removal.
Before trenching, inspect and ensure there are 
no exposed or buried cables, pipes  or other 
objects that may create a hazard or interfere 

Summary of Contents for WG896

Page 1: ...12AMP 2 in 1 Lawn Edger Trencher EN Coupe bordure tailleur de tranch es deux en un de 12A F Bordeadora zanjadora de jard n 2 en 1 de 12AMP ES P06 P12 P19 WG896...

Page 2: ......

Page 3: ...1 2 10 13 5 4 3 7 6 8 9 11 12...

Page 4: ...1 2 3 1 2 1 2 1 2 1 2 1 2 D1 D2 D3 E1 A B C1 C2...

Page 5: ...Depth Indicator Indicateur de profondeur Indicador de profundidad 1 2 1 2 1 2 1 2 1 2 E2 F G1 G2 D3 E1...

Page 6: ...Rated Power 12A Rated No load speed 4700 min Protection class II Blade diameter 7 1 2 Blade cutting depth 1 1 1 4 1 1 2 Machine weight 14 lbs ACCESSORIES 7 1 2 Blade WA0034 1 We recommend that you pur...

Page 7: ...gloves and substantial footwear is recommended when working outdoors Wear protective hair covering to contain long hair 5 Use Safety Glasses Always use face or dust mask if operation is dusty 6 Use R...

Page 8: ...ed Keep handles dry clean and free from oil and grease 19 Check Damaged Parts Before further use of the appliance a guard or other part that is damaged should be carefully checked to determine that it...

Page 9: ...he plug If the plug still does not fit contact a qualified electrician to install the proper wall outlet Do not change the equipment plug extension cord receptacle or extension cord plug in any way SA...

Page 10: ...Subsequent edging will be completed more rapidly If the tool slows down back it up an inch or two until the blade comes up to normal speed During edging some sparks may be generated from hitting ston...

Page 11: ...dger and inside of guard before storage See MAINTENANCE section If necessary the edger may be stored by hanging on a hook by its handle CAUTION DO NOT HANG EDGER ON THE SWITCH TRIGGER OR POWER CORD NO...

Page 12: ...60Hz Amp rage nominal 12A Vitesse vide 4700 min Double isolation II Diam tre de la lame 190mm 7 1 2po Profondeur de coupe de la lame 25mm 32mm 38mm 1po 1 1 4po 1 1 2po Poids de la machine 6 3kg 14 lb...

Page 13: ...s les visiteurs devraient se tenir loign s de l aire de travail 4 Habillez vous convenablement Ne portez pas des v tements l ches ou des bijoux Ils peuvent se prendre dans les pi ces en mouvement L ut...

Page 14: ...emment Lorsqu inutilis s les appareils devraient tres entrepos s l int rieur dans un endroit sec lev et gard sous clef hors de la port e des enfants 18 Entretenez les appareils avec soin Gardez les ar...

Page 15: ...sens avec une rallonge lectrique polaris e Si la fiche ne s accouple pas compl tement avec la rallonge lectrique tournez la fiche Si la fiche ne s accouple toujours pas utilisez une rallonge lectrique...

Page 16: ...ppareils sur le m me circuit domestique AVERTISSEMENT Assurez vous qu il n y a aucune personne ou aucun animal domestique moins de 100 pieds ALIGNEMENT 1 Avant de d marrer le taille bordure alignez le...

Page 17: ...peut galement tre utilis pour l excavation de tranch es La lame laisse une petite tranch e pour la mise en place d un c ble souterrain En raison de la direction de rotation de la lame le coupe bordure...

Page 18: ...e l outil dans un liquide IMPORTANT Pour assurer la S CURIT et la FIABILIT du produit les r parations la maintenance et les r glages doivent tre effectu s par un service apr s vente agr ou d autres or...

Page 19: ...encia Nominal 12A Velocidad nominal en vac o 4700 min Doble Aislamiento II Di metro de corte 7 1 2plug 190mm Profundidad de corte de la cuchilla 1plug 1 1 4plug 1 1 2plug 25mm 32mm 38mm Peso de la m q...

Page 20: ...abaje bajo la lluvia 3 Mantenga alejados a los ni os Todos los visitantes deben mantenerse a distancia del rea de trabajo 4 V stase apropiadamente No use ropas sueltas o alhajas ya que pueden quedar a...

Page 21: ...cuentre en uso antes de hacer mantenimiento o al cambiar accesorios tales como hojas de corte o similares desenchufe la herramienta del tomacorriente 17 Guarde las herramientas que no usa en lugares c...

Page 22: ...esgo de descarga el ctrica esta herramienta posee un enchufe polarizado un perno es m s ancho que el otro y requerir el uso de un cable prolongador polarizado El enchufe de la herramienta se inserta e...

Page 23: ...e la Figura B Colocaci n del cable de extensi n Consulte la Figura C1 C2 Funcionamiento Ajuste a la posici n de bord Consulte la Figura D1 Bordeado Consulte la Figura D2 D3 Ajuste de profundidad de co...

Page 24: ...astan a un punto muy afilado con el orillado OPERACI N DE ZANJAS Y JARDINER A La Bordeadora tambi n se puede utilizar para zanjas La cuchilla dejar una peque a zanja para colocar el cableado subterr n...

Page 25: ...en ning n l quido IMPORTANTE Para garantizar la SEGURIDAD y la CONFIABILIDAD del producto las reparaciones el mantenimiento y los ajustes deben ser realizados por centros de servicio autorizados u ot...

Page 26: ......

Page 27: ......

Page 28: ...Copyright 2014 Positec All Rights Reserved 2GLE01DPK11000A0 www worx com...

Reviews: