14
Cordless Lawn Mower
EN
working period.
Helping to minimise your vibration exposure risk.
ALWAYS use sharp chisels, drills and blades.
Maintain this tool in accordance with these instructions
and keep well lubricated (where appropriate).
If the tool is to be used regularly then invest in anti
vibration accessories.
Plan your work schedule to spread any high vibration tool
use across a number of days.
4. INTENDED USE
This product is intended for domestic lawn mowing.
5. OPERATION INSTRUCTION
NOTE: Read instruction handbook before
operation this machine.
ASSEMBLY & OPERATION
ACTION
FIGURE
ASSEMBLY
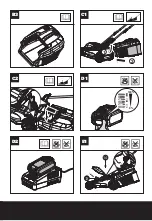
Assembling the handle bar
See Fig.
A1-A4
Assembling the grass collection
bag
See Fig.
B1-B3
Fitting the grass collection bag to
the lawn mower
NOTE:
Depress the grass
collection bag slightly to ensure
that it is completely installed.
See Fig. C1,
C2
Checking the battery charge
condition
NOTE:
Fig. D1 only applies for the
battery pack with battery indicator
light.
See Fig. D1
Charging the battery pack
More details can be found in
charger’s manual.
See Fig. D2
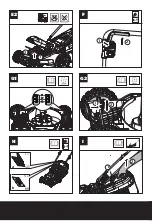
Fitting / removing battery
Insert the safety key before
installing the battery pack.
See Fig. E1, E2
OPERATION
Starting & stopping
See Fig. F
Adjusting the cutting height
Remove the battery pack. Flip the
mower over. Grip one wheel and
pull or push it forward. Make sure
to pull it forward far enough that it
is able to be move up/down in the
wheel bracket. With the wheel in its
most forward position, slide it up
or down into the desired position.
Repeat the above steps to all four
wheels. Make sure all four wheels
are in the same cutting height.
WARNING!
Stop, release
Operating Bail and wait until
the motor stops before adjusting
height. The blades continue
to rotate after the machine is
switched off, a rotating blade can
cause injury. Do not touch rotating
blades.
See Fig. G1,
G2
Grass bag filling indicator
Empty status: flap floats (a)
Fully status: flap falls down (b)
See Fig. H
Removing / emptying grass
collection bag
WARNING!
Always check the
safety flap close the discharge
outlet before using. Never lift the
safety flap when the lawn mower
is being used without fitted grass
collection bag.
See Fig. I
Storage
See Fig. J1, J2
MOWING TIPS
NOTE:
ALWAYS INSPECT AREA WHERE MOWER IS
TO BE USED AND REMOVE ALL STONES, STICKS,
WIRE, METAL AND OTHER DEBRIS WHICH MIGHT
BE THROWN BY THE ROTATING BLADE.
1. Mow across the face of slopes, never up-and-down.
Exercise extreme caution when changing direction
on slopes. Do not mow excessively steep slopes.
Always maintain good footing.
2. Release bail handle to turn mower “OFF” when
crossing any graveled area (stones can be thrown
by the blade).
3. Set mower at highest cutting height when mowing
in rough ground or in tall weeds. Removing too
much grass at one time can cause circuit breaker
to trip, which stops mower.
Summary of Contents for WP733E
Page 3: ...1 3 4 5 6 7 8 10 11 12 9 2...
Page 4: ...A1 A2 A3 A4 1 2 B2 B1 1 2...
Page 5: ...13 14 100 0 E1 D2 D1 C1 C2 1 2 B3...
Page 6: ...I H G2 a b 0 100 1 2 1 2 L F G1 3 2 1 70mm 50mm 30mm 2 1 E2 1 2...
Page 7: ...L 1 L 2 L 3 15 14 K 1 K 2 K 3 L K M1 L J2 O2 M2 L J1 1 2...
Page 129: ...129 GR a b c d a b c...
Page 130: ...130 GR a b c d e f g h i j k l m...
Page 131: ...131 GR n o p q a b c d...
Page 132: ...132 GR e f a b c d e...
Page 133: ...133 GR f g h i j k Worx l m n o p q r...
Page 134: ...134 GR 2 1 2 3 4 5 6 7 8 9 10 11 12 13 E1...
Page 136: ...136 GR 100C 4 O OO o o oo o o o o 5 A1 A4 B1 B3 C1 C2 D1 D1 D2 E1 E2 F G1 G2 H I J1 J2...
Page 137: ...137 GR 1 2 3 4 5 6 7 5 200 m 4 0Ah 1 2 1 3 3 4 5 6...
Page 138: ...138 GR 1 2 3 1 2 K 1 2 3 K 1 K 2 4 5 K 3 6 7 L L 1 L 2 L 3 M1 M2 50 2 16 7 J1 J2 8 9 1 A C...
Page 139: ...139 GR 2 C D 3 C 4 5 180 6 LED 7 LED...
Page 196: ...Copyright 2021 Positec All Rights Reserved www worx com...

