background image

Cordless rotary hammer


WX382 WX382.1 


WX382.2 WX382.3 WX382.4


11

D

C

2

1

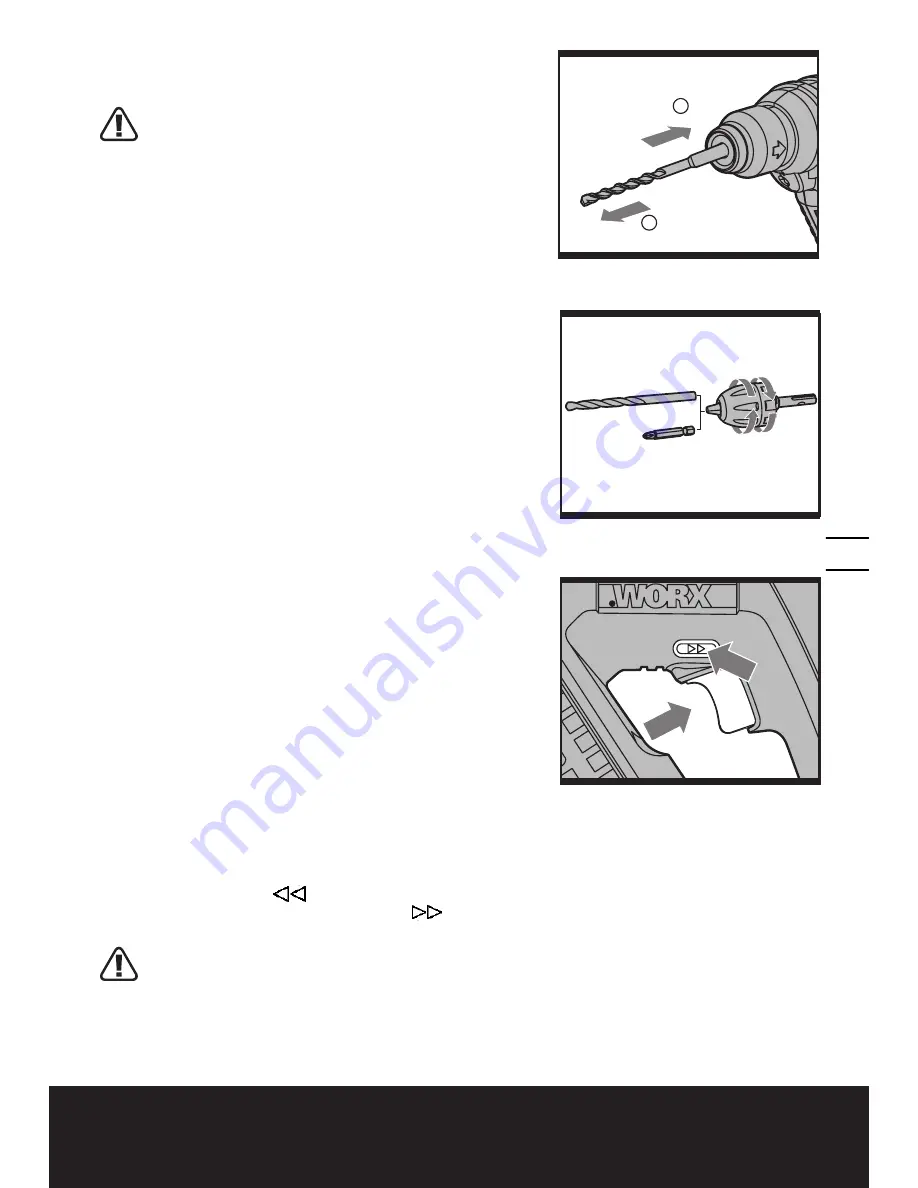
— REMovING (See Fig. B3)

Retract back the bit holder locking sleeve (2) and pull 
out the bit.

WARNING: 

Your new WORX Rotary Hammer 

Drill generates powerful forces to get your job 

done quickly and effectively. These forces may cause 
inferior quality SDS bits to break and jam in the chuck, 
We therefore recommend that only high quality SDS 
bits be used with this tool.

2. INSERtING A tool INto CHUCK (13) (See 

Fig. C)

To open the chuck jaws rotate the front section of the 
chuck while holding the rear section. Insert the drill bit 
between the chuck jaws and rotate the front section in 
the opposite direction while holding the rear section. 
Ensure that the drill bit is in the center of the chuck 
jaws. Finally, firmly rotate the two separate chuck 
sections in opposite directions. Your drill bit is now 
locked in the chuck.

3. oN/oFF SWItCH (See Fig. D)

Depress the On/Off switch (4) to start and release it to 
stop your tool. 

— oN/oFF SWItCH WItH vARIABlE SPEED 

CoNtRol 

Depress the On/Off switch to start and release it to stop 
your tool. This tool has a variable speed switch (4) that 
delivers higher speeds with increased trigger pressure 
- speed is controlled by varying the pressure applied to 
the switch.

4. SWItCH loCK (See Fig. D)

The switch trigger can be locked in the OFF position. 
This helps to reduce the possibility of accidental 
starting when not in use. To lock the switch trigger, 
place the direction of rotation control in the center 
position.

5. FoRWARD AND REvERSE RotAtIoN CoNtRol 

(See Fig. D)

With the hammer pointing away from you, push the 
forward/reverse-lever “

 “ to the left for forward 

rotation. Push the forward/reverse-lever “ 

“ to the 

right for reverse rotation.

WARNING:


Never change the direction of 

rotation while the tool is rotating, wait until 

it has stopped.

B3

Summary of Contents for WX382

Page 1: ...SAFETY AND OPERATING MANUAL Original instructions Cordless rotary hammer WX382 WX382 1 WX382 2 WX382 3 WX382 4 ...

Page 2: ...rating a power tool outdoors use an extension cord suitable for outdoor use Use of a cord suitable for outdoor use reduces the risk of electric shock f If operating a power tool in a damp location is unavoidable use a residual current device RCD protected supply Use of an RCD reduces the risk of electric shock 3 Personal safety a Stay alert watch what you are doing and use common sense when operat...

Page 3: ...ing into account the working conditions and the work to be performed Use of the power tool for operations different from those intended could result in a hazardous situation 5 Battery tool use and care a Recharge only with the charger specified by the manufacturer A charger that is suitable for one type of battery pack may create a risk of fire when used with another battery pack b Use power tools...

Page 4: ... To reduce the risk of injury user must read instruction manual Warning Wear eye protection Wear ear protection Wear dust mask Do not expose to rain or water Do not burn Do not dispose of batteries Return exhausted batteries to your local collection or recycling point Li ...

Page 5: ...Cordless rotary hammer WX382 WX382 1 WX382 2 WX382 3 WX382 4 5 1 2 3 4 5 6 9 10 13 11 12 7 8 ...

Page 6: ...nd Reverse Rotation Control 4 On Off Switch 5 Carabiner Clip hook 6 Battery Pack 7 Battery Pack Release Button 8 Function Mode Selection Switch 9 LED Light 10 Screwdriver bits 11 SDS drill bits 12 HSS drill bit 13 Keyless chuck with SDS adaptor Not all the accessories illustrated or described are included in standard delivery ...

Page 7: ...ighted sound pressure 84dB A A weighted sound power 95dB A KpA KwA 3 0dB A Wear ear protection when sound pressure is over 80dB A VIBRATION INFORMATION Vibration total values triax cover sum determined according to EN 60745 Hammer drilling into concrete Vibration emission value ah HD 8 51m s2 Uncertainty K 1 5m s2 WARNING The vibration emission value during actual use of the power tool can differ ...

Page 8: ...f all parts of the operating cycle such as the times when the tool is switched off and when it is running idle but not actually doing the job This may significantly reduce the exposure level over the total working period Helping to minimise your vibration exposure risk ALWAYS use sharp chisels drills and blades Maintain this tool in accordance with these instructions and keep well lubricated where...

Page 9: ... 50mm Slotted 5 5mm 50mm 9 PH1 PH2 PH3 50mm PZ1 PZ2 PZ3 50mm Slotted 4 5 5 5 6 5mm 50mm 4 PH2 50mm PZ1 50mm PZ2 50mm Slotted 5 5mm 50mm SDS drill bits 2 6mm 8mm 4 2x 6mm 2x8mm 2 6mm 8mm 30pcs drill and drive bit set 1 WA1108 We recommend that you purchase your accessories from the same store that sold you the tool Use good quality accessories marked with a well known brand name Choose the type acc...

Page 10: ...huck no longer rotates In a warm environment or after heavy use the battery pack may become too hot to permit charging Allow time for the battery pack to cool down before recharging When the battery pack is charged for the first time and after prolonged storage The battery pack will accept a 100 charge after several charge and discharge cycles B TO REMOVE OR INSTALL BATTERY PACK See Fig A Depress ...

Page 11: ...ions in opposite directions Your drill bit is now locked in the chuck 3 ON OFF SWITCH See Fig D Depress the On Off switch 4 to start and release it to stop your tool ON OFF SWITCH WITH VARIABLE SPEED CONTROL Depress the On Off switch to start and release it to stop your tool This tool has a variable speed switch 4 that delivers higher speeds with increased trigger pressure speed is controlled by v...

Page 12: ...y great for dark or enclosed area LED is also a battery capacity indicator It will flash when power gets low 8 TEMPERATURE DEPENDENT OVERLOAD PROTECTION When using as intended for the power tool cannot be subject to overload When the load is too high or the allowable battery temperature of 75 C is exceeded the electronic control switches off the power tool until the temperature is in the optimum t...

Page 13: ...ck There are no user serviceable parts in your power tool Never use water or chemical cleaners to clean your power tool Wipe clean with a dry cloth Always store your power tool in a dry place Keep the motor ventilation slots clean Keep all working controls free of dust Occasionally you may see sparks through the ventilation slots This is normal and will not damage your power tool ENVIRONMENTAL PRO...

Page 14: ... machinery representative of Hammer Drill Function Hammering various materials Complies with the following Directives Machinery Directive 2006 42 EC Electromagnetic Compatibility Directive 2004 108 EC RoHS Directive 2011 65 EU Standards conform to EN 55014 1 EN 55014 2 EN 60745 2 6 EN 60745 1 The person authorized to compile the technical file Name Russell Nicholson Address Positec Power Tools Eur...

Page 15: ......

Page 16: ...www worx com Copyright 2013 Positec All Rights Reserved 2CDH04APK11003A2 ...

Reviews: