background image

7

12V Multifunction Jump Starter 

with LED Lights

EN

unit is charged such that the unit’s Status Display 

shows 3 LEDs when the Power Button is depressed.

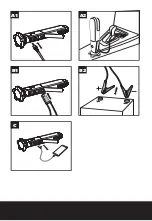
1)  Connect the clamp set to the vehicle ignition port. 

Be sure that the cable connection is fully engaged 

and secure. Upon connection, the clamp will then 

light a flashing blue LED, indicating the unit is in 

standby mode. (See Figure B1)

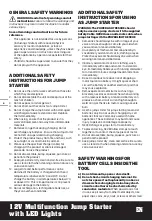
2)  Turn ignition off before making vehicle 

connections.

3)  Clamp the positive (red +) clamp to the positive 

terminal on the vehicle battery, and clamp the 

negative (black –) clamp to the negative terminal. 

Once connected, the clamp will turn on solid 

green. (See Figure B2)

 NOTE:

 If you need to start more than once, pay 

attention to the unit’s Status Display (at least 3 

LEDs on).


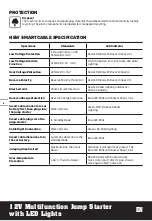
If the unit lights on or beeps, check the 

New 

Smart Cable Specification.


NOTE:

 You have 10 seconds to start the vehicle 

(counting from the moment the clamps are 

connected correctly into the Jump Starter) or the 

unit will return to standby mode.

4)   Start the vehicle (turn on the vehicle ignition). 


NOTE:

 If the vehicle doesn’t start within 6 

seconds, let the jump starter cool for 3 minutes 

before attempting to start the vehicle again or you 

may damage the jump starter. 


NOTE:

 During very cold conditions, the unit 

may not start on the first attempt. We suggest 

attempting to start a second or third time, as the 

starting attempt will warm the internal battery 

and improve your starting chances. Do not 

attempt to start after four attempts – either the 

unit does not have sufficient power to start the 

vehicle or there is a more extensive problem with 

the vehicle than simply a depleted battery.

5)   When the vehicle is started, the smart cable/

clamp will show a solid blue LED and the warning 

buzzer will beep.

6)   Disconnect the clamp from the vehicle.

7)   Disconnect the clamp from the jump starter.

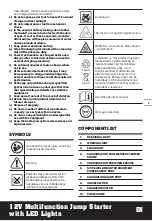
3. CHARGING MOBILE DEVICES (SEE FIGURE C)

1)   Plug the USB charging cable into either the USB 

1 or USB 2 charging port. You can charge up to 2 

devices at a time. 

2)   Connect the charging cable to the mobile device

3)   Press the power button to start charging

4.LIGHTING 

The jump starter features several different work light 

modes through pressing on the power button for 

different times:

1.   First Power Button press turns the unit ON, 

indicating the unit’s state of charge.

2.   Second press turns ON solid working light.

3.   Third press turns ON solid red signal light.

4.   Fourth press turns ON flashing red signal light.

5.   Fifth press turns ON solid flashlight.

6.   Sixth press turns ON flashing flashlight.

7.   Seventh press turns entire unit OFF.

NOTE: 

While in any of the above work light modes, 

you can turn the unit OFF by pressing and holding 

the Power Button for four seconds. The power 

indicator will automatically turns off after 10 

minutes.

TROUBLE SHOOTING

1.   The indicator light does not show when charging 

the device

1)   Check that the charging cable is actually 

connected to the device.

2)   Check if the port is correctly connected.

2.   Flashlight can’t open

1)   Check if the device has enough charge for use.

2)   Check that it is used correctly.

3.   Unresponsive when using the device

1)   Charge the device, when charging, the light 

flashes.

2)   If an emergency start is given to a car device with 

low battery capacity, the start is not valid due 

to the activation of the chip safety protection 

function. It can be reset by charging it to be 

reactivated.

MAINTENANCE AND 

STORAGE 

Remove the plug from the socket before 

carrying out any adjustment, servicing or 

maintenance.

Your tool requires no additional lubrication or 

maintenance. Never use water or chemical cleaners 

to clean your charger. Wipe clean with a dry cloth. 

Always store your charger in a dry  place.

PRECAUTIONS

1)  The applicable temperature for use -17 

o

C -60 

o

C

2)   Avoid direct sunlight or humid conditions.

3)   Avoid the switch being squeezed when placed.

4)   If circuit protection is caused by plugging in 

high-power 12V vehicle equipment (current more 

than 8A), charge the emergency power supply to 

activate it.

ENVIRONMENTAL 

Summary of Contents for WX852

Page 1: ...12VMultifunctionJumpStarterwithLEDLights Многофункциональноепуско зарядноеустройство12Всо светодиоднымииндикаторами EN RU P04 P09 WX852 WX852 X ...

Page 2: ...1 2 8 9 4 5 6 5 7 3 10 13 11 12 ...

Page 3: ...B1 B2 C A2 A1 ...

Page 4: ...rechargeable batteries as they can overheat and break ADDITIONAL SAFETY INSTRUCTIONS FOR USING AS JUMP STARTER WARNING The POWERLIGHT RESCUE should only be used as a jump starter with the supplied Safety Cable NEVER use an alternate cable when jump starting with the POWERLIGHT RESCUE 1 Someone should always be within range of your voice or close enough to come to your aid when you work near a lead...

Page 5: ...he original product literature for future reference n Dispose of properly o Do not mix cells of different manufacture capacity size or type within a device p Do not use any cell which is not designed for use with the equipment q Keep the battery away from microwaves and high pressure SYMBOLS To reduce the risk of injury user must read instruction manual Warning Batteries may enter water cycle if d...

Page 6: ...arge it when it is hot or immediately after each use 5 Do not allow the mental teeth of the red clamp to touch the black clamp 6 Keep the jump starter from children 7 Do not dissemble the jump starter 8 Do not insert foreign objects into any input or output ports 9 Do not put the jump starter in extreme environment where the temperature and humidity is high 10 If you find the jump starter inflates...

Page 7: ...ging cable into either the USB 1 or USB 2 charging port You can charge up to 2 devices at a time 2 Connect the charging cable to the mobile device 3 Press the power button to start charging 4 LIGHTING The jump starter features several different work light modes through pressing on the power button for different times 1 First Power Button press turns the unit ON indicating the unit s state of charg...

Page 8: ...link with Buzzer Shout 0 1s Short circuit Short circuit Protection Red LED Solid Lighting and Buzzer Shout in Rapidly Reverse Charge Protection Reverse Charge Protection Blue LED Blink with Buzzer Shout 0 5s Smart cable connects to car battery first then plugs into the jump starter Work normally Green RED BLUE LED Solid Lighting Smart cable plugs into the jump starter In Standby Mode Blue LED Blin...

Page 9: ...ьзуйте изделие 10 Не разбирайте не ударяйте не сжимайте не прокалывайте и не пробивайте изделие 11 Храните пусковое устройство в сухом чистом месте в отсутствии масла Очищайте только чистой тканью и не используйте агрессивные растворители 12 Зарядка аккумулятора при температуре воздуха от 18 C до 24 C обеспечит более длительный срок службы и улучшенные характеристики Не заряжайте аккумулятор при т...

Page 10: ...го подальшеот металлическихпредметов такихкакзажимы монеты гвозди винтыи прочие металлическиепредметынебольшого размера которыемогут соединить клеммы другсдругом c Недопускаетсяподвергать электроинструментвоздействиювысоких температурилипламени Избегайте храненияэлектроинструментавместах подверженныхвоздействиюпрямого солнечногосвета d Недопускаетсяподвергать электроинструментмеханическимударам e ...

Page 11: ...ы для окружающей среды и здоровья человека поскольку они содержат вредные вещества См руководство оператора Носите защиту органов зрения СПИСОК КОМПОНЕНТОВ 1 КРАСНАЯ СИГНАЛЬНАЯ ЛАМПА 2 РАБОЧАЯ ЛАМПА 3 ФОНАРЬ 4 РАЗЪЕМ ДЛЯ ЗАРЯДКИ АВАРИЙНОГО ИСТОЧНИКА ЭЛЕКТРОПИТАНИЯ 5 РАЗЪЕМ ДЛЯ ЗАРЯДКИ МОБИЛЬНОГО УСТРОЙСТВА 6 РАЗЪЕМ ЭЛЕКТРОПИТАНИЯ ДОПОЛНИТЕЛЬНОГО АВТОМОБИЛЬНОГО ОБОРУДОВАНИЯ 12 В 7 РАЗЪЕМ С ЗАЖИМАМИ...

Page 12: ...Берегите пусковое устройство от детей 7 Не разбирайте пусковое устройство 8 Не вставляйте какие либо посторонние предметы во входные или выходные разъемы 9 Избегайте нахождения пускового устройства в экстремальных условиях с высокой температурой и влажностью 10 При вспучивании пускового устройства прекратите его использовать и отправьте в авторизованный сервисный центр 11 Устройство необходимо хра...

Page 13: ...ятор и повышают вероятность запуска Не пытайтесь запускать после четырех попыток либо мощность устройства недостаточно для запуска автомобиля либо в автомобиле присутствует более серьезная неполадка чем просто севший аккумулятор 5 После запуска автомобиля на интеллектуальном кабеле зажиме будет постоянно гореть голубой светодиод и раздастся предупреждающий звуковой сигнал 6 Отсоедините зажим от ав...

Page 14: ...ыше 8 А сработала защита цепи для активации проведите зарядку аварийного источника электропитания ОХРАНА ОКРУЖАЮЩЕЙ СРЕДЫ Переработка отходов Машина ее аксессуары и упаковочные материалы должны быть отсортированы для экологически чистой переработки Пластиковые компоненты имеют маркировку для вторичной переработки СПЕЦИФИКАЦИЯ НОВОГО ИНТЕЛЛЕКТУАЛЬНОГО КАБЕЛЯ Операции Стандарты Светодиодный индикато...

Page 15: ...я Мигает голубой светодиод Правильное соединение кабеля Нормальная работа Непрерывно горит зеленый светодиод Интеллектуальный кабель отсоединяется от автомобильного аккумулятора Автоматическое обнаружение режима ожидания Мигает голубой светодиод Время запуска ограничено Максимум 60 с затем отключение Через 60 с активируется автоматическая защита Мигает голубой светодиод с зуммером 0 5 с Защита от ...

Page 16: ...ООО ПОЗИТЕК ЕВРАЗИЯ Адрес Российская Федерация 117342 г Москва ул Бутлерова д 17 этаж 3 ком 67 Страна производства КНР Изготовитель Позитек Технолоджи КНР Ко Лтд Адрес Донгванг Роуд 18 Сучжоу Индастриал Парк Цзянсу КНР Срок службы изделия 6 лет Срок гарантии 2 года Дата производства изделия указана на изделии Телефон сервисной службы ООО ПОЗИТЕК ЕВРАЗИЯ 7 495 136 83 96 Электронная почта service ru...

Reviews: