15
Cordless Grass Line Trimmer &
Brushcutter, Attachment-Capable
EN
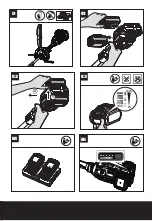
BATTERY STATUS (See Fig. E5)
Before starting or after use, press the button beside the power
indicator light on the machine to check the battery capacity.
During operation, the battery capacity will be indicated
automatically by the battery power indicator.
The indicator constantly senses and displays the battery
condition as follows.
For the machine with 2 battery packs with different power, the
power indicator light displays the battery condition with the
lower one of the two batteries.
Battery power
indicator status
Battery condition
Five green lights
(
) are
illuminated.
The two batteries are in a
highly charged condition.
Two, three or four
green lights are
illuminated.
The two batteries have a
remaining charge. The more
lights are illuminated, the
more battery capacity.
Only one green light
(
) is
illuminated.
At least one battery is
almost depleted and needs
to be charged.
No light is
illuminated.
At least one battery is not
fully installed or battery may
be defective.
Only one light is
flashing twice per
cycle.
At least one battery is
over discharged (please
refer to the battery charge
condition), please recharge
the two batteries at once
before use again or storage.
Only one light is
flashing three times
per cycle.
At least one battery is hot,
wait for them cool down
before start again.
Only one light is
flashing four times
per cycle.
The machine is over load.
Raise the cutting height or
push slowly.
OPERATION INSTRUCTIONS
WARNING!
The charger and battery pack
are specially designed to work together so do
not attempt to use any other devices. Never insert or
allow metallic objects into your charger or battery
pack connections because of an electrical failure and
hazard will occur.
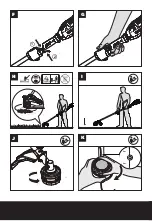
1. Bump-line feed system (See Fig. I)
The trimmer is equipped with a bump-line system.
Just bump the trimmer head while the machine is
running, new line will feed out.
2. Winding the trimmer line (See Fig. K)
Insert the replacement line through the eyelet and feed it
through the other side. Ensure both ends of the line are
even on each end of the trimmer head (recommended
2m) and cut the line. Turn the dial clockwise to wind the
line around the spool until about 19cm remains on either
side.
STORING YOUR GRASS
TRIMMER
Always remove the battery pack from
your trimmer after use.
To store your GRASS trimmer
The trimmer is provided with a hanging slot for
storing the trimmer on the wall. (See Fig. N)
Store in a dry place where the trimmer and battery
can be protected from damage.
MAINTENANCE
Always remove the battery pack from
your trimmer after use.
Always check the product prior to being used
for any damage.
After use, disconnect the battery from the tool and
check for damage.
Your power tool requires no additional lubrication
or maintenance. There are no user serviceable parts
in your power tool. Never use water or chemical
cleaners to clean your power tool. Wipe clean
with a dry cloth. Always store your power tool in
a dry room temperature location. Keep the motor
ventilation slots clean. Keep all working controls
free of dust.
FOR BATTERY TOOLS
The ambient temperature range for the use and
storage of tool and battery is 0°C-45°C (32°F-113°F).
The recommended ambient temperature range for
the charging system during charging is 0°C-40°C
(32°F-104°F).
ENVIRONMENTAL
PROTECTION
Disposal
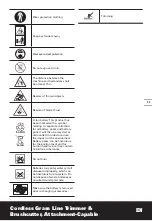
The machine, its accessories and
packaging materials should be sorted for
environmentally friendly recycling.
The plastic components are labeled for categorized
recycling.
Summary of Contents for WG186E.1
Page 1: ...WG186E 1 WG186E 92 P08 P17 Cordless Grass Line Trimmer Brushcutter Attachment Capable EN RU...
Page 2: ......
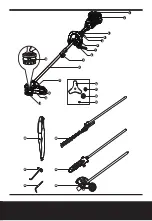
Page 3: ...4 5 3 10 12 13 14 9 6 2 7 16 18 19 17 23 21 20 22 25 24 1 8 11 15...
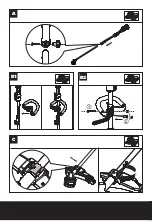
Page 4: ...C A B2 1 2 B1...
Page 5: ...E1 1 E2 2 E4 E5 D 100 0 E3...
Page 6: ...G F 1 2 K 2m 2m I J H...
Page 7: ...L1 L2 L3 M 2 N 1...
Page 17: ...17 RU 1 a b c 2 a b c d e f 3 a b c d e f...
Page 18: ...18 RU g h 4 a b c d e f g h 5 a b c d e f 130 C g...
Page 19: ...19 RU 6 a b 1 2 3 4 5 b c a b b c d e f a b c d...
Page 20: ...20 RU a b c d e f g h i j k l 20 C 5 C m n WorxNITRO o p q r s t u v...
Page 21: ...21 RU 15 Li Ion Li Ion...
Page 25: ...25 RU I J K L1 L2 L3 M 1 WA0220 2 WA0222 3 WA0223 E5 2 2 3 4 1 1 I 2 See Fig K 2 19...
Page 26: ...26 RU N 0 C 45 C 32 F 113 F 0 C 40 C 32 F 104 F...
Page 27: ...27 RU...


