1.5V “AAA” LR03 / UM4
1.5V “AAA” LR03 / UM4
1.5V “AAA” LR03 / UM4
DC IN 5V 0.5A
* The HydraQuad is
operated by 1 x 3.7V
800 mAh Lithium-ion
rechargeable. (included)
DRIVE ON THE GROUND
PRO TIPS:
FOR BEST PERFORMANCE, OPERATE ON SMOOTH
SURFACES TO AVOID OBSTACLES.
THE HYDRAQUAD CAN ONLY DRIVE FORWARD,
NOT BACKWARDS, IN GROUND MODE.
RECOMMENDED FOR INDOOR USE ONLY.
ON SMOOTH SURFACES TO AVOID DAMAGE.
NAVIGATING IN WATER MODE
10 CM
WATER TAKEOFF
STUNT: AQUATIC ROLL
PLACE HYDRAQUAD IN THE WATER. BELOW
10 CM DEPTH HYDRAQUAD WILL LOSE
SIGNAL AND RETURN TO THE SURFACE.
PUSH
LEFT STICK
UP TO GLIDE FORWARD.
TOGGLE THE
RIGHT STICK
TO CHANGE
DIRECTION.
THE HYDRAQUAD CAN ONLY NAVIGATE
FORWARD, NOT BACKWARDS, IN
WATER MODE.
INSTALL CONTROLLER BATTERIES
(3 x AAA BATTERIES NOT INCLUDED)
FLASHING
SLOWLY
WAITING
FOR PAIR
POWER & PAIR
POWER LED
LIGHT WILL
TURN SOLID.
CONTROLLER
WILL BEEP ONCE.
SUCCESSFUL PAIRING
IMPORTANT LED INDICATORS
SELECT MODE ON CONTROLLER
CHARGE BATTERY
LED INDICATORS
75 MINUTES
CHARGE TIME
RED = CHARGING
GREEN = FULLY CHARGED
3) LEFT STICK
1) STUNT
2) TURBO
1) AIR MODE
BATTERY REPLACEMENT
WATER MODE
POWERING UP AND PAIRING CONTROLLER
GROUND MODE
AIR MODE
FAIL SAFE GUIDE:
If the HydraQuad goes out of range of the controller, it will automatically land itself. If the
controller comes back in to range before the HydraQuad lands, push up on the left stick to cancel landing.
PUSH
LEFT STICK
UP OR DOWN TO CHANGE SPEED.
PUSH
RIGHT STICK
LEFT OR RIGHT TO CHANGE DIRECTION.
BOOST
TO HOVER EVEN HIGHER OVER THE SURFACE.
PULL BACK ON THE
LEFT STICK
TO STOP.
TO PURCHASE EXTRA PARTS, PLEASE VISIT: HTTPS://STORE.WOWWEE.COM/
IF YOU HAVE A PROBLEM, PLEASE DO NOT TAKE THIS TOY BACK TO THE STORE.
CONTACT US AT: HTTPS://SUPPORT.WOWWEE.COM
• Use only fresh batteries of the required size and recommended type.
• Do not mix old and new batteries, different types of batteries [standard
(Carbon-Zinc), Alkaline or rechargeable] or rechargeable batteries of
different capacities.
• Remove rechargeable batteries from the toy before recharging them.
• Rechargeable batteries are only to be charged under adult supervision.
• Please respect the correct polarity, (+) and (-).
• Do not try to recharge non-rechargeable batteries.
• Do not dispose of batteries into fire.
IMPORTANT BATTERY INFORMATION
• Replace all batteries of the same type/brand at the same time.
• The supply terminals are not to be short-circuited.
• Remove exhausted batteries from the toy.
• Batteries should be replaced by adults.
• Batteries should be recycled or disposed of as per state and
local guidelines.
• Protect the environment by not disposing of this product with
household waste. Check your local authority for recycling advice
and facilities.
SPECIFICATIONS
Drone Battery:
800 mAh Li-po (included)
Remote Controller Battery:
3 x AAA “LR03 / R03”1.5V
Batteries (not included)
Charging Time:
Approximately 75 Minutes
Water Mode & Air Mode
Run Time:
Approximately 4 Minutes
Ground Mode Run Time:
Approximately 5 Minutes
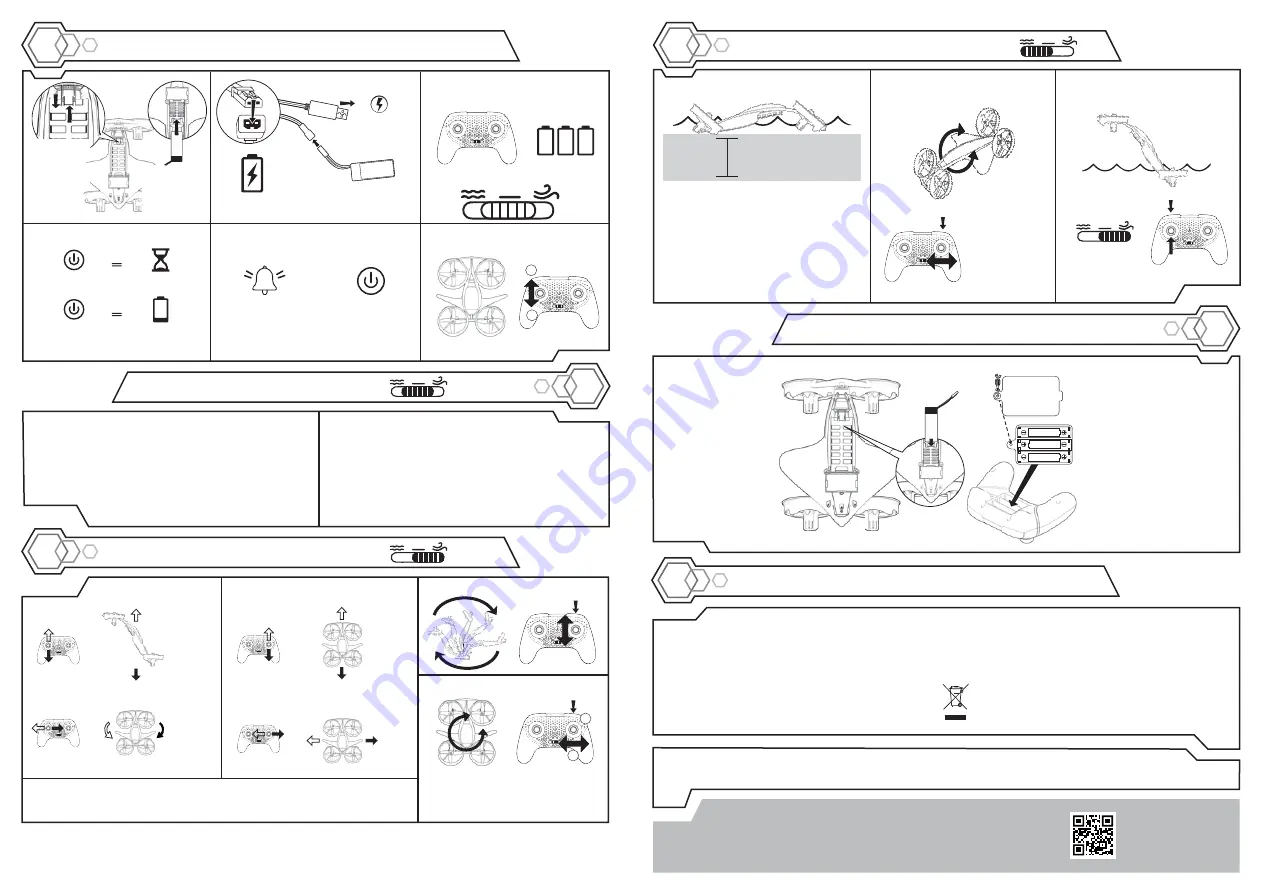
1. Lay your HydraQuad remote controller
so that the battery compartment faces
upwards. The HydraQuad remote
controller requires 3 x AAA “LR03 /
R03”1.5V Batteries (not included).
2. Using a Phillips screwdriver (not
included) remove the screw on the
battery compartment cover.
3. Remove any existing batteries and
insert new batteries according to
the diagram. Ensure that the
positive and negative polarities
match the illustrations inside the
battery compartment.
4. Replace the battery compartment
cover and tighten screw using the
screwdriver. Do not over-tighten.
STUNT: FLIPS
LEFT STICK
INCREASE
ALTITUDE
DECREASE
ALTITUDE
SPIN LEFT
(YAW)
SPIN RIGHT
(YAW)
RIGHT STICK
PRO TIPS:
AVOID FLYING NEAR TREES, BUILDINGS, AND OTHER AREAS WHERE THE HYDRAQUAD CAN CRASH OR GET STUCK.
FOR BEST PERFORMANCE OUTDOORS, THE HYDRAQUAD SHOULD BE OPERATED UNDER LOW SPEED WIND CONDITIONS.
FOR SAFETY REASONS, DO NOT FLY THE HYDRAQUAD NEAR OTHER PEOPLE, ESPECIALLY FACES.
FORWARD
BACKWARD
MOVE
LEFT
MOVE
RIGHT
PUSH LEFT STICK UP TO TAKE OFF. BOOST TO TURBO CHARGE THE ALTITUDE.
PULL BACK ON THE LEFT STICK TO LAND.
FLASHING FAST &
ALARM SOUND
LOW BATTERY
(STUNTS WILL
NOT WORK)
AFTER BATTERY
INSTALLATION,
ENSURE
LOCKING LATCH
IS SECURED
STUNT: 360º TURNS
1) STUNT
2
3
1) STUNT
2) PUSH THE RIGHT STICK TO SPIN
LEFT OR RIGHT
3) PRESS THE STUNT BUTTON AGAIN
TO RESET
2) RIGHT STICK
TO ROLL OVER
LEFT OR RIGHT
SCAN HERE TO LEARN
HOW TO REPLACE
PROPELLERS AND
OTHER TIPS
PRESS DOWN
ON THE BATTERY
GUARD AND
PUSH UP ON
THE LOCKING
LATCH TO
RELEASE THE
BATTERY
1
2
LiPO battery Is
detachable


