background image

Rev 6.0/11-20

FL1-DC: #35026

1

INTENDED FOR USE BY SKILLED 
PROFESSIONALS • READ AND 

UNDERSTAND BEFORE OPERATING

OPERATING

INSTRUCTIONS

908 W. Main • P.O. Box 368

Laurel, MT  USA 59044 

800-548-7341 (phone)
406-628-8231 (phone)

406-628-8354 (fax)

www.WPG.com

Record serial number in blank space above (to locate, see serial 
label on the product).

FLAT LIFTER 300,
DC-VOLTAGE

Model number: FL1HV11DC

KEEP FOR FUTURE REFERENCE

Summary of Contents for FL1HV11DC

Page 1: ...ERATING OPERATING INSTRUCTIONS 908 W Main P O Box 368 Laurel MT USA 59044 800 548 7341 phone 406 628 8231 phone 406 628 8354 fax www WPG com Record serial number in blank space above to locate see ser...

Page 2: ...FL1 DC 35026 Rev 6 0 11 20 2...

Page 3: ...oning the Lifter on the Load 13 Sealing the Pad on the Load 14 Reading the Vacuum Gauge 14 TO LIFT AND MOVE THE LOAD 15 Interpreting the Warning Light and Optional Warning Buzzer 15 Watching Vacuum In...

Page 4: ...1 20 2 VACUUM PAD MAINTENANCE 23 Pad to Load Friction Coefficient 23 Pad Inspection 23 Pad Cleaning 24 BATTERY RECHARGE 25 REPLACEMENT PARTS 26 LIMITED WARRANTY 27 TO OBTAIN REPAIRS OR WARRANTY SERVIC...

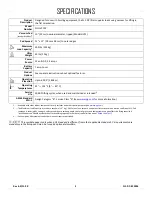
Page 5: ...an also affect the lifting capacity A qualified person should evaluate the effective lifting capacity for each use see definition under Rated Load Test 300 lbs 135 kg Lifter Weight 45 lbs 21 kg Power...

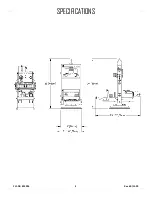
Page 6: ...FL1 DC 35026 Rev 6 0 11 20 4 SPECIFICATIONS...

Page 7: ...fter if the Maximum Load Capacity or any safety label appears to be missing or obscured Make sure the contact surfaces of the load and vacuum pad are clean before attaching the lifter see MAINTENANCE...

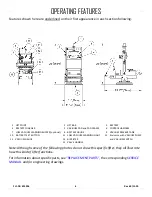
Page 8: ...8 BATTERY GAUGE 9 VACUUM RESERVE TANK 10 BATTERY TEST BUTTON 11 LOW VACUUM WARNING LIGHT 12 Enclosure with VACUUM PUMP 13 VACUUM GAUGE 14 AIR FILTER and VACUUM SWITCH 15 VALVE HANDLE Note Although som...

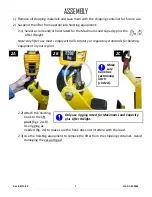
Page 9: ...r use must comply with all statutory or regulatory standards for hoisting equipment in your region 2A 2B 2C Make sure hook has restraining latch circled 2 2 Only use rigging rated for Maximum Load Cap...

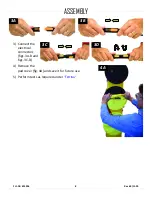
Page 10: ...FL1 DC 35026 Rev 6 0 11 20 8 3 3C 3D Connect the electrical connectors figs 3A B and figs 3C D 4 4A Remove the pad cover fig 4A and save it for future use 5 Perform tests as required under TESTING ASS...

Page 11: ...ings Test such surfaces for damaging effects before using the lifter on them 5 1 Although concave vacuum pads can also attach to some curved loads curvature can reduce lifting capacity Contact WPG for...

Page 12: ...designed to be watertight Moisture can result in reduced lifting capacity Do not use it in rain or other unsuitable conditions CE A secondary positive holding device is required to lift loads on const...

Page 13: ...nspections and Tests Follow the INSPECTION SCHEDULE and TESTING Examine air filter regularly and service when needed Examine the air filter and service whenever its bowl contains liquid or other conta...

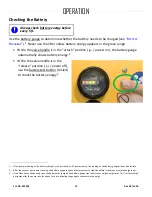
Page 14: ...he release position power off use the battery test button circled to check the battery energy 3 1 If the pump is running or the battery charger is connected to an AC power source the reading on the ba...

Page 15: ...load 2 Make sure the vacuum pad will fit on the load 3 Place the vacuum pad in contact with the load surface 1 The lifter is designed to handle the maximum load weight when the load s center of gravi...

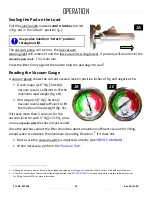
Page 16: ...e maximum load weight fig 1B Red range 16 Hg 54 kPa Vacuum level is not sufficient to lift the maximum load weight fig 1C If it takes more than 5 seconds for the vacuum level to reach 5 Hg 17 kPa pres...

Page 17: ...ing Note The low vacuum warning buzzer if present turns on and off together with the warning light Watching Vacuum Indicators 1A Watch the low vacuum warning light and the vacuum gauge fig 1A througho...

Page 18: ...k helps maintain vacuum temporarily in the event of a battery failure or electrical system failure Although the lifter is designed to support the load for at least 5 minutes without power this depends...

Page 19: ...personal injury 2 Before you lift another load perform the Every Lift Inspection see INSPECTION SCHEDULE AFTER USING THE LIFTER 1 Leave the valve handle in the release position power off 2 Charge the...

Page 20: ...prevent the lifter from tipping over on relatively horizontal surfaces place the vacuum pad facedown on a clean smooth flat surface 2 Charge the battery completely and repeat every 6 months see BATTER...

Page 21: ...AINTENANCE in SERVICE MANUAL Perform Vacuum Test Check for unusual vibrations or noises while operating lifter Examine entire lifter for evidence of looseness excessive wear or excessive corrosion def...

Page 22: ...it is supported by the lifter 7 Watch the vacuum gauge Starting from a vacuum level of 16 Hg 54 kPa the lifter must maintain a vacuum level greater than 12 Hg 41 kPa for 5 minutes 4 If not lifting th...

Page 23: ...SERVICE MANUAL 4 Take precautions in case load should fall during test Raise the load a minimal distance and disconnect the battery connector see AFTER USING THE LIFTER on page 17 2 5 Watch the vacuum...

Page 24: ...d for 2 minutes 5 Once the test is completed lower the load for release as previously directed 6 Never use lifter that has failed test Inspect the lifter for any stress damage and repair or replace co...

Page 25: ...ery 2 years or more often when necessary Pad Inspection 1A Inspect the vacuum pad fig 1A according to the INSPECTION SCHEDULE and correct the following faults before using the lifter see REPLACEMENT P...

Page 26: ...use rubber conditioners on vacuum pad Many rubber conditioners can leave a hazardous film on vacuum pads 2 Prevent liquid from entering the vacuum system through the suction hole on the pad face 3 Wip...

Page 27: ...8 hours to charge completely 3 If not check for the following faults Power lamp flashes Charger is not connected to battery reconnect charger see ASSEMBLY Error lamp turns on immediately Battery lead...

Page 28: ...1 53120 Pad Fitting Elbow 3 64 ID 1 49606T Vacuum Pad Model HV11 10 25 cm Diameter Lipped Chemical Resistant optional 1 49605T Vacuum Pad Model HV11 10 25 cm Diameter Lipped 1 29353 Pad Cover 1 15630...

Page 29: ...ear and tear and or the product has been damaged misused or neglected If a problem is not covered under warranty WPG will notify the customer of costs prior to repair If the customer agrees to pay all...

Page 30: ...FL1 DC 35026 Rev 6 0 11 20 28...

Reviews: