background image


32 


Wright

  Manufacturing,  Inc.  (hereinafter:  WMI)  warrants  to  the  original  owner 

that  the  new  WMI  mower  accompanying  this  document  will  be  free  from 

manufacturing  defects  in  materials  or  workmanship  subject  to  the  following 

limitations  and  exclusions.    Any  part  of  the  WMI  commercial  mower 

manufactured by WMI and found, in the reasonable judgment of WMI, to be 

defective  in  materials  or  workmanship,  will  be  repaired  or  replaced  by  an 

Authorized  WMI  Service  Dealer  without  charge  for  parts  and  (except  as 

excluded below) labor.  This Warranty is limited to the original Owner and the 

mower this document was provided with and is not transferable.  Dealer demo 

units with less than fifty hours when first retailed shall also be covered by this 

limited warranty.  Proofs of Purchase, Authorized Dealer performed Pre-Deliver 

Service  and  the  First  Eight  Hour  Service  will  be  required  by  the  Authorized 

WMI Service Dealer  to substantiate any warranty claims.  All WMI warranty 

work must be performed by an Authorized WMI Service Dealer and item must 

be delivered to the dealer prior to the expiration of the warranty period.  This 

Warranty  is  limited  to  the  following  specified  periods  from  the  date  of  the 

original  retail  purchase  for  defects  in  materials  or  workmanship  and  will 

commence upon the date of original retail purchase.  This warranty shall apply 

only  if  the  warranty  registration  form  has  been  completed  and  returned  to 

Wright  Manufacturing,  Inc.  within  14  days  from  the  date  of  original  retail 

purchase.  This  warranty  includes  only  the  cost  of  parts  and  labor  (when 

applicable).    This  warranty  applies  only  to  the  replacement  of  defective  or 

otherwise warrantable WMI OEM parts being replaced with WMI OEM parts. 


All parts and components (except as noted below) – 2 years  


Belts – 90 days  


Battery – 90 days 


Engine  –  warranty  covered  by  engine  manufacturer  and  handled 

through the respective Authorized engine Dealers 


Exclusions:


Any damage or deterioration due to normal use, wear and tear or exposure 

All filters, engine oil, hydraulic oil, tires and tubes 

Bent, fractured or broken parts occurring through impact or hard use 

Clutch: linings, anti-rotation failure or other failure due to improper 

replacement installation 

Cost of regular maintenance service, parts or adjustments 

Worn bearings (other than spindle bearings; see above) 

Worn bushings, cotters, clips, pins and retainers 

Grease fittings/zerks 

Paint, paint fading, cosmetic imperfections and steel surface imperfections 

Fabric, cushion and rubber grip wear or damage 

Cutting blades, light bulbs, fuses 

Damage due to loose pulleys on shafts 

Damage due to loose wheel hubs on tapered hydraulic motor shafts 

Fire Damage 

Abrasion or corrosion wear or damage 


Repair Parts Replaced During Original Warranty 

All Repair parts (excluding wear or otherwise excluded items) 

installed during the warranty period are warranted until the end 

of the respective original period according to the categories 

above except in the case that the respective original warranty 

period expires in less than ninety (90) days after the installation 

of the part(s).  If this happens then the parts are warranted for a 

total of ninety (90) days from the time of their installation. 


Rental Use 

The above warranty periods are limited to maximum of ninety 

(90) days for mowers that are used for rental purposes. 


The WMI mower, including any defective part, must be returned to an  

Authorized WMI Service Dealer within the warranty period.  The expense of 

lost production time and delivering the mower to the Authorized WMI Service 

Dealer for warranty work and the expense of returning it to the Owner after 

repair will be paid for by the Owner.  WMI’s responsibility is limited to making 

the  required  repairs  and  no  claim  of  breach  of  warranty  shall  be  cause  for 

cancellation  or  rescission  of  the  contract  of  sale  of  any  WMI  mower.    This 

Warranty does not apply to any mower that was delivered to an Owner prior to 

the Pre-Delivery Service as specified in the Owner’s Manual.  This Warranty 

does  not  apply  to  any  mower  that  was  shipped  in  a  crate  to  the  Owner  or 

delivered to the Owner by non-employees of an Authorized Dealer.  For the 

Owner’s protection and a valid Warranty, please note:  WMI does not permit 

Authorized Dealers to make non-face-to-face deliveries of the mower and any 

who are found doing so are subject to immediate cancellation as Authorized 

Dealers.  This Warranty does not cover any mower that has been subject to 

misuse, neglect, negligence, burning in any fire, an accident, or that has been 

operated or maintained in any way contrary to the operating and maintenance 

instructions as specified in the Owner’s Manual.  The Warranty does not apply 

to any damage to the mower that is the result of improper maintenance or to 

any mower or parts that have not been assembled or installed as specified in 

the Owner’s Manual.  The Warranty does not cover any mower that has been 

altered  or  modified  changing  performance  or  durability.    In  addition,  the 

Warranty does not extend to repairs made necessary by normal wear, or by the 

use  of  parts  or  accessories  which,  in  the  reasonable  judgment  of  WMI,  are 

either  incompatible  with  the  WMI  mower  or  adversely  affect  its  operation, 

performance or durability. 


WMI reserves the right to change or improve the design of any mower without 

assuming any obligation to modify any mower previously manufactured. 


All other implied warranties are limited in duration to the two (2) year warranty 

period or ninety (90) days for mowers used for rental purposes.  Accordingly, 

any such implied warranties including merchantability, fitness for a particular 

purpose, or otherwise, are disclaimed in their entirety after the expiration for 

the  appropriate  two  (2)  year  or  ninety  (90)  day  warranty  period.    WMI’s 

obligation under this Warranty is strictly limited to the repair or replacement of 

defective parts and WMI does not assume, or authorize anyone to assume for 

them, any other obligation.  Some states do not allow limitations on how long 

an implied warranty lasts, so the above limitation may not apply. 


WMI assumes no responsibility for incidental, consequential or other damages 

including,  but not limited to,  expense  for gasoline, expense  of delivering the 

mower to an Authorized WMI Service Dealer and expense of returning it to the 

Owner, damage by fire, mechanic’s travel time, telephone charges, rental of a 

like product during the time warranty repairs are being performed, travel, loss 

or  damage  to  personal  property,  loss  of  revenue,  loss  of  use  of  the  power 

equipment,  loss  of  time  or  inconvenience.    Some  states  do  not  allow  the 

exclusion or limitation of incidental or  consequential damages, so the above 

limitation or exclusion may not apply. 


This  Warranty  gives  you  specific  legal  rights,  and  you  may  also  have  other 

rights which vary from state to state. 


This Warranty applies to all WMI mowers sold in the United States of America 

and Canada. 


For the location of the Authorized WMI Service 
Dealer nearest you or  other information, such 
as,  Parts  Lists  and  Owner’s  Manuals  visit  our 
website at: 

www.wrightmfg.com


Wright Manufacturing, Inc. 

4600-X Wedgewood Blvd. 

Frederick, MD 21703 


WRIGHT MANUFACTURING, INC. POWER EQUIPMENT LIMITED WARRANTY 

THIS WARRANTY SUPERSEDES ALL PREVIOUS ON UNITS WITH A RETAIL SALES DATE ON OR AFTER 04/01/05 

Summary of Contents for Stander

Page 1: ...ts lists are available from your authorized Wright Dealer for a nominal charge Also check www wrightmfg com for the most up to date product literature Please note the complete model number and serial number of your Wright product For reference please note the following information at the time of purchase SERIAL ________________________________ MODEL ________________________________ DATE OF PURCHAS...

Page 2: ...onstantly seeking ways to improve its products the mower you have may differ slightly from the information and specifications in this manual Wright reserves the option to make changes at any time without notice in the process of continually improving our products Wright Manufacturing Inc SAFETY ALERT This is the safety alert symbol It is used throughout this manual and on the mower s safety labels...

Page 3: ...HE MOWER 16 4 4 HOW TO STOP PARK THE MOWER 17 4 5 DRIVING THE MOWER OVER A CURB 17 4 5 1 NEVER DRIVE STRAIGHT ONTO OR OFF A CURB 17 4 6 MOWING ON VARYING TERRAIN 17 4 7 HOW TO ADJUST NEUTRAL 18 4 8 CHANGING THE SPEED SENSITIVITY ADJUSTMENT 18 4 9 HOW TO PERFORM THE TRACKING ADJUSTMENT 18 4 10 HOW TO TEST USE THE BLADE CLUTCH BRAKE SWITCH 19 4 11 HOW TO TEST THE OPERATOR PRESENCE CONTROL OPC SWITCH...

Page 4: ...s set below recommended pressures Lubricate all appropriate moving parts see the Lubrication section of this manual Check the battery to see that the cables are tight and connected properly The battery is 12 volts and is a maintenance free battery Only charge the battery if it will not start the mower properly Add regular unleaded gasoline to fuel tank use a minimum of 87 octane gasoline You may u...

Page 5: ...ly As you drive the mower listen for any unusual noises and test for irregular operation and adjust or service as necessary Go over the safety information and operating procedures in this manual with the customer Instruct each customer in proper operation and observe the customer during their initial operation on a level parking lot Repeat until the customer is familiar and comfortable with the ba...

Page 6: ...cial characteristics and who are also knowledgeable about the safety instructions Use only approved repair parts to maintain Accident prevention regulations other general safety regulations occupational safety rules and traffic regulations must be followed without fail Unauthorized modifications to the design of the machine will absolve the manufacturer from liability for any resulting personal in...

Page 7: ...he unit 1 5 User Qualifications This product is designed for use by physically fit experienced professional commercial mower operators who have a minimum of 160 hours of experience operating fifteen horsepower and greater industrial mowers Operators must be 18 years or older and weigh at least 120 pounds and no more than 350 pounds They must have read and understood this manual DO NOT allow childr...

Page 8: ...ior to operating the unit carefully inspect all lawn ground areas where you plan to use the mower for hidden hard to see objects or uneven ground that may be hidden in the grass Clear the work area of moveable objects such as wires rocks glass toys etc that might be picked up by the mower and dangerously thrown Remove if possible or mark the location of all immovable objects or irregular areas and...

Page 9: ...amely all blade and belt covers engine shields and grass discharge chute deflector Keep hands feet and clothing away from rotating parts especially the rear wheels blades engine flywheel belts and pulleys Do not touch engine muffler or hydraulic system while engine is running or soon after it is stopped These areas can be so hot as to cause severe burns Clean grass leaves and lubricant spills from...

Page 10: ... areas of steeper slopes Recommendations for this angle Lean as far forward as possible to add your weight to the front of the mower Accelerate gently Do not accelerate quickly to avoid popping a wheelie If backing down the hill do not stop suddenly but slow down gradually When pointing down a slope your mower has the least weight on the rear drive wheels and therefore the least traction at the ti...

Page 11: ...ry If foreign fluid is injected into the skin it must be surgically removed within a few hours by a doctor familiar with this form of injury or gangrene may result Seek medical attention immediately Make sure all hydraulic fluid connections are tight and all hydraulic hoses and lines are in good condition before starting your Wright mower Hydraulic fluid is under high pressure If you need service ...

Page 12: ...6 Gal Type of Fuel Unleaded regular gasoline minimum 85 octane Do not use gasoline containing more than 10 ethanol Do not mix oil with gasoline Fuel Filter In line Fuel shut off On Off located on fuel tank Safety Interlock System PTO switch must be disengaged brake engaged and the control handles in the neutral and locked position to start the engine Operator must have feet on the platform to enga...

Page 13: ...not disconnect any safety switches or remove any decals 1 Flexible Chute Deflector 2 Rear Drive Tire 3 Fuel Tank 4 Hinged Upright Pad 5 Control Handles 6 Stationary Handlebar 7 Brake Handle 8 Battery Box 9 Kawasaki Engine 10 Muffler 11 Caster Tire 12 Anti Scalp Rollers 13 Aero Core Cutter Deck 14 Deck Covers 5 4 3 2 1 8 7 6 10 9 13 12 11 14 5 5 5 ...

Page 14: ...ion are controlled by using the control handles Moving the control handles equal distance forward or backward the machine moves in a straight line By releasing the control handles during operation the controls will return to the neutral position and the machine will stop 1 Control Levers 2 Stationary Handle Bar 3 Throttle 4 Choke 5 Digital Hour Meter 6 PTO Switch 7 Ignition Switch 4 2 1 3 5 6 7 2 ...

Page 15: ...oint the meter will flash svc ENG in remaining hours every 5 sec Shut off engine Will display how many times the engine has started 3 4 Model Serial Location 1 The plate is affixed to the rear of the engine deck in between the hydro pumps 2 Stated on the plate will be the model and serial number these will be needed when ordering parts 3 5 Fuel System Shut Off Valve The fuel shut off valve and fue...

Page 16: ...nterlock system The PTO must be disengaged brake applied and control levers in the neutral position in order to start the machine With the brake applied the controls are locked in the neutral position Brake applied Handlebars locked Brake Off Handlebars unlocked Locked Unlocked ...

Page 17: ...hould go through each step in the order indicated every time you start the mower 4 2 How to start the mower Before starting the engine Move mower to an open well ventilated area Make sure the control levers are in the exact neutral position Apply the parking brake if it is not already set Turn OFF the blade engaging switch if it is on Check the engine oil Turn fuel valve to the ON position Startin...

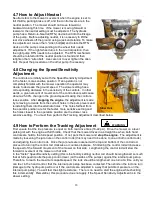
Page 18: ...then gradually bump into the curb with that tire until it is just on top of the curb If the tire slips even while lurching the mower into the curb then the curb is too high and you should use ramps or find another way The mower should still be at a 45 degree angle to the curb Now while maintaining the same angle to the curb continue to back up until the right rear tire is close to the curb Using t...

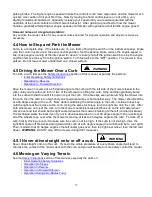
Page 19: ... The holes farthest from the operator position are for the faster more sensitive setting and the holes closest to the operators position are the slower less sensitive setting You must then perform the Tracking Adjustment described below 4 9 How to Perform the Tracking Adjustment First ensure that the tire pressure is equal on both rear drive tires 18 22 psi Drive the mower on a level parking lot w...

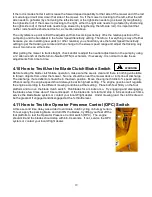
Page 20: ...ssary It is normal to make these adjustments from time to time 4 10 How to Test Use the Blade Clutch Brake Switch Before testing the blade clutch brake operation make sure the area is clear and there is nothing vulnerable to thrown objects from under the mower No one should be near the mower deck or in its line of discharge The discharge chute deflector should be in the down position Move the engi...

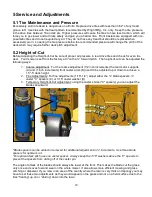
Page 21: ...llowing ways 1 Coarse Adjustment For the coarse adjustment 1 2 inch increments the rear motor supports A and 1 inch increments front caster arms B need to be adjusted up or down to achieve a 1 5 5 deck height 2 Fine Adjustments For fine adjustments 1 16 1 4 adjust either the blade spacers caster C spacers C or 1 16 caster washer D 3 Temporary Height of Cut Adjustment using the caster shims C space...

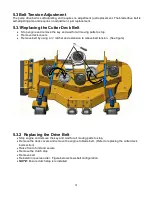
Page 22: ...g parts to stop Remove deck covers Remove belt by using a ratchet and extension to relieve belt tension See figure 5 3 2 Replacing the Drive Belt Stop engine and remove the key and wait for all moving parts to stop Remove the deck covers and remove the engine to blade belt Refer to replacing the cutter deck belt section Raise front of unit and secure Remove the clutch stop Remove belt Reinstall in...

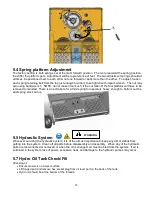
Page 23: ...d to reinstall There is an extra hole for a third spring for operators heavy enough to bottom out the duel spring stock set up 5 5 Hydraulic System Whenever servicing the hydraulic system it is of the utmost importance to keep any dirt or debris from getting into the system Clean off all parts before disassembly and assembly When any of the hydraulic parts are disconnected or removed or when the o...

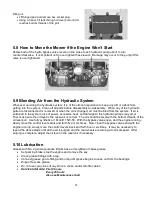
Page 24: ...raulic pumps may occur First make sure the oil level in the reservoir is correct The oil should be level with the bottom threads of the oil level port Use fully synthetic oil Mobil1 15W 50 With the bypass valves open and the engine running slowly move the control levers back and forth five or six times Now close the bypass valves and with the engine running slowly move the control levers back and ...

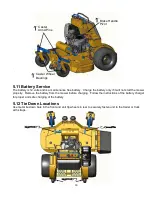
Page 25: ...Remove the battery from the mower before charging Follow the instructions of the battery charger for proper and safe charging of the battery 5 12 Tie Down Locations Use metal tie down bars in the front and anti tip wheels in rear to securely fasten unit to the trailer or truck with straps Brake Handle Pivot Caster Arms Pins Caster Wheel Bearings ...

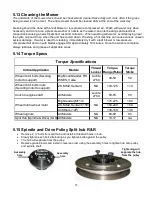
Page 26: ... Wash with water only when necessary and do not use a pressure washer or nozzle as the water can enter bearings and electrical connections causing an electrical short rust and corrosion When washing with water avoid spraying near the hydro cap and do so when the unit has cooled down Washing a hot machine can cause various unseen system damage If water is used for cleaning immediately dry it with a...

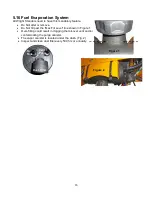
Page 27: ... Do Not fill past the Max Fill Level line shown in Figure 1 Over filling could result in clogging the roll over vent and or contaminating the purge canister The vapor canister is located under the dash Fig 2 Inspect and clean dust filter every 500 hrs or annually Figure 1 Figure 2 Dust Filter Vent Purge To Tank ...

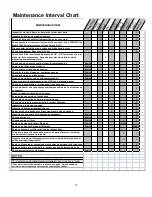
Page 28: ... rings nuts etc X X Check blades for wear and sharpness sharpen and balance or replace as necessary X X Clean out debris under blade belt cover X X Scrape clean underside of cutter deck X X Check blade mounting bolts for proper tightness X X Check blade spindle mounting bolts for proper tightness X X Inspect tires replace as needed X X Inspect and tighten all hydraulic hoses X X Adjust parking bra...

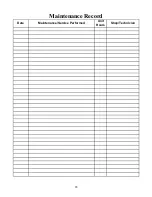
Page 29: ...28 Date Maintenance Service Performed Unit Hours Shop Technician Maintenance Record ...

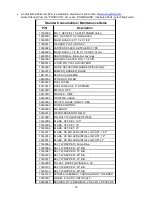
Page 30: ...NOID 53490019 WATER RESISTANT RELAY 71410021 PIG TAIL 19 CLUTCH 71410020 71440004 BLADE OFF SET 16 5 71440005 BLADE OFF SET 18 71440006 BLADE OFF SET 21 71440011 BLADE CE ROLLED AIRFOIL LOW LIFT 16 5 71440012 BLADE CE ROLLED AIRFOIL LOW LIFT 18 71440013 BLADE CE ROLLED AIRFOIL LOW LIFT 21 71460064 BELT WRAPPED Pump Drive 71460065 BELT WRAPPED 52 B B 71460067 BELT WRAPPED 61 B B 71460070 BELT WRAPP...

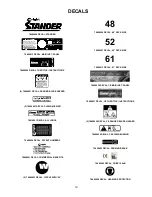
Page 31: ... NUMBERS 76490051 DECAL COMMERCIAL BENEFITS 2 76490023 DECAL CIRCLE WITH W 48 76490008 DECAL 48 DECK SIZE 52 76490007 DECAL 52 DECK SIZE 61 76490012 DECAL 61 DECK SIZE 76490030 DECAL CE MAIN INST PANEL 76490031 DECAL CE THROTTLE INSTRUCTIONS 2 76490028 DECAL CE DANGER BLADE HAZARD 76490029 DECAL CE SHIELD MISSING 76490053 DECAL PARKING BRAKE 76490045 DECAL NOISE 100dB 76490058 DECAL HEARING PROTEC...

Page 32: ...aler for warranty work and the expense of returning it to the Owner after repair will be paid for by the Owner WMI s responsibility is limited to making the required repairs and no claim of breach of warranty shall be cause for cancellation or rescission of the contract of sale of any WMI mower This Warranty does not apply to any mower that was delivered to an Owner prior to the Pre Delivery Servi...

Page 33: ...you retain all receipts covering maintenance on your commercial mower but WMI cannot deny warranty solely for the lack of receipts As the commercial mower owner you should however be aware that WMI may deny you warranty coverage if your commercial mower or a part has failed due to abuse neglect or improper maintenance or unapproved modifications You are responsible for presenting your commercial m...

Page 34: ...ent components proximately caused by a failure under warranty of any warranted part 8 Throughout the commercial mower warranty period stated above WMI will maintain a supply of warranted parts sufficient to meet the expected demand for such parts 9 Any replacement part may be used in the performance of any warranty maintenance or repairs and must be provided without charge to the owner Such use wi...

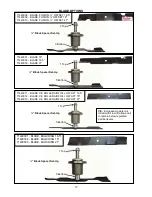
Page 35: ...ADE CE ROLLED AIRFOIL LOW LIFT 18 71440013 BLADE CE ROLLED AIRFOIL LOW LIFT 21 71490001 BLADE MULCHING 16 5 71490002 BLADE MULCHING 18 71490003 BLADE MULCHING 21 Blade Spacer Set Up 3 Top 3 Bottom 1 Top Blade Spacer Set Up 5 Bottom 5 Bottom 1 Top Blade Spacer Set Up 5 Bottom 1 Top Blade Spacer Set Up CE European models only rolled airfoil low lift allows unit to remain below regulated decibel leve...

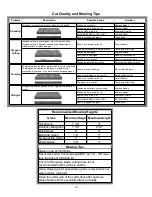
Page 36: ... Lawn is uneven or bumpy Roll or level the lawn Deck cutting hieght is set too low Raise cutting height Deck is not leveled correctly Level the deck Tire pressure is uneven Check and inflate tires Stringers are sparse patches of uncut grass left behind the mower Blades are not sharp or are nicked Sharpen blades Blades are worn down too far Replace blades Engine RPM is too low Mow at full throttle ...

Page 37: ...37 NOTES ...

Page 38: ...Notes ...

Page 39: ......

Page 40: ...4600X Wedgewood Blvd Frederick MD 21703 www wrightmfg com ...

Reviews: