background image

S-28

05-E2B, 05-E2BG, WSM

DIESEL  ENGINE

Turbocharger (equipped with Turbocharger Model)

CAUTION

• While the engine is running and or just after it stops, the

turbocharger is hot, be careful not to touch the
turbocharger.
NOTE

Q

• When detaching and attaching the turbocharger assembly,

be very careful not to allow dust, dirt and other foreign
matters in the oil pipes.

• When the turbocharger assembly has been replaced, pour

fresh engine oil through the oil filter port of the
turbocharger.

• Before starting the engine, make sure that the air cleaner

position.

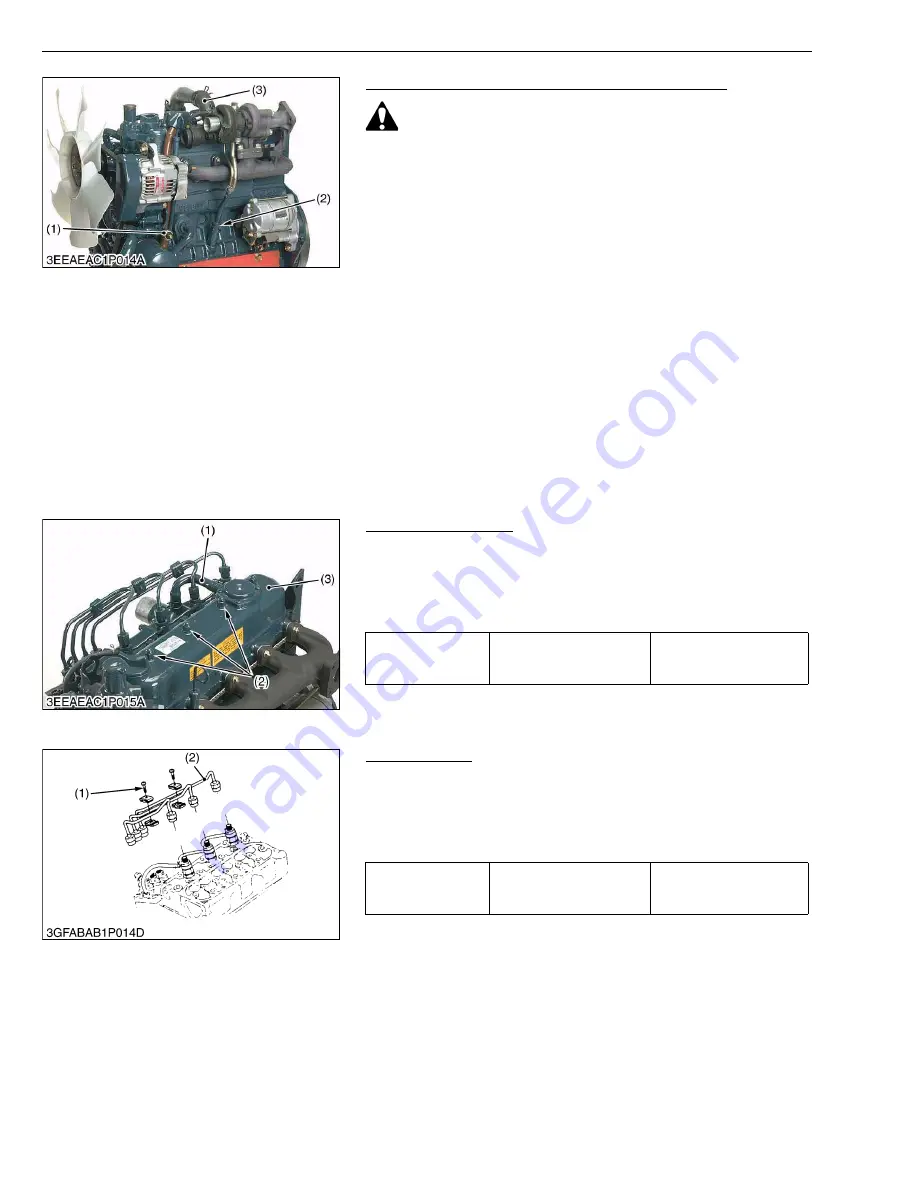
1. Disconnect the intake hose (3).
2. Remove the oil switch (1).
3. Disconnect the pipe band (2).
4. Remove the exhaust manifold with turbocharger.

W1021474

(3) Cylinder Head and Valve

Cylinder Head Cover

1. Disconnect the breather hose (1).
2. Remove the cylinder head cover screw (2).
3. Remove the cylinder head cover (3).

(When reassembling)

• Check to see if the cylinder head cover gasket is not defective.

W1028468

Injection Pipes

1. Loosen the screws to the pipe clamp (1).
2. Detach the injection pipes (2).

(When reassembling)

• Sent compressed air into the pipes to blow out dust.  Then,

reassemble the pipes in the reverse order.

W1028640

(1) Oil Switch
(2) Pipe Band

(3) Intake Hose

Tightening torque

Cylinder head cover screw

6.9 to 8.8 N·m
0.7 to 0.9 kgf·m
5.1 to 6.5 ft-lbs

(1) Breather Hose
(2) Cylinder Head Cover Screw

(3) Cylinder Head Cover

Tightening torque

Injection pipe retaining nut

24.5 to 34.3 N·m
2.5 to 3.5 kgf·m
18.1 to 25.3 ft-lbs

(1) Pipe Clamp

(2) Injection Pipe

KiSC issued 06, 2011 A

Summary of Contents for 05-E2B SERIES

Page 1: ...05 E2B SERIES 05 E2BG SERIES WORKSHOP MANUAL DIESEL ENGINE KiSC issued 06 2011 A ...

Page 2: ...l Engine Mechanism Workshop Manual Code No 9Y021 01870 for the one which has not been described to this workshop manual Q Servicing Information on the troubleshooting servicing specification lists tightening torque checking and adjusting disassembling and assembling and servicing which cover procedures precautions factory specifications and allowable limits All information illustrations and specif...

Page 3: ...on labels on the machine itself to warn of the possibility of personal injury Read these instructions carefully It is essential that you read the instructions and safety regulations before you attempt to repair or use this unit DANGER Indicates an imminently hazardous situation which if not avoided will result in death or serious injury WARNING Indicates a potentially hazardous situation which if ...

Page 4: ...ping Otherwise hot water will spout out from radiator Only remove radiator cap when cool enough to touch with bare hands Slowly loosen the cap to first stop to relieve pressure before removing completely Escaping fluid fuel or hydraulic oil under pressure can penetrate the skin causing serious injury Relieve pressure before disconnecting hydraulic or fuel lines Tighten all connections before apply...

Page 5: ...ulations when disposing of oil fuel coolant electrolyte and other harmful waste PREVENT ACID BURNS Sulfuric acid in battery electrolyte is poisonous It is strong enough to burn skin clothing and cause blindness if splashed into eyes Keep electrolyte away from eyes hands and clothing If you spill electrolyte on yourself flush with water and get medical attention immediately PREPARE FOR EMERGENCIES ...

Page 6: ...mp Governor All speed mechanical governor Direction of Rotation Counter clockwise viewed from flywheel side Injection Nozzle Mini Nozzle DNOPD Injection Timing 0 31 rad 18 before T D C 0 37 rad 21 before T D C 0 31 rad 18 before T D C 0 37 rad 21 before T D C 0 31 rad 18 before T D C 0 37 rad 21 before T D C Firing Order 1 2 3 1 3 4 2 Injection Pressure 13 73 MPa 140 kgf cm2 1991 psi Compression R...

Page 7: ...from flywheel side Injection Nozzle Mini Nozzle DNOPD Injection Timing 0 31 rad 18 before T D C Firing Order 1 2 3 1 3 4 2 1 2 3 1 3 4 2 Injection Pressure 13 73 MPa 140 kgf cm2 1991 psi Compression Ratio 24 1 23 1 Lubricating System Forced lubrication by trochoid pump Oil Pressure Indicating Electrical type switch Lubricating Filter Full flow paper filter Cartridge type Cooling System Pressurized...

Page 8: ...Injection Timing 0 29 rad 16 5 before T D C Firing Order 1 2 3 1 3 4 2 Injection Pressure 13 73 MPa 140 kgf cm2 1991 psi Compression Ratio 23 1 24 1 Lubricating System Forced lubrication by trochoid pump Oil Pressure Indicating Electrical type switch Lubricating Filter Full flow paper filter Cartridge type Cooling System Pressurized radiator forced circulation with water pump Starting System Elect...

Page 9: ...29 rad 16 5 before T D C Firing Order 1 2 3 1 3 4 2 Injection Pressure 13 73 MPa 140 kgf cm2 1991 psi Compression Ratio 24 1 Lubricating System Forced lubrication by trochoid pump Oil Pressure Indicating Electrical type switch Lubricating Filter Full flow paper filter Cartridge type Cooling System Pressurized radiator forced circulation with water pump Starting System Electric Starting with Starte...

Page 10: ...05 E2B 05 E2BG WSM PERFORMANCE CURVES PERFORMANCE CURVES 1 Gross Int 2 Net Int 3 Net Cont 4 Brake Horsepower 5 Engine Speed 6 Specified Fuel 7 Torque 8 Gross 9 Overload 10 Continuous KiSC issued 06 2011 A ...

Page 11: ...9 05 E2B 05 E2BG WSM PERFORMANCE CURVES 1 Gross Int 2 Net Int 3 Net Cont 4 Brake Horsepower 5 Engine Speed 6 Specified Fuel 7 Torque 8 Gross 9 Overload 10 Continuous KiSC issued 06 2011 A ...

Page 12: ...10 05 E2B 05 E2BG WSM PERFORMANCE CURVES 1 Gross Int 2 Net Int 3 Net Cont 4 Brake Horsepower 5 Engine Speed 6 Specified Fuel 7 Torque 8 Gross 9 Overload 10 Continuous KiSC issued 06 2011 A ...

Page 13: ...330 dia 12 99 dia D 396 15 59 396 15 59 396 15 59 396 15 59 E 194 7 64 194 7 64 194 7 64 194 7 64 F 608 7 23 96 608 7 23 96 608 7 23 96 608 7 23 96 G 233 5 9 19 233 5 9 19 233 5 9 19 233 5 9 19 H 200 7 87 200 7 87 200 7 87 200 7 87 I 250 81 to 251 12 dia 9 874 to 9 887 dia 250 81 to 251 12 dia 9 874 to 9 887 dia 250 81 to 251 12 dia 9 874 to 9 887 dia 250 81 to 251 12 dia 9 874 to 9 887 dia J 56 2...

Page 14: ...ia 370 dia 14 57 dia 370 dia 14 57 dia D 396 15 59 396 15 59 396 15 59 E 194 7 64 194 7 64 194 7 64 F 613 7 24 16 613 7 24 16 629 3 24 16 G 238 5 9 39 238 5 9 39 238 5 9 39 H 200 7 87 200 7 87 200 7 87 I 250 81 to 251 12 dia 9 874 to 9 887 dia 250 81 to 251 12 dia 9 874 to 9 887 dia 250 81 to 251 12 dia 9 874 to 9 887 dia J 56 2 20 56 2 20 56 2 20 KiSC issued 06 2011 A ...

Page 15: ...7 360 14 17 360 14 17 E 333 38 dia 13 13 dia 333 38 dia 13 13 dia 333 38 dia 13 13 dia 333 38 dia 13 13 dia 333 38 dia 13 13 dia F 200 02 dia 7 87 dia 200 02 dia 7 87 dia 200 02 dia 7 87 dia 200 02 dia 7 87 dia 200 02 dia 7 87 dia G 356 dia 14 02 dia 356 dia 14 02 dia 356 dia 14 02 dia 356 dia 14 02 dia 356 dia 14 02 dia H 290 dia 11 42 dia 290 dia 11 42 dia 290 dia 11 42 dia 290 dia 11 42 dia 290...

Page 16: ... 3 CHECK POINTS OF EVERY 50 HOURS G 10 4 CHECK POINTS OF EVERY 100 HOURS G 11 5 CHECK POINTS OF EVERY 200 HOURS G 13 6 CHECK POINTS OF EVERY 400 HOURS G 14 7 CHECK POINTS OF EVERY 500 HOURS G 15 8 CHECK POINTS OF EVERY 1 OR 2 MONTHS G 17 9 CHECK POINTS OF EVERY YEAR G 18 10 CHECK POINTS OF EVERY 800 HOURS G 19 11 CHECK POINTS OF EVERY 1500 HOURS G 20 12 CHECK POINTS OF EVERY 3000 HOURS G 21 13 CHE...

Page 17: ...mber The engine serial number is an identified number for the engine It is marked after the engine model number It indicates month and year of manufacture as follows Year of manufacture W1010477 Alphabet or Number Year Alphabet or Number Year 1 2001 F 2015 2 2002 G 2016 3 2003 H 2017 4 2004 J 2018 5 2005 K 2019 6 2006 L 2020 7 2007 M 2021 8 2008 N 2022 9 2009 P 2023 A 2010 R 2024 B 2011 S 2025 C 2...

Page 18: ...ng to Tier 1 Phase 1 requirements and those conforming to Tier 2 Phase 2 requirements we have adopted E2B as a new model name for the engines conforming Tier 2 Phase 2 regulations In the after sale services for 05 E2B and 05 E2BG series engines only use the dedicated parts for E2B models and carry out the maintenance services accordingly 3 CYLINDER NUMBER The cylinder numbers of kubota diesel engi...

Page 19: ...battery first Remove oil and dirt from parts before measuring Use only KUBOTA genuine parts for parts replacement to maintain engine performance and to ensure safety Gaskets and O rings must be replaced during reassembly Apply grease to new O rings or oil seals before assembling When reassembling external or internal snap rings position them so that the sharp edge faces against the direction from ...

Page 20: ...hrs 2 years Checking fuel hoses and clamp bands Changing engine oil Oil pan depth 125 mm 4 92 in 130 mm 5 12 in Cleaning air cleaner element Replace the element after 6 times cleaning Cleaning fuel filter element Check fan belt tension and damage Checking battery electrolyte level Replacing oil filter cartridge Oil pan depth 125 mm 4 92 in 130 mm 5 12 in Checking radiator hoses and clamp bands Che...

Page 21: ... road vehicle engine runs on a high sulfur fuel it is advisable to employ the CF CD or CE lubricating oil with a high total base number If the CF 4 or CG 4 lubricating oil is used with a high sulfur fuel change the lubricating oil at shorter intervals Lubricating oil recommended when a low sulfur or high sulfur fuel is employed P Recommendable X Not recommendable W1035555 Fuel Lubricating oil clas...

Page 22: ... or viscosity from the previous drain old oil Never mix two different types of oil NOTE Q Be sure to inspect the engine locating it on a horizontal place If placed on gradients accurately oil quantity may not be measured Be sure to keep the oil level between upper and lower limits of the dipstick Too much oil may cause a drop in output or excessive blow by gas On the closed breather type engine in...

Page 23: ...t brand cannot be identified drain out all of the remaining coolant and refill with a totally new brand of coolant mix CAUTION Do not remove the radiator cap until coolant temperature is below its boiling point Then loosen the cap slightly to relieve any excess pressure before removing the cap completely IMPORTANT Q During filling the coolant air must be vented from the engine coolant passages The...

Page 24: ...se the proper SAE Engine Oil according to ambient temperature Upon an oil change be sure to replace the gasket with new one W1016604 Above 25 C 77 F SAE 30 or SAE 10W 30 SAE 10W 40 0 C to 25 C 32 F to 77 F SAE 20 or SAE 10W 30 SAE 10W 40 Below 0 C 32 F SAE 10W or SAE 10W 30 SAE 10W 40 Oil pan depth Models Capacity 125 mm 4 92 in 130 mm 5 12 in D905 E2B E2BG D1005 E2B E2BG D1105 E2B E2BG D1105 T E2...

Page 25: ...by hand Over tightening may cause deformation of rubber gasket 4 After the new cartridge has been replaced the engine oil normally decrease a little Thus see that the engine oil does not leak through the seal and be sure to read the oil level on the dipstick Then replenish the engine oil up to the specified level IMPORTANT Q To prevent serious damage to the engine replacement element must be highl...

Page 26: ...ve When bleeding fuel system 1 Fill the tank with fuel and open the cock 4 2 Loosen the air vent plug 3 of the fuel filter a few turns 3 Screw back the plug when bubbles do not come up any more 4 Open the air vent cock on top of the fuel injection pump 5 If equipped electrical fuel feed pump turn the key to AC position and pump the fuel up for 10 to 15 seconds If equipped mechanical fuel feed pump...

Page 27: ...e with kerosene 3 Take out the element 4 and dip it in the kerosene to rinse 4 After cleaning reassemble the fuel filter keeping out dust and dirt 5 Bleed the fuel system IMPORTANT Q If dust and dirt enter the fuel the fuel injection pump and injection nozzle will wear quickly To prevent this be sure to clean the fuel filter cup 5 periodically W1046058 Fan Belt Tension 1 Measure the deflection A d...

Page 28: ...nk in the pulley groove 4 If the fan belt is nearly worn out and deeply sunk in the pulley groove replace it W1209480 Checking Battery Electrolyte Level 1 Check the battery electrolyte level 2 If the level is below than lower level line 2 and the distilled water to pour level of each cell W1047154 A Good B Bad 1 Upper Level Line 2 Lower Level Line KiSC issued 06 2011 A ...

Page 29: ...se the proper SAE Engine Oil according to ambient temperature Upon an oil change be sure to replace the gasket with new one W1018298 Above 25 C 77 F SAE 30 or SAE 10W 30 SAE 10W 40 0 C to 25 C 32 F to 77 F SAE 20 or SAE 10W 30 SAE 10W 40 Below 0 C 32 F SAE 10W or SAE 10W 30 SAE 10W 40 Oil pan depth Models Capacity 125 mm 4 92 in 130 mm 5 12 in D905 E2B E2BG D1005 E2B E2BG D1105 E2B E2BG D1105 T E2...

Page 30: ...eads and retighten it securely 3 The water hose is made of rubber and tens to age It must be replaced every two years Also replace the clamp and tighten it securely W1029518 Checking Intake Air Line 1 Check to see if the intake air hose s are properly fixed every 200 hours of operation 2 If the clamp is loose apply oil to the threads and retighten it securely 3 The intake air hose s is made of rub...

Page 31: ...ined close the drain plug 4 Fill with clean water and cooling system cleaner 5 Follow directions of the cleaner instruction 6 After flushing fill with clean water and anti freeze until the coolant level is just below the port Install the radiator cap 1 securely 7 Fill with coolant up to FULL A mark on the recovery tank 3 8 Start and operate the engine for few minutes 9 Stop the engine and let cool...

Page 32: ...ng system NOTE Q The above data represents industrial standards that necessitate a minimum glycol content in the concentrated anti freeze When the coolant level drops due to evaporation add fresh soft water only to keep the anti freeze mixing ratio less than 50 In case of leakage add anti freeze and fresh soft water in the specified mixing ratio Anti freeze absorbs moisture Keep unused anti freeze...

Page 33: ...uld be slightly lower than the specified level to prevent overflow 2 Connect the battery to the charging unit following the manufacture s instructions 3 As the electrolyte generates gas while charging remove all port caps 4 The electrolyte temperature must not exceed 40 C 104 F during charging If it exceed 40 C 104 F decrease the charging amperage or stop charging for a while 5 When charging sever...

Page 34: ... varies with temperature To be exact the specific gravity decreases by 0 0007 with an increase of 1 C 0 0004 with an increase of 1 F in temperature and increases by 0 0007 with a decreases of 1 C 0 0004 with a decrease of 1 F Therefore using 20 C 68 F as a reference the specific gravity reading must be corrected by the following formula Specific gravity at 20 C Measured value 0 0007 electrolyte te...

Page 35: ...heel and alignment mark 2 on the rear end plate so that the No 1 piston comes to the overlap position 6 Check the following valve clearance marked with using a feeler gauge 7 If the clearance is not within the factory specifications adjust with the adjusting screw NOTE Q The sequence of cylinder numbers is given as No 1 No 2 No 3 and No 4 starting from the gear case side After adjusting the valve ...

Page 36: ...on Pressure 1 Set the injection nozzle to a nozzle tester 2 Slowly move the tester handle to measure the pressure at which fuel begins jetting out from the nozzle 3 If the measurement is not within the factory specifications replace the adjusting washer in the nozzle holder to adjust it W10408820 Valve Seat Tightness 1 Set the injection nozzle to a nozzle tester 2 Raise the fuel pressure and keep ...

Page 37: ... the compressor cover 10 to see if there is no air leak 2 If any air leak is found change the clamp 8 and or inlet hoses 3 Check the intake hose 7 and the clamp to see if there is not loose or crack 4 If any loose or crack is found tighten the cramp or change the hose to prevent dust from entry Radial Clearance 1 If the wheel contact to the housing replace the turbocharger assembly with new one W1...

Page 38: ...tion timing is out of adjustment readjust the timing with shims NOTE Q The liquid gasket is not required for assembling Shims are available in thickness of 0 20 mm 0 0079 in 0 25 mm 0 0098 in and 0 30 mm 0 0118 in Combine these shims for adjustments Addition or reduction of shim 0 05 mm 0 0020 in delays or advances the injection timing by approx 0 0087 rad 0 5 In disassembling and replacing the in...

Page 39: ...r when the fuel jets from the injection nozzle After that turn the flywheel by the hand and raise the pressure to approx 13 73 MPa 140 kgf cm2 1991 psi 7 Now turn the flywheel back about half a turn to keep the plunger free Maintain the flywheel at this position and clock the time taken for the pressure to drop from 13 73 to 12 75 MPa from 140 to 130 kgf cm2 from 1991 to 1849 psi 8 Measure the tim...

Page 40: ...ttery start with the positive terminal first Never check battery charge by placing a metal object across the posts 1 Disconnect the negative terminal and positive terminal 2 Remove the battery holder 3 Remove the used battery 4 Replace the new battery 5 Tighten the battery holder 6 Connect the positive terminal 7 Connect the negative terminal W1023996 Replacing Radiator Hoses and Clamp Bands CAUTI...

Page 41: ...hen bubbles do not come up any more 4 Open the air vent cock on top of the fuel injection pump 5 If equipped electrical fuel feed pump turn the key to AC position and pump the fuel up for 10 to 15 seconds If equipped mechanical fuel feed pump set the stop lever on stop position and crank the engine for 10 to 15 seconds 6 Close securely the air vent cock after air bleeding NOTE Q Always keep the ai...

Page 42: ...ion 6 After flushing fill with clean water and anti freeze until the coolant level is just below the port Install the radiator cap 1 securely 7 Fill with coolant up to FULL A mark on the recovery tank 3 8 Start and operate the engine for few minutes 9 Stop the engine and let cool Check coolant level of radiator and recovery tank 3 and add coolant if necessary IMPORTANT Q Do not start engine withou...

Page 43: ...g pressure atmospheric A higher boiling point is obtained by using a radiator pressure cap which permits the development of pressure within the cooling system NOTE Q The above data represents industrial standards that necessitate a minimum glycol content in the concentrated anti freeze When the coolant level drops due to evaporation add fresh soft water only to keep the anti freeze mixing ratio le...

Page 44: ...ole Code No 07909 39081 Assembly 07909 31301 L 07909 31291 K 07909 31311 M Application Use to measure diesel engine compression and diagnosis of need for major overhaul Adaptor L for 05 E2B series W1025289 Oil Pressure Tester Code No 07916 32032 Application Use to measure lubricating oil pressure W1024318 1 Gauge 2 L Joint 3 Adaptor A 4 Adaptor B 5 Adaptor C 6 Adaptor E 7 Adaptor F 8 Adaptor G 9 A...

Page 45: ... dia J 8 mm dia 0 31 in dia K 1 0 mm 0 039 in L 17 mm dia 0 67 in dia M 6 10 to 6 20 mm dia 0 2402 to 0 2441 in dia N 8 mm 0 31 in O 4 mm 0 16 in P 11 97 to 11 99 mm dia 0 4713 to 0 4720 in dia Q PF 1 2 R 23 mm 0 91 in S 17 mm 0 67 in T 4 mm 0 16 in U 12 00 to 12 02 mm dia 0 4724 to 0 4732 in dia V 100 mm 3 94 in W M12 P1 5 X 5 mm 0 20 in A 225 mm 8 86 in B 70 mm 2 76 in C 45 mm 1 77 in D 20 mm di...

Page 46: ...mm 4 7244 in D 21 8 to 21 9 mm dia 0 8583 to 0 8622 in dia E 24 8 to 24 9 mm dia 0 9764 to 0 9803 in dia F 20 mm dia 0 7874 in dia a 6 3 μm 250 μin b 6 3 μm 250 μin A 196 mm 7 7165 in B 26 mm 1 0236 in C 150 mm 5 9055 in D 25 8 to 25 9 mm dia 1 0157 to 1 0197 in dia E 28 8 to 28 9 mm dia 1 1339 to 1 1378 in dia F 20 mm dia 0 7874 in dia a 6 3 μm 250 μin b 6 3 μm 250 μin A 20 mm 0 79 in B 15 mm 0 5...

Page 47: ...to 2 0236 in dia H 47 3 to 47 5 mm dia 1 862 to 1 870 in dia C1 Chamfer 1 0 mm 0 039 in C2 Chamfer 2 0 mm 0 079 in C0 3 Chamfer 0 3 mm 0 012 in A 135 mm 5 31 in B 72 mm 2 83 in C 40 mm radius 1 57 in radius D 10 mm 0 39 in E 24 mm 0 95 in F 20 mm dia 0 79 in dia G 68 mm dia 2 68 in dia H 47 3 to 47 5 mm dia 1 862 to 1 870 in dia C1 Chamfer 1 0 mm 0 039 in C2 Chamfer 2 0 mm 0 079 in C0 3 Chamfer 0 ...

Page 48: ...m dia 2 05 in dia L 40 mm dia 1 57 in dia M 10 mm 0 39 in N 33 mm 1 30 in O 20 mm dia 0 79 in dia P 40 mm dia 1 57 in dia Q 72 10 to 72 15 mm dia 2 840 to 2 841 in dia R 73 mm dia 2 87 in dia S 83 mm dia 3 27 in dia C0 3 Chamfer 0 3 mm 0 01 in C1 Chamfer 1 mm 0 04 in C5 Chamfer 5 mm 0 2 in A 42 mm 1 65 in B 12 mm 0 47 in C 30 mm 1 18 in D M10 Pitch 1 25 E 2 mm 0 08 in F 10 mm 0 39 in G 2 0 mm 0 08...

Page 49: ...CONTENTS MECHANISM 1 ENGINE BODY M 1 1 CLOSED BREATHER NATURAL ASPIRATION TYPE ONLY M 1 2 GOVERNOR M 2 3 BOOST COMPENSATOR M 4 KiSC issued 06 2011 A ...

Page 50: ...opted to prevent the release of blow by gas into the atmosphere After its oil content is filtered by oil shield 4 the blow by gas in fed back to the intake manifold through breather valve 3 to be used for re combustion W1012956 1 Breather Tube 2 Cylinder Head Cover 3 Breather Valve 4 Oil Shield 5 Rubber Packing KiSC issued 06 2011 A ...

Page 51: ...s hooked to a slide plate and holds the control rack in the direction of the full fuel position Fork lever 2 9 and the floating lever are installed in fork lever 1 6 with the fork lever shaft 4 The max torque limitation 1 device limits the amount of the fuel exhalation at the overload with the torque pin W1012753 At Rated Operation When the engine is running the fork lever 2 9 and the floating lev...

Page 52: ...pply and suppresses the generation of black smoke W1013023 Q Two Lever Type Fork Lever for BG Series The engine speeds of BG engine are 1500 min 1 rpm and 1800 min 1 rpm specifications The fork lever assembly of BG series is composed of fork lever 1 3 fork lever 2 4 A slide plate is installed in fork lever 1 The governor spring 5 is hooked to fork lever 2 4 The start spring is hooked to a slide pl...

Page 53: ...ring the engine startup and acceleration The rod of actuator 2 is pushed out by the rise of boost pressure and the plate 3 moves in the direction of the fuel increase around the fulcrum A W1013615 1 Boost Compensator Assembly 2 Actuator 3 Plate 4 Injection Pump Assembly 5 Guide 6 Stop Solenoid A Fulcrum KiSC issued 06 2011 A ...

Page 54: ...m S 17 4 Fuel System S 19 5 Electrical System S 22 6 Turbocharger S 26 2 DISASSEMBLING AND ASSEMBLING S 27 1 Draining Oil and Coolant S 27 2 External Components S 27 3 Cylinder Head and Valve S 28 4 Gear Case and Timing Gears S 32 5 Piston and Connecting Rod S 37 6 Flywheel and Crankshaft S 40 7 Starter S 42 8 Alternator S 44 3 SERVICING S 45 1 Cylinder Head and Valves S 45 2 Timing Gears Camshaft...

Page 55: ... nut Incorrect injection timing Adjust S 19 Fuel camshaft worn Replace S 36 Injection nozzle clogged Clean or replace S 21 22 Injection pump malfunctioning Repair or replace S 20 35 Seizure of crankshaft camshaft piston cylinder or bearing Repair or replace S 58 to 64 S 36 to 39 Compression leak from cylinder Replace head gasket tighten cylinder head screw glow plug and nozzle holder S 29 30 31 Im...

Page 56: ...t Replace the turbocharger assembly S 28 Turbocharger fin or other part damaged due to foreign matters Replace the turbocharger assembly S 28 Either White or Blue Exhaust Gas Is Observed Excessive engine oil Reduce to specified level Piston ring and cylinder worn or stuck Repair or replace S 38 39 64 Incorrect injection timing Adjust S 19 Oil Leak into Exhaust Pipe or Suction Pipe Waste oil pipe c...

Page 57: ...38 39 Piston ring groove worn Replace piston S 37 to 39 Valve stem and valve guide worn Replace S 31 47 Crankshaft bearing and crank pin bearing worn Replace S 41 Oil leaking due to defective seals or packing Replace Fuel Mixed into Lubricant Oil Injection pump s plunger worn Repair or replace S 20 35 Deficient nozzle injection Repair or replace nozzle S 21 22 Injection pump broken Replace S 35 Wa...

Page 58: ...h dust Clean Inside of radiator corroded Clean or replace G 15 Coolant flow route corroded Clean or replace G 15 16 Radiator cap defective Replace Overload running Reduce the load Head gasket defective Replace S 30 31 Incorrect injection timing Adjust S 19 Unsuitable fuel used Use specified fuel 4 Battery Quickly Discharged Battery electrolyte insufficient Replenish distilled water and charge G 12...

Page 59: ...0217 to 0 0276 in Cylinder Head Surface Flatness 0 05 mm 0 0020 in Valve Recessing Intake and Exhaust 0 05 to 0 25 mm 0 0020 to 0 0098 in 0 40 mm 0 0157 in Valve Stem to Valve Guide Valve Stem Valve Guide Clearance O D I D 0 035 to 0 065 mm 0 0014 to 0 0025 in 6 960 to 6 975 mm 0 2741 to 0 2746 in 7 010 to 7 025 mm 0 2760 to 0 2765 in 0 10 mm 0 0039 in Valve Face Angle Intake Angle Exhaust 1 047 r...

Page 60: ...8 to 0 7866 in 20 000 to 20 021 mm 0 7874 to 0 7882 in 0 07 mm 0 0028 in Timing Gear Crank Gear to Idle Gear 1 Idle Gear 1 to Cam Gear Idle Gear 1 to Injection Pump Gear Idle Gear 1 to Idle Gear 2 Idle Gear 2 to Governor Gear Backlash Backlash Backlash Backlash Backlash 0 032 to 0 115 mm 0 0013 to 0 0045 in 0 036 to 0 114 mm 0 0014 to 0 0045 in 0 034 to 0 116 mm 0 0013 to 0 0046 in 0 033 to 0 117 ...

Page 61: ...0201 in 0 20 to 0 51 mm 0 0079 to 0 0201 in 0 80 mm 0 0315 in 0 80 mm 0 0315 in Camshaft Side Clearance Alignment 0 07 to 0 22 mm 0 0028 to 0 0087 in 0 30 mm 0 0118 in 0 01 mm 0 0004 in Cam Height Intake Exhaust 28 80 mm 1 1339 in 29 0 mm 1 1417 in 28 75 mm 1 1319 in 28 95 mm 1 1398 in Camshaft Journal to Cylinder Block Bore Camshaft Journal Cylinder Block Bore Oil Clearance O D I D 0 050 to 0 091...

Page 62: ...mm 0 0492 in Piston Ring Gap D905 E2BG D1005 E2BG V1305 E2BG Top Ring 0 25 to 0 40 mm 0 0098 to 0 0157 in 1 25 mm 0 0492 in Second Ring 0 25 to 0 40 mm 0 0098 to 0 0157 in 1 25 mm 0 0492 in Oil Ring 0 25 to 0 40 mm 0 0098 to 0 0157 in 1 25 mm 0 0492 in Piston Ring Gap D1105 E2BG V1505 E2BG Top Ring 0 30 to 0 45 mm 0 0118 to 0 0177 in 1 25 mm 0 0492 in Second Ring 0 30 to 0 45 mm 0 0118 to 0 0177 i...

Page 63: ...arance O D I D 0 029 to 0 091 mm 0 0011 to 0 0036 in 39 959 to 39 975 mm 1 5732 to 1 5738 in 40 004 to 40 050 mm 1 5750 to 1 5768 in 0 20 mm 0 0079 in Crankshaft Side Clearance 0 15 to 0 31 mm 0 0059 to 0 0122 in 0 50 mm 0 0197 in Cylinder Liner I D D905 E2B E2BG D1005 E2B E2BG V1305 E2B E2BG D1105 E2B E2BG D1105 T E2B V1505 E2B E2BG V1505 T E2B 72 000 to 72 019 mm 2 8346 to 2 8354 in 76 000 to 76...

Page 64: ...071 in Outer Rotor to Pump Body Clearance 0 100 to 0 180 mm 0 0039 to 0 0071 in Inner Rotor to Cover Clearance 0 025 to 0 075 mm 0 0010 to 0 0030 in Fan Belt Tension 7 0 to 9 0 mm 98 N 0 28 to 0 35 in 98 N 10 kgf 22 lbs Thermostat Valve Opening Temperature At Beginning Valve Opening Temperature Opened Completely 69 5 to 72 5 C 157 1 to 162 5 F 85 C 185 F Radiator Cap Pressure Falling Time 10 secon...

Page 65: ...00 min 1 rpm 0 27 to 0 31 rad 15 5 to 17 5 before T D C Pump Element Fuel Tightness 13 73 MPa 140 kgf cm2 1991 psi Delivery Valve Fuel Tightness 10 seconds 13 73 12 75 MPa 140 130 kgf cm2 1991 1849 psi 5 seconds 13 73 12 75 MPa 140 130 kgf cm2 1991 1849 psi Injection Nozzle Injection Pressure 13 73 to 14 71 MPa 140 to 150 kgf cm2 1991 to 2134 psi Injection Nozzle Valve Seat Valve Seat Tightness Wh...

Page 66: ...m 0 630 in 29 0 mm 1 142 in 0 05 mm 0 0020 in 0 20 mm 0 0079 in 10 5 mm 0 413 in Starter Electromagnetic Drive Type Commutator Difference Mica Brush O D O D Undercut Length 28 0 mm 1 102 in Less than 0 05 mm 0 0002 in 0 50 to 0 80 mm 0 0197 to 0 0315 in 16 0 mm 0 630 in 27 0 mm 1 063 in 0 4 mm 0 016 in 0 20 mm 0 0079 in 10 5 mm 0 413 in Alternator Stator Rotor Slip Ring Brush Resistance Resistance...

Page 67: ...by numbers punched on the screw and bolt heads Prior to tightening be sure to check out the numbers as shown below W1012705 Grade Nominal Unit Diameter Standard Screw and Bolt Special Screw and Bolt N m kgf m ft lbs N m kgf m ft lbs M6 7 9 to 9 3 0 80 to 0 95 5 8 to 6 9 9 8 to 11 3 1 00 to 1 15 7 23 to 8 32 M8 17 7 to 20 6 1 8 to 2 1 13 0 to 15 2 23 5 to 27 5 2 4 to 2 8 17 4 to 20 3 M10 39 2 to 45...

Page 68: ...5 Idle gear shaft screws M6 x 1 0 9 8 to 11 3 1 00 to 1 15 7 2 to 8 3 Fan drive pulley screw M14 x 1 5 235 4 to 245 2 24 0 to 25 0 173 6 to 180 8 Bearing case cover mounting screw M6 x 1 0 9 8 to 11 3 1 00 to 1 15 7 2 to 8 3 Glow plugs M8 x 1 0 7 8 to 14 7 0 8 to 1 5 5 8 to 10 8 Nozzle holder assembly M20 x 1 5 49 0 to 68 6 5 0 to 7 0 36 2 to 50 6 Nozzle holder 34 3 to 39 2 3 5 to 4 0 25 3 to 28 9...

Page 69: ...he cylinder wall through the glow plug hole or nozzle hole and measure the compression pressure again 8 If the compression pressure is still less than the allowable limit check the top clearance valve clearance and cylinder head 9 If the compression pressure increases after applying oil check the cylinder wall and piston rings NOTE Q Check the compression pressure with the specified valve clearanc...

Page 70: ... 1TC mark 1 on the flywheel and alignment mark 2 on the rear end plate so that the No 1 piston comes to the overlap position 6 Check the following valve clearance marked with using a feeler gauge NOTE Q The sequence of cylinder numbers is given as No 1 No 2 No 3 and No 4 starting from the gear case side After adjusting the valve clearance secure the adjusting screw with the lock nut W10155550 Numb...

Page 71: ...ne oil pressure switch to the specified torque W10349520 3 Cooling System Fan Belt Tension 1 Measure the deflection A depressing the belt halfway between the fan drive pulley and alternator pulley at specified force 98 N 10 kgf 22 lbs 2 If the measurement is not within the factory specifications loosen the alternator mounting screws and relocate the alternator to adjust W10356670 Engine oil pressu...

Page 72: ...and measure the time for the pressure to fall to 59 kPa 0 6 kgf cm2 9 psi 3 If the measurement is less than the factory specification replace the radiator cap W1054156 Radiator Water Leakage 1 Pour a specified amount of water into the radiator 2 Set a radiator tester 1 and an adaptor 2 and raise the water pressure to the specified pressure 3 Check the radiator for water leaks 4 For water leak from...

Page 73: ...ee the degree on flywheel The flywheel gas mark 1TC 10 and 20 for the crank angle before the top dead center of No 1 cylinder 8 If injection timing is out of adjustment readjust the timing with shims NOTE Q The liquid gasket is not required for assembling Shims are available in thickness of 0 20 mm 0 0079 in 0 25 mm 0 0098 in and 0 30 mm 0 0118 in Combine these shims for adjustments Addition or re...

Page 74: ...ressure 6 Stop the starter when the fuel jets from the injection nozzle After that turn the flywheel by the hand and raise the pressure to approx 13 73 MPa 140 kgf cm2 1991 psi 7 Now turn the flywheel back about half a turn to keep the plunger free Maintain the flywheel at this position and clock the time taken for the pressure to drop from 13 73 to 12 75 MPa from 140 to 130 kgf cm2 from 1991 to 1...

Page 75: ...le to measure the pressure at which fuel begins jetting out from the nozzle 3 If the measurement is not within the factory specifications replace the adjusting washer 1 in the nozzle holder to adjust it Reference Pressure variation with 0 01 mm 0 0004 in difference of adjusting washer thickness Approx 235 kPa 2 4 kgf cm2 34 psi W10182100 Valve Seat Tightness 1 Set the injection nozzle to a nozzle ...

Page 76: ...comes very explosive IMPORTANT Q If the machine is to be operated for a short time without battery using a slave battery for starting use additional current lights while engine is running and insulate terminal of battery If this advice is disregarded damage to alternator and regulator may result Battery Voltage 1 Stop the engine 2 Measure the voltage with a circuit tester between the battery termi...

Page 77: ...drometer at eye level The hydrometer reading must be taken at the highest electrolyte level Reference Specific gravity slightly varies with temperature To be exact the specific gravity decreases by 0 0007 with an increase of 1 C 0 0004 with an increase of 1 F in temperature and increases by 0 0007 with a decreases of 1 C 0 0004 with a decrease of 1 F Therefore using 20 C 68 F as a reference the sp...

Page 78: ...t switch W1019297 Magnetic Switch Test 1 Disconnect the battery negative cable from the battery 2 Disconnect the battery positive cable from the battery 3 Disconnect the leads from the starter B terminal 4 Remove the starter from the engine 5 Connect a jumper lead from the starter S terminal 1 to the battery positive terminal 2 6 Connect a jumper lead momentarily between the starter s body and the...

Page 79: ...s operating measure the voltage between two battery terminals If the voltage is between 13 8 V and 14 8 V the alternator is operating normally 3 If the results of alternator on unit test are not within the specifications disassemble the alternator and check the each component part for finding out the failure See the DISASSEMBLING AND ASSEMBLING and SERVICING for alternator 0000010745E Glow Plug Le...

Page 80: ...ding position after turn off the switch 4 7 If the plunger is not attracted the engine stop solenoid is faulty IMPORTANT Q Never apply the current for pulling coil more than two seconds when inspecting W1020600 6 Turbocharger Turbine Side 1 Check the exhaust port 3 and inlet port 5 side of turbine housing 1 to see if there is no exhaust gas leak 2 If any gas leak is found retighten the bolts and n...

Page 81: ...rain cock to drain coolant 2 Prepare an oil pan Remove the drain plug to drain engine oil in the pan W1021151 2 External Components Air Cleaner and Muffler 1 Remove the air cleaner 2 Remove muffler retaining nuts to remove the muffler When reassembling Install the muffler gasket so that its steel side face the muffler W1021239 Alternator and Fan Belt 1 Remove the alternator 1 2 Remove the fan belt...

Page 82: ...t manifold with turbocharger W1021474 3 Cylinder Head and Valve Cylinder Head Cover 1 Disconnect the breather hose 1 2 Remove the cylinder head cover screw 2 3 Remove the cylinder head cover 3 When reassembling Check to see if the cylinder head cover gasket is not defective W1028468 Injection Pipes 1 Loosen the screws to the pipe clamp 1 2 Detach the injection pipes 2 When reassembling Sent compre...

Page 83: ...seal and injection nozzle gasket must be changed when the injection nozzle is removed for cleaning or for service W1021255 Rocker Arm and Push Rod 1 Remove the rocker arm bracket screws 2 Detach the rocker arm assembly 1 3 Remove the push rods 2 When reassembling When putting the push rods 2 onto the tappets 3 check to see if their ends are properly engaged with the dimples IMPORTANT Q After insta...

Page 84: ...rbon type specification engine Engine serial number and cylinder head gasket W10205250 Model Type of Gasket Parts Number Serial Number D905 E2B E2BG Carbon gasket 16221 03310 4R0300 and below Metal gasket 1G032 03310 4R0301 and above D1005 E2B E2BG Carbon gasket 16231 03310 4Z0452 and below Metal gasket 1G040 03310 4Z0453 and above D1105 E2B E2BG D1105 T E2B Carbon gasket 1E010 03310 4J0010 and be...

Page 85: ...nd specified sequence a to n or r NOTE Q Do not use O ring on the pin pipe It is not necessary to retighten the cylinder head screw and to readjust valve clearance after engine warmed up W1030042 Tappets 1 Remove the tappets 1 from the crankcase When reassembling Visually check the contact between tappets and cams for proper rotation If defect is found replace tappets Before installing the tappets...

Page 86: ...ey 1 Secure the flywheel to keep it from turning 2 Remove the fan drive pulley screw 3 Draw out the fan drive pulley with a puller When reassembling Install the pulley to crankshaft aligning the mark 1 on them 3 cylinder engine Apply engine oil to the fan drive pulley retaining screw And tighten it W10181950 1 Thermostat Cover Mounting Screw 2 Thermostat Cover 3 Thermostat Cover Gasket 4 Thermosta...

Page 87: ...come off Measure L when the gear case mounting bolt is inserted in the gear case bolt hole and judge the installation position of the mounting bolt when you do not understand the installation position of the mounting bolt A L 18 mm 0 71 in Pipe Pin Position B L 13 mm 0 51 in Water Pipe Mounting C L 10 mm 0 39 in D Nut W1030917 1 Gear Case KiSC issued 06 2011 A ...

Page 88: ...sembling 1 Install the stop solenoid mounting bolt 3 in boost compensator assembly 2 and assemble it to the boost compensator installation position at the same time 2 Tighten the boost compensator mounting bolt 5 3 Remove the stop solenoid mounting bolt 3 4 Install the stop solenoid 1 and tighten the mounting bolt 3 NOTE Q Apply a liquid gasket Three Bond 1217D or equivalent to the boost compensat...

Page 89: ...sembling When installing the injection pump insert the control rack pin 2 firmly into the groove 7 of the thrust lever of fork lever NOTE Q Addition or reduction of shim 0 05 mm 0 0020 in delays or advances the injection timing by approx 0 0087 rad 0 5 In disassembling and replacing be sure to use the same number or new gasket shims with the same thickness W1033441 1 Notch 2 Control Rack Pin 3 Inj...

Page 90: ...external snap ring of the governor shaft Check the governor shaft for smooth rotation IMPORTANT Q There is a model of idle gear 1 4 and idle gear 2 7 by the difference of the method of transmission the power to the governor gear 6 When replacing the ball bearing of governor shaft securely fit the ball bearing 10 to the crankcase apply an adhesive Three Bond 1324B or equivalent to the set screw 13 ...

Page 91: ...ter of the flange as well as on the inner wall of each screw hole Cut the nozzle of the liquid gasket container at its second notch Apply liquid gasket about 5 mm 0 20 in thick Within 20 minutes after the application of fluid sealant reassemble the components Wait then for about 30 minutes and pour oil in the crankcase W10236610 Connecting Rod 1 Remove the connecting rod cap When reassembling Alig...

Page 92: ...ark on the connecting rod to the injection pump IMPORTANT Q Do not change the combination of cylinder and piston Make sure of the position of each piston by marking For example mark 1 on the No 1 piston When installing the piston into the cylinder place the gaps of all the piston rings as shown in the figure Carefully insert the pistons using a piston ring compressor 1 Otherwise their chrome plate...

Page 93: ... the oil ring gap 11 Apply engine oil to the piston pin When installing the connecting rod to the piston immerse the piston in 80 C 176 F oil for 10 to 15 minutes and insert the piston pin to the piston When installing the connecting rod to the piston align the mark 8 on the connecting rod to the fan shaped concave 9 NOTE Q Mark the same number on the connecting rod and the piston so as not to cha...

Page 94: ...he bearing case gasket 3 and the bearing case cover gasket 4 with correct directions Install the bearing case cover 6 to position the casting mark UP on it upward Apply engine oil to the oil seal 5 lip and take care that it is not rolled when installing Tighten the bearing case cover mounting screws with even force on the diagonal line W10292140 Tightening torque Flywheel screw 53 9 to 58 8 N m 5 ...

Page 95: ...assage in the main bearing cases Apply clean engine oil on the bearings Install the main bearing case assemblies in the original positions Since diameters of main bearing cases vary install them in order of makings b A B C from the gear case side Match the alignment numbers a on the main bearing case assembly 1 When installing the main bearing case 1 and 2 face the mark FLYWHEEL to the flywheel In...

Page 96: ...ut the armature 10 with the drive lever 3 NOTE Q Do not damage to the brush and commutator When reassembling Apply grease DENSO CO LTD No 50 or equivalent to the parts indicated in the figure Joint of solenoid switch a Bushing b Drive lever c Collar d Teeth of pinion gear e Armature shaft f W1012736 1 Solenoid Switch Mounting Nut 2 Starter Drive Housing 3 Drive Lever 4 Gasket 5 Solenoid Switch 6 B...

Page 97: ...housing 11 9 Remove the idle gear 6 and the overrunning clutch 5 10 Remove the magnet switch cover 9 11 Remove the plunger 10 NOTE Q Do not damage to the brush and commutator When reassembling Apply grease DENSO No 50 or equivalent to the idle gear and overrunning clutch portions W1012736 1 Through Bolt 2 Brush 3 Yoke 4 Armature 5 Overrunning Clutch 6 Idle Gear 7 End Frame 8 Brush Holder 9 Magnet ...

Page 98: ... drive end frame 2 9 Remove the retainer plate 5 10 Press out the bearing 4 from drive end frame 2 with a press and jig 11 Lightly secure the rotor with a vise to prevent damage and remove the bearing 7 with a puller When reassembling W1224556 1 Pulley 2 Drive End Frame 3 Stator 4 Bearing 5 Retainer Plate 6 Rotor 7 Bearing 8 Rear End Frame 9 Rectifier 10 IC Regulator 11 Brush Holder 12 Rear End Co...

Page 99: ...ey are out of spec check the oil clearance of the crank pin journals and piston pin NOTE Q Top clearance Width of the crushed plastigauge W1020190 Cylinder Head Surface Flatness 1 Clean the cylinder head surface 2 Place a straightedge on the cylinder head s four sides and two diagonal as shown in the figure 3 Measure the clearance with a thickness gauge 4 If the measurement exceeds the allowable l...

Page 100: ...alve replace the cylinder head W10768800 Clearance between Valve Stem and Valve Guide 1 Remove carbon from the valve guide section 2 Measure the valve stem O D with an outside micrometer 3 Measure the valve guide I D with a small hole gauge and calculate the clearance 4 If the clearance exceeds the allowable limit replace the valves If it still exceeds the allowable limit replace the valve guide W...

Page 101: ...ammer during replacement W10278890 Valve Seating 1 Coat the valve face lightly with prussian blue and put the valve on its seat to check the contact 2 If the valve does not seat all the way around the valve seat or the valve contact is less than 70 correct the valve seating as follows 3 If the valve contact does not comply with the reference value replace the valve or correct the contact of valve ...

Page 102: ... fit them with valve lapping tool 4 Check the valve seating with prussian blue The valve seating surface should show good contact all the way around W10283500 Valve Lapping 1 Apply compound evenly to the valve lapping surface 2 Insert the valve into the valve guide Lap the valve onto its seat with a valve flapper or screwdriver 3 After lapping the valve wash the compound away and apply oil then re...

Page 103: ...84360 Oil Clearance between Rocker Arm and Rocker Arm Shaft 1 Measure the rocker arm shaft O D with an outside micrometer 2 Measure the rocker arm I D with an inside micrometer and then calculate the oil clearance 3 If the oil clearance exceeds the allowable limit replace the rocker arm and measure the oil clearance again If it still exceeds the allowable limit replace also the rocker arm shaft W1...

Page 104: ... of the tappet guide bore with a cylinder gauge and calculate the oil clearance 3 If the oil clearance exceeds the allowable limit or the tappet is damaged replace the tappet Push rod alignment Allowable limit 0 25 mm 0 0098 in Oil Clearance between tappet and tappet guide bore Factory spec 0 020 to 0 062 mm 0 0008 to 0 0024 in Allowable limit 0 07 mm 0 0028 in Tappet O D Factory spec 19 959 to 19...

Page 105: ...Factory spec 0 032 to 0 115 mm 0 0013 to 0 0045 in Allowable limit 0 15 mm 0 0059 in Backlash between idle gear 1 and cam gear Factory spec 0 036 to 0 114 mm 0 0014 to 0 0045 in Allowable limit 0 15 mm 0 0059 in Backlash between idle gear 1 and injection pump gear Factory spec 0 034 to 0 116 mm 0 0013 to 0 0046 in Allowable limit 0 15 mm 0 0059 in equipped with idle gear 2 Backlash between idle ge...

Page 106: ...asure the camshaft alignment 4 If the measurement exceeds the allowable limit replace the camshaft W10296710 Cam Height 1 Measure the height of the cam at its highest point with an outside micrometer 2 If the measurement is less than the allowable limit replace the camshaft W10297880 Camshaft side clearance Factory spec 0 07 to 0 22 mm 0 0028 to 0 0087 in Allowable limit 0 30 mm 0 0118 in Camshaft...

Page 107: ...ear bushing using an idle gear bushing replacing tool See page SPECIAL TOOLS When installing 1 Clean a new idle gear bushing and idle gear bore and apply engine oil to them 2 Press in a new bushing using an idle gear bushing replacing tool until it is flush with the end of the idle gear W10302410 Oil clearance of camshaft journal Factory spec 0 050 to 0 091 mm 0 00197 to 0 00358 in Allowable limit...

Page 108: ... When installing 1 Clean a new small end bushing and bore and apply engine oil to them 2 Using a small end bushing replacing tool press in a new bushing service parts taking due care to see that the connecting rod oil hole matches the bushing hole W10307120 Piston pin bore I D Factory spec 22 000 to 22 013 mm 0 8661 to 0 8667 in Allowable limit 22 03 mm 0 8673 in Oil clearance between piston pin a...

Page 109: ...rod 2 Install the connecting rod on the connecting rod alignment tool 3 Put a gauge over the piston pin and move it against the face plate 4 If the gauge does not fit squarely against the face plate measure the space between the pin of the gauge and the face plate 5 If the measurement exceeds the allowable limit replace the connecting rod W10314620 Connecting rod alignment Allowable limit 0 05 mm ...

Page 110: ...o 0 40 mm 0 0098 to 0 0157 in Allowable limit 1 25 mm 0 0492 in Piston ring gap D1005 E2B V1305 E2B D1105 E2B V1505 E2B Top ring Factory spec 0 30 to 0 45 mm 0 0118 to 0 0177 in Allowable limit 1 25 mm 0 0492 in Second ring Factory spec 0 30 to 0 45 mm 0 0118 to 0 0177 in Allowable limit 1 25 mm 0 0492 in Oil ring Factory spec 0 25 to 0 40 mm 0 0098 to 0 0157 in Allowable limit 1 25 mm 0 0492 in P...

Page 111: ...to 0 40 mm 0 0098 to 0 0157 in Allowable limit 1 25 mm 0 0492 in Oil ring Factory spec 0 25 to 0 40 mm 0 0098 to 0 0157 in Allowable limit 1 25 mm 0 0492 in Piston ring gap D1105 E2BG V1505 E2BG Top ring Factory spec 0 30 to 0 45 mm 0 0118 to 0 0177 in Allowable limit 1 25 mm 0 0492 in Second ring Factory spec 0 30 to 0 45 mm 0 0118 to 0 0177 in Allowable limit 1 25 mm 0 0492 in Oil ring Factory s...

Page 112: ...e plate at both end journals 2 Set a dial indicator with its tip on the intermediate journal 3 Measure the crankshaft alignment 4 If the measurement exceeds the allowable limit replace the crankshaft W10330010 Crankshaft side clearance Factory spec 0 15 to 0 31 mm 0 0059 to 0 0122 in Allowable limit 0 50 mm 0 0197 in Oversize 0 2 mm 0 008 in 0 4 mm 0 016 in Dimension A 51 5 to 51 7 mm 2 028 to 2 0...

Page 113: ...hile the connecting rod screws are tightened Reference Undersize dimensions of crankpin W10331060 Oil clearance between crankpin and crankpin bearing Factory spec 0 029 to 0 091 mm 0 0011 to 0 0036 in Allowable limit 0 20 mm 0 0079 in Crankpin O D Factory spec 39 959 to 39 975 mm 1 5732 to 1 5738 in Crankpin bearing I D Factory spec 40 004 to 40 050 mm 1 5750 to 1 5768 in Undersize 0 2 mm 0 008 in...

Page 114: ...ing tool press in a new bearing 1 2 so that its seam 1 directs toward the exhaust manifold side See figure W10339460 Oil clearance between crankshaft journal and crankshaft bearing 1 Factory spec 0 034 to 0 114 mm 0 0013 to 0 0045 in Allowable limit 0 20 mm 0 0079 in Crankshaft journal O D Factory spec 47 934 to 47 950 mm 1 8872 to 1 8878 in Crankshaft bearing 1 I D Factory spec 47 984 to 48 048 m...

Page 115: ... Crankshaft journal O D Intermediate Factory spec 47 934 to 47 950 mm 1 8872 to 1 8878 in Crankshaft bearing 2 I D Factory spec 47 984 to 48 029 mm 1 8891 to 1 8909 in Oil clearance between crankshaft journal and crankshaft bearing 3 Factory spec 0 034 to 0 103 mm 0 0013 to 0 00405 in Allowable limit 0 20 mm 0 0079 in Crankshaft journal O D Flywheel side Factory spec 51 921 to 51 940 mm 2 0441 to ...

Page 116: ...and 200 C 302 and 392 F and fix the sleeve to the crankshaft as shown in figure 4 Press fit the sleeve using the auxiliary socket for pushing 3 NOTE Q Mount the sleeve with its largely chamfered surface facing outward Should heating is not enough a sleeve might stop halfway so careful W1045923 1 Crankshaft Sleeve 2 Sleeve Guide 3 Auxiliary Socket for Pushing 4 Crankshaft KiSC issued 06 2011 A ...

Page 117: ...tches If deep scratches are found the cylinder should be bored Refer to Correcting Cylinder W10343890 Cylinder I D Factory spec D905 E2B E2BG 72 000 to 72 019 mm 2 8346 to 2 8354 in D1005 E2B E2BG V1305 E2B E2BG 76 000 to 76 019 mm 2 9921 to 2 9929 in D1105 E2B E2BG D1105 T E2B V1505 E2B E2BG V1505 T E2B 78 000 to 78 019 mm 3 0709 to 3 0716 in Allowable limit D905 E2B E2BG 72 15 mm 2 8406 in D1005...

Page 118: ... factory specifications replace the oil pump rotor assembly W10355630 Oversized cylinder liner I D Factory spec D905 E2B E2BG 72 500 to 72 519 mm 2 85433 to 2 85507 in D1005 E2B E2BG V1305 E2B E2BG 76 500 to 76 519 mm 3 0118 to 3 0126 in D1105 E2B E2BG D1105 T E2B V1505 E2B E2BG V1505 T E2B 78 500 to 78 519 mm 3 0906 to 3 0913 in Allowable limit D905 E2B E2BG 72 65 mm 2 8602 in D1005 E2B E2BG V130...

Page 119: ...actory specifications replace the oil pump rotor assembly W10357320 7 Starter Overrunning Clutch 1 Check the pinion and if worn or damage replace the clutch assembly 2 Check that the pinion turns freely and smoothly in the overrunning direction and does not slip in the cranking direction 3 If the pinion slips or does not turn in both directions replace the overrunning clutch assembly NOTE Q Do not...

Page 120: ...r 2 Measure the brush length A with vernier caliper 3 If the length is than the allowable limit replace the yoke assembly and brush holder W1156360 Commutator O D Factory spec Electromagnetic drive type 28 0 mm 1 102 in Planetary gear reduction type 30 0 mm 1 181 in Allowable limit Electromagnetic drive type 27 0 mm 1 063 in Planetary gear reduction type 29 0 mm 1 142 in Difference of O D s Factor...

Page 121: ...t tester 2 If it conducts replace the armature 3 Check the continuity across the segments of the commutator with resistance range of circuit tester 4 If it dose not conduct replace the armature W1156507 Field Coil 1 Check the continuity across the lead 1 and brush 2 with a circuit tester 2 If it dose not conduct replace the yoke assembly 3 Check the continuity across the brush 2 and yoke 3 with a ...

Page 122: ...continuity across the slip ring and core with resistance range of circuit tester 4 If infinity is not indicated replace it W1020094 Slip Ring 1 Check the slip ring for score 2 If scored correct with an emery paper or on a lathe 3 Measure the O D of slip ring with vernier calipers 4 If the measurement is less than the allowable limit replace it W1020208 Brush Wear 1 Measure the brush length with ve...

Page 123: ...ectifier conducts in one direction and does not conduct in the reverse direction W1020452 IC Regulator 1 Check the continuity across the B terminal 2 and the F terminal 1 of IC regulator with resistance range of circuit tester 2 The IC regulator is normal if the conducts in one direction and does not conduct in the reverse direction W1020645 1 F Terminal 2 B Terminal KiSC issued 06 2011 A ...

Page 124: ...ERY SERVICE LTD 64 ISHIZU KITAMACHI SAKAI KU SAKAI CITY OSAKA 590 0823 JAPAN PHONE 81 72 241 1129 FAX 81 72 245 2484 E mail ksos pub kubota co jp KUBOTA Corporation Printed in Japan 2011 06 S EI EI e Code No 9Y011 02754 2004 02 S EI EI e ...

Reviews: