background image

PRINCESS  –  Edition: 17.02.2005

1

1

Unpacking - Installation . . . . . . . . . . . . . . . . . . . . . . . . . . . . . . . . . . . . . . . . . . . . .  4

1.1

Unlocking . . . . . . . . . . . . . . . . . . . . . . . . . . . . . . . . . . . . . . . . . . . . . . . . . . . . . . . . . . . . . . . . . . . . . . . . 4

1.2

Removal of shipping guards  . . . . . . . . . . . . . . . . . . . . . . . . . . . . . . . . . . . . . . . . . . . . . . . . . . . . . . . . 4

1.3

Verification of power voltage . . . . . . . . . . . . . . . . . . . . . . . . . . . . . . . . . . . . . . . . . . . . . . . . . . . . . . . . 4

1.4

Wall mounting  . . . . . . . . . . . . . . . . . . . . . . . . . . . . . . . . . . . . . . . . . . . . . . . . . . . . . . . . . . . . . . . . . . . . 5

1.5

Speaker connection. . . . . . . . . . . . . . . . . . . . . . . . . . . . . . . . . . . . . . . . . . . . . . . . . . . . . . . . . . . . . . . . 5

1.6

Power on. . . . . . . . . . . . . . . . . . . . . . . . . . . . . . . . . . . . . . . . . . . . . . . . . . . . . . . . . . . . . . . . . . . . . . . . . 6

2

Loading compact discs  . . . . . . . . . . . . . . . . . . . . . . . . . . . . . . . . . . . . . . . . . . . . .  7

2.1

Position of CDs in the magazines  . . . . . . . . . . . . . . . . . . . . . . . . . . . . . . . . . . . . . . . . . . . . . . . . . . . . 7

2.2

Remove magazines . . . . . . . . . . . . . . . . . . . . . . . . . . . . . . . . . . . . . . . . . . . . . . . . . . . . . . . . . . . . . . . . 7

2.3

CD handling precautions - CD and player cleaning . . . . . . . . . . . . . . . . . . . . . . . . . . . . . . . . . . . . . . 8

2.4

Inserting title cards . . . . . . . . . . . . . . . . . . . . . . . . . . . . . . . . . . . . . . . . . . . . . . . . . . . . . . . . . . . . . . . . 9

2.5

Programming number of CDs in the magazines. . . . . . . . . . . . . . . . . . . . . . . . . . . . . . . . . . . . . . . . 10

2.6

Adjustment of the page limitation . . . . . . . . . . . . . . . . . . . . . . . . . . . . . . . . . . . . . . . . . . . . . . . . . . . 11

3

Coin operation or free play?  . . . . . . . . . . . . . . . . . . . . . . . . . . . . . . . . . . . . . . . .  12

3.1

Coin operation . . . . . . . . . . . . . . . . . . . . . . . . . . . . . . . . . . . . . . . . . . . . . . . . . . . . . . . . . . . . . . . . . . . 12

3.2

Free play . . . . . . . . . . . . . . . . . . . . . . . . . . . . . . . . . . . . . . . . . . . . . . . . . . . . . . . . . . . . . . . . . . . . . . . . 12

3.3

Test credit. . . . . . . . . . . . . . . . . . . . . . . . . . . . . . . . . . . . . . . . . . . . . . . . . . . . . . . . . . . . . . . . . . . . . . . 13

4

Track selections . . . . . . . . . . . . . . . . . . . . . . . . . . . . . . . . . . . . . . . . . . . . . . . . . .  14

4.1

How to select a track . . . . . . . . . . . . . . . . . . . . . . . . . . . . . . . . . . . . . . . . . . . . . . . . . . . . . . . . . . . . . . 14

4.2

I do not like this track - the button CANCEL . . . . . . . . . . . . . . . . . . . . . . . . . . . . . . . . . . . . . . . . . . . 15

4.3

Albumplay - playing a whole CD  . . . . . . . . . . . . . . . . . . . . . . . . . . . . . . . . . . . . . . . . . . . . . . . . . . . . 16

5

Automatic random select . . . . . . . . . . . . . . . . . . . . . . . . . . . . . . . . . . . . . . . . . . .  17

6

Volume, sound and balance control . . . . . . . . . . . . . . . . . . . . . . . . . . . . . . . . . .  18

6.1

Volume, sound and balance control - amplifier F91. . . . . . . . . . . . . . . . . . . . . . . . . . . . . . . . . . . . . 18

6.2

Volume, sound and balance control - amplifier K99  . . . . . . . . . . . . . . . . . . . . . . . . . . . . . . . . . . . . 20

7

Coin and price settings  . . . . . . . . . . . . . . . . . . . . . . . . . . . . . . . . . . . . . . . . . . . .  22

7.1

Price settings . . . . . . . . . . . . . . . . . . . . . . . . . . . . . . . . . . . . . . . . . . . . . . . . . . . . . . . . . . . . . . . . . . . . 22

7.2

Examples  . . . . . . . . . . . . . . . . . . . . . . . . . . . . . . . . . . . . . . . . . . . . . . . . . . . . . . . . . . . . . . . . . . . . . . . 22

7.3

Free play programming. . . . . . . . . . . . . . . . . . . . . . . . . . . . . . . . . . . . . . . . . . . . . . . . . . . . . . . . . . . . 23

7.4

Color codes of coin input . . . . . . . . . . . . . . . . . . . . . . . . . . . . . . . . . . . . . . . . . . . . . . . . . . . . . . . . . . 23

7.5

Selecting, displaying and programming of top tunes  . . . . . . . . . . . . . . . . . . . . . . . . . . . . . . . . . . . 24

8

Programming short view  . . . . . . . . . . . . . . . . . . . . . . . . . . . . . . . . . . . . . . . . . . .  26

9

Jukebox programming . . . . . . . . . . . . . . . . . . . . . . . . . . . . . . . . . . . . . . . . . . . . .  27

9.1

Calling service programs . . . . . . . . . . . . . . . . . . . . . . . . . . . . . . . . . . . . . . . . . . . . . . . . . . . . . . . . . . 27

9.2

Programming of time functions . . . . . . . . . . . . . . . . . . . . . . . . . . . . . . . . . . . . . . . . . . . . . . . . . . . . . 28

9.3

Programming of the Playstimulator (random selections without coin insertion) . . . . . . . . . . . . . 29

9.4

BackGround Music (BGM), level 3 . . . . . . . . . . . . . . . . . . . . . . . . . . . . . . . . . . . . . . . . . . . . . . . . . . . 31

9.5

Happy hour pricing (additional bonus plays) . . . . . . . . . . . . . . . . . . . . . . . . . . . . . . . . . . . . . . . . . . 34

9.6

Number of tracks played successively on the same disc, level 2 button 3 . . . . . . . . . . . . . . . . . . 35

9.7

Disabling single tracks . . . . . . . . . . . . . . . . . . . . . . . . . . . . . . . . . . . . . . . . . . . . . . . . . . . . . . . . . . . . 35

Summary of Contents for PRINCESS

Page 1: ...R 18 PRINCESS 18 ...

Page 2: ... or even months of use Before you touch the player discharge your hands and tools by touching a grounded metal part of the jukebox such as the amplifier or the mechanism chassis Make sure that you are connected via a wrist wrap with resis tance to the same potential as the chassis of the jukebox Keep parts and tools at the same potential If you remove the player in case of repair or for transport ...

Page 3: ...his track the button CANCEL 15 4 3 Albumplay playing a whole CD 16 5 Automatic random select 17 6 Volume sound and balance control 18 6 1 Volume sound and balance control amplifier F91 18 6 2 Volume sound and balance control amplifier K99 20 7 Coin and price settings 22 7 1 Price settings 22 7 2 Examples 22 7 3 Free play programming 23 7 4 Color codes of coin input 23 7 5 Selecting displaying and ...

Page 4: ...scription of the amplifier K99 50 12 2 Technical data 50 12 3 Verification of power voltage 51 12 4 Position of fuses and plug connectors 52 12 5 The first power ON 53 12 6 Volume control 53 12 7 The infrared remote control 54 12 8 Treble and bass control 55 12 9 Automatic volume correction 55 12 10 Background Music volume attenuation 55 12 11 External speaker connection 56 12 12 External amplifie...

Page 5: ...r functions without S CC unit 72 16 2 Special test functions of the CD PRO player 74 17 Accessories 75 17 1 Microfone kit part no 0006953 75 17 2 BGM Connector 75 18 Steps to solve mechanical problems 76 18 1 Treating simple errors 76 18 2 Treating simple errors by hand 76 18 3 Set the mechanism to 0 position 76 19 Declaration of Conformity 78 ...

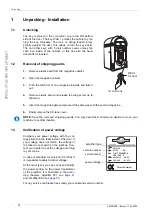
Page 6: ...ens cover NOTE Save the removed shipping guards You may need them should you decide to move your machine to another location 1 3 Verification of power voltage Compare your power voltage with the vol tage printed on the label inside of the door If your voltage does not match the voltage of the label do not switch on the jukebox Con tact your dealer to set the voltage according to your mains In case...

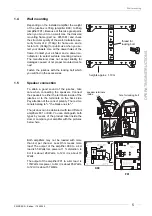
Page 7: ...minals inside Verstärker Sicherungen 210V 240V Si 1 Si 301 Si 2 Si 302 Si 102 Si 103 Si 100 Si 101 MT 4A T 3 15A 100V 117V Si 1 Si 301 Si 2 Si 302 T 5A Si 102 Si 103 Si 100 Si 101 T 3A Zur Beachtung Nur Sicherungen mit gleicher Größe und gleichem Wert verwenden um Schäden zu vermeiden Caution To reduce the risk of fire replace only with same type and rating fuses Achtung Vor Abnahme der Kappe den ...

Page 8: ... than their rating After having connected all speakers disconnect the moni tor speaker inside the jukebox It is for test purposes only 1 6 Power on NOTE Make sure that power outlet is grounded properly Insert the power plug Set the power switch on the L H side of the jukebox to on The illumination will light The selection sledge starts an initialisation run and the coun ting of the disc compartmen...

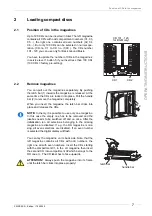
Page 9: ...2 to remove the magazine completely When you insert the magazine the latch bar clicks into place and releases the CDs NOTE In theory it is possible to use only one magazine In this case the empty one has to be removed and the jukebox needs to be switched off and on once After the initialisation run all selections belonging to the missing magazine are disabled If e g the RH magazine is mis sing all...

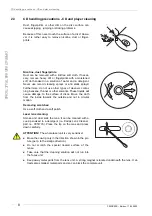
Page 10: ...eaners contai ning benzene thinner or other solvents These liquids will cause damage to the surface of discs Move the cloth from the inside towards the outside and not in circular motion Removing scratches Use a soft cloth and a soft polish Laser lens cleaning Smoke and dust soils the lens It can be cleaned with a cue tip soaked in a detergent i e Kodak Lens Cleaner part no 0051735 Place the tip o...

Page 11: ...shown in the picture After in serting a page turn it forward and backward once to check its propper function If the page system works properly the red LED lights continuously A blinking LED indicates the following errors 1x LH light gate indicates an error or is defective 2x Lead through gate indicates an error or is defective 3x RH light gate indicates an error or is defective 4x no or to slow pa...

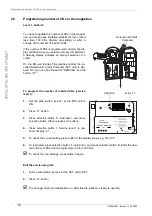
Page 12: ...l 1 is rea ched Display is 1_ _ _ 5 To check the current setting press button 5 the display shows e g 50 or 00 6 To reprogram press selection button 5 hold down and press selection button R Enter the desi red number of CDs with two digits enter 00 for 100 CDs To check the new settings press button 5 again Exit the service program 1 Set the slide switch service at the SCC unit to OFF 2 Press LT but...

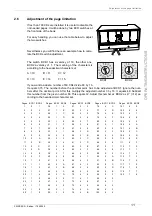
Page 13: ...t BCD2 as C 12 ac cording to the hexadecimal character set Pages BCD1 BCD2 Pages BCD1 BCD2 Pages BCD1 BCD2 Pages BCD1 BCD2 Pages BCD1 BCD2 1 0 1 26 1 A 51 3 3 76 4 C 101 6 5 2 0 2 27 1 B 52 3 4 77 4 D 102 6 6 3 0 3 28 1 C 53 3 5 78 4 E 103 6 7 4 0 4 29 1 D 54 3 6 79 4 F 104 6 8 5 0 5 30 1 E 55 3 7 80 5 0 105 6 9 6 0 6 31 1 F 56 3 8 81 5 1 106 6 A 7 0 7 32 2 0 57 3 9 82 5 2 107 6 B 8 0 8 33 2 1 58 ...

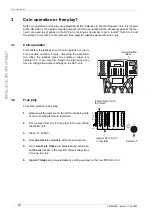
Page 14: ...ted for If you want to change the play prices you have to change the jumper settings on the SCC unit 3 2 Free play To set the jukebox to free play 1 Remove all the jumpers on the SCC unit taking note of current setting for future reference 2 Set a jumper from 0 to F free play in the row GP on the S CC unit 3 Press LT button 4 Now one track is selectable without coin insertion 5 From two to six tra...

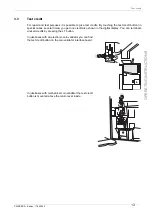
Page 15: ...utton in special cases several times you get one credit also shown in the digital display You can terminate unused credits by pressing the LT button In jukeboxes with an electronic coin validator you can find the test credit button on the coin validator interface board In jukeboxes with mechanical coin validator the test credit button is mounted above the return lever inside ...

Page 16: ...s and executes a selection also made by mistake By pressing the button R the available credit will be displayed for a few seconds The display flashes After entering the fourth digit of a selection the jukebox starts to search and play the selected CD immediately If the display flashes the entered selection was not valid Check if credit is available if the selection is higher than the programmed nu...

Page 17: ...ße und gleichem Wert verwenden um Schäden zu vermeiden Caution To reduce the risk of fire replace only with same typ and rating fuses Netzspannung 50 60 Hz Mains Voltage 50 60 cps Netzspannung 50 60 Hz Mains Voltage 50 60 cps 240 230 220 210 117 100 240 230 220 210 117 100 CAUTION CAUTION TO REDUCE THE RISK OF FIRE REPLACE ONLY WITH SAME TYPE AND RATING FUSE TO REDUCE THE RISK OF FIRE REPLACE ONLY...

Page 18: ...ection button R hold down and press selection button 0 then release both buttons 4 Press selection button 1 Service level 1 is reached Display is 1_ _ _ To enable Albumplay press selection button 9 hold down and press selection button R Release both buttons Enter 01 to enable or 00 to disable Albumplay ATTENTION If you press the CANCEL button while a complete CD is playing as long as the last trac...

Page 19: ... 29 On jukeboxes with F91 amplifier or without remote con trols you can switch on CONTINUOUS PLAY with the continuous play switch Part number is 0034410 It has to be connected to P8 of the SCC unit RCS K No 0059745 SELECTION 1 2 3 4 5 6 RESET POWER OPTION 7 8 9 0 CANCEL MUTE VOLUME INTERN CHANNEL 1 EXTERN CHANNEL 2 button to switch continuous on and off play MEMORY Stecker von OFF auf ON umstecken...

Page 20: ... LED lights button increases volume button decreases volume BASS Press MODE button once Bass LED lights button increases bass volume button decreases bass volume TREBLE Press MODE button twice Treble LED lights button increases treble volume button decreases treble volume BALANCE Press MODE button 3 times Balance LED lights button increases right hand channel volume and decreases left hand channel...

Page 21: ...s located in the cash box If credit is given or free play is programmed a CD can be selec ted with the buttons 0 to 9 and R Double button functions as required in the service programs i e press button 5 hold down and press button R are impossible For this you only can use the keyboard of the jukebox The meanings of the music control buttons are according to the buttons on the control terminal on t...

Page 22: ...els to an equal level The level of CDs with a high level will be reduced the level of low levelled CDs will be increased This control works rather slow to save the dynamic range of the track You can enable the correction with the DIP switch AVC the 3rd DIP swich of the 6 sw group Default is AVC disabled With the second DIP switch of the 6 sw group you can reduce the intensity of volume correction ...

Page 23: ...ternal speakers The external buttons control the volume of the K99 RCA jacks for an optional external amplifier In 2 channel mode you can control the external speakers by the buttons and of the external channel Beam the jukebox directly if possible You can connect the wire remote control box as well The power on volume level is always set by the channel 1 and 2 pots on the amplifier or on the cont...

Page 24: ...ory 0045411 P8 P5 P6 1 6 1 5 1 8 GP GP 6 BS B4 B3 B2 B1 F 6 5 4 3 2 0 7 6 5 4 3 2 0 6 5 4 3 2 1 0 6 5 4 3 2 1 0 6 5 4 3 2 1 0 ON OFF SERVICE Z K T T 2 3 BR 1 2 4 5 T1 10 20 B T M LT 1 2 4 3 GB 1 50p 20p 10p 1 play 30 p 2 plays 50 p 5 plays 1 2 1 20ct 50ct 10ct 1 play 1 3 plays 2 USA 25cts 1 00 1 00 1 play 50 cts 3 plays 1 00 18 plays 5 00 USA 25cts 1 00 1 00 1 play 50 cts 3 plays 1 00 21 plays 5 0...

Page 25: ... position OFF si le Top Tunes le compteur de popularité et la contenu de la caisse sont demandés ACHTUNG ATTENTION ATTENTION CD TOWER Selection Credit Computer CDM 12 ON OFF Memory 0045411 P8 P5 P6 1 6 1 5 1 8 GP GP 6 BS B4 B3 B2 B1 F 6 5 4 3 2 0 7 6 5 4 3 2 0 6 5 4 3 2 1 0 6 5 4 3 2 1 0 6 5 4 3 2 1 0 ON OFF SERVICE Z K T T 2 3 BR 1 2 4 5 T1 10 20 B T M LT LT BS GP Cash flow 111 DIP switches on in...

Page 26: ...om TT Top Tunes of the SCC unit to 2 the jukebox plays two additional tracks in our example 9 tracks If you set a jumper from TT to 3 the jukebox plays 3 additional tracks in our example 10 tracks To find out which tracks will be played after selecting 9999 you can display the tracks by entering 9998 At first the most played track will be displayed Then you have to enter 9998 again and the jukebox...

Page 27: ...PRINCESS Edition 17 02 2005 25 OPERATING INSTRUCTIONS pulse plays from GP from bonus step plays B1 B4 total plays inserted money 1 2 3 4 5 6 7 8 9 10 11 12 13 14 15 16 17 18 19 20 21 22 23 24 25 Price settings 1 2 4 5 T1 10 20 T B test credit GND 35 V ...

Page 28: ...l Display CDs in memory Box sel memory Display contents number of plays test magazines bad reserved ID reset 1 CD no printer start program CDs Albumsel Display Flops 1 CD no 2 plays Month Weekday per CD tracks reserved Hour Hour stimulator stimulator Time Day Year tracks disabled Happy Happy Play Play HH MM DD MM YY WW CD TT time price start Interval stop 2 plays button 2 R version 01 99 8digits e...

Page 29: ...operly Calling service levels By pressing the LT button The display shows the actual service level number in the LH digit Each option can be called by pres sing the corresponding selection button Calling a certain service level recommen ded method Press selection button R hold down and press selection button 0 Release both but tons The display is dark Enter the number of the desired service le vel...

Page 30: ...buttons Enter the correct date with four digits 9 2 3 Set year and weekday level 2 button 2 To display the year and the weekday press selection button 2 The weekdays are assigned to numbers as shown To program press selection button 2 hold down and press selection button R Release both but tons Enter the correct year with two digits then enter a 0 followed by the number of the weekday Exit the ser...

Page 31: ...f no credit is available 1 Set the slide switch service at the SCC unit to ON 2 Press LT button Display shows e g _ 4 0 9 409 or higher SCC program version 3 Press selection button R hold down and press selection button 0 then release both buttons The display is dark 4 Press selection button 2 Service level 2 is reached Display shows 2_ _ _ 5 Press selection button 9 The display shows three digits...

Page 32: ...T TIME with three digits To check the settings Press button 9 again 9 3 2 Programming start and stop time level 2 button 8 Press selection button 8 The display shows at first a flashing 1 This means start time Then the time will be displayed here 14 05 o clock 2 05 p m Press selection button 8 once again The display shows now a flashing 2 This means stop time Then the time will be displayed here 1...

Page 33: ... is adjustable with the two BGM pots RH channel LH chan nel on the amplifier BGM mode is active when the LED on the amplifiers lights The source of the BGM control signal is the SCC unit plug brown X6 pin 1 Once the BGM mode is acti vated it is not possible to operate the Playsti mulator If a selection is made by means of coin insertion the track being played will be interrupted imme diately Two i...

Page 34: ...GM CDs B not used always 0 C BGM mode You can determine the digit for the BGM mode as follows Select the desired features and add the corresponding code numbers Enter the sum of the code numbers as the mode digit Example To program press selection button 8 hold and press selection button R The digital display goes dark Enter start position 2 digits followed by a 0 and the BGM mode 1 digit After en...

Page 35: ...me two programmed time will be displayed here 23 45 o clock To program press selection button 0 or button 1 6 depending on the week day to be programmed The digital display goes dark Enter the two time zo nes in four blocks containing four digits per block one after another 16 digits Table of weekdays Examples The jukebox should play BGM on Tuesday from 9 30 to 11 45 and from 17 00 to 19 55 To pro...

Page 36: ...ain The display shows flashing 2 means stop time the stop time will be displayed with four digits e g 12 30 o clock 7 To reprogram press selection button 6 hold and press selection button R The digital display goes dark Enter the Happy hour start and stop time with 8 digits After complete entry the digital display is dark Example Happy Hour should operate from 09 05 to 11 00 o clock Enter 8 figure...

Page 37: ...button 3 hold and press selection button R The digital display goes dark Enter the desired setting by means of the selection buttons with two digits If you set this value to 01 all selections will be played in selection order 7 To check the settings Press selection button 3 again 8 To exit the service program set the slide switch service at the SCC unit to OFF and press the LT button once The chan...

Page 38: ...xt track to be disabled with step 8 10 To check the diabled tracks Press selection button 4 again up to 25 times for 25 disabled tracks 11 To exit the service program set the slide switch service at the SCC unit to OFF and press the LT button To enable a disabled track When a track is indicated press button 4 hold and press selection button R and enter first the number of the CD followed by 0 0 To...

Page 39: ...n insertion if credits of the 4th bonus level have been obtained or in free play modus link in row GP from 0 to F on the SCC unit of the jukebox Memory reset feature will cancel remaining credits and selections by power off of the jukebox This option prevents the jukebox playing preselected tracks from the day before the jukebox was swit ched off in the night To change the settings Service program...

Page 40: ... 1 button 0 1 Press selection button 0 once At first the least played CD is shown The last two digits are simply a code confirming the least played status The display shows alternately the disc number and the number of plays e g If the counter shows 0 0 0 0 this means the disc has not been played Press selection but ton 0 to continue the process for the second least played disc and so on At first ...

Page 41: ...edure press selection button R 10 1 4 Total number of plays level 1 button 3 1 Press selection button 3 once Display shows the total number of plays since last reset maxi mum 9999 2 To cancel the procedure press selection button R 10 1 5 CLEAR ALL counters reset to 0 0 0 0 level 1 button 3 reset 1 Press selection button 3 hold and press selection button R reset The counters belonging to the button...

Page 42: ...D is registered every new try will be counted So it is possible to find out defective discs and exchange these for new ones 1 Press selection button 6 the display shows flashing 1 means first defective CD then e g A CD number B NUMBER of times the CD was not playable or interrupted 2 Press selection button 6 to display the next not playable CD etc After displaying the 6th not playable CD and press...

Page 43: ...x 540W Verstärker Sicherungen 210V 240V Si 1 Si 301 Si 2 Si 302 Si 102 Si 103 Si 100 Si 101 MT 4A T 3 15A 100V 117V Si 1 Si 301 Si 2 Si 302 T 5A Si 102 Si 103 Si 100 Si 101 T 3A Zur Beachtung Nur Sicherungen mit gleicher Größe und gleichem Wert verwenden um Schäden zu vermeiden Caution To reduce the risk of fire replace only with same type and rating fuses Achtung Vor Abnahme der Kappe den Netzste...

Page 44: ...use Si1 T4A T5A 70V L H channel power stage Fuse Si2 T4A T5A 70V L H channel power stage No sound in the L H channel Speaker relay is not activated green LED does not light Fuse Si301 T4A T5A 70V R H ch power stage Fuse Si302 T4A T5A 70V R H ch power stage No sound in the R H channel Speaker relay is not activated green LED does not light Fuse Si100 T3 15A T3A supply 30 V The jukebox operates norm...

Page 45: ...ues These values can be set with different binary DIP switch combinati ons The switches are located on the amplifier pre amp board You can find the recommended set tings on the amplifier cover Low Level BGM Mic Kit L R Line Out L R Input Tape L R Input CD Amplifier F91 0039155 BGM Level R L L R Clipping P10 Remote P10 Remote P4 1 2 4 1 2 4 Tone off on Treble Bass 1 2 4 8 16 32 1 2 4 8 16 32 Volume...

Page 46: ...V Si 1 Si 301 Si 2 Si 302 Si 102 Si 103 Si 100 Si 101 MT 4A T 3 15A 100V 117V Si 1 Si 301 Si 2 Si 302 T 5A Si 102 Si 103 Si 100 Si 101 T 3A Zur Beachtung Nur Sicherungen mit gleicher Größe und gleichem Wert verwenden um Schäden zu vermeiden Caution To reduce the risk of fire replace only with same type and rating fuses Achtung Vor Abnahme der Kappe den Netzstecker ziehen Attention Pull power plug ...

Page 47: ... each channel at a load of 4Ω is 170 W rms i e the min power consumption of a 4Ω speaker set should be 200 Watts All speakers must be connected with the correct polarity The speakers may be operated as desired in the mode STEREO or 2 CHANNEL In STEREO mode the sound reproduction is al ways stereo In 2 CHANNEL mode it is possible to control the volume of both channels independent to each other It a...

Page 48: ...s and in parallel with one 8Ω spea ker Low Level BGM Mic Kit L R Line Out L R Input Tape L R Input CD Amplifier F91 0039155 BGM Level R L L R Clipping P10 Remote P10 Remote P4 1 2 4 1 2 4 Tone off on Treble Bass R L S1 S1 P12 Volume Mode Input CD Stereo Tape 2 Kanal R mode switch position STEREO 2 channel Stereo slide switch S1 L R 2K Volume 8 100W _ 8 100W _ 8 100W _ 8 100W _ monitor speaker L H ...

Page 49: ...cted in series Example 2 1st room a speaker of 4Ω 200W 2nd room 4speaker of 16Ω 50W connected in parallel Low Level BGM Mic Kit L R Line Out L R Input Tape L R Input CD Amplifier F91 0039155 BGM Level R L L R Clipping P10 Remote P10 Remote P4 1 2 4 1 2 4 Tone off on Treble Bass 1 2 4 8 16 32 1 2 4 8 16 32 Volume off on R L Mode Input CD Stereo Tape 2 Kanal R L Volume Mode Input CD Stereo Tape 2 Ka...

Page 50: ...t will have an effect on the AVC circuit and the volume will be reduced Occasional lightning of the clipping LEDs during a loud performance is normal Continuously lightning of one or both LEDs indicates an overdriven channel and dis tortion can be heard It is recommended to re duce the volume Also speakers with an impedance lower than 4Ω in STEREO mode may cause an overload and the LEDs will light...

Page 51: ...tages and no high sublow frequencies It also indicates that the load limi tation cut off has been reached If only one test is not successful the relays will be switched off 11 11 Tape input Additional to the CD input a tape input with a higher input sensivity is provided As an op tion this input stage may be wi red as a correcting network to work with a magnetic pick up RIAA Set the input DIP swit...

Page 52: ...ollable with pot Automatic volume correction AVC switchable 2 channel operation switchable RH internal speakers LH external speakers Status display with 7segment display Independent controllable RCA output to connect external amplifiers For use with the old and the new changer mechanism Optional Remote control of F91 with large distance range Functions track selection volume chan 1 vo lume chan 2 ...

Page 53: ...erminals 1 to 9 primary side indicates the current voltage setting The following combinations are possible 240V 1 9 230V 1 8 220V 2 9 210V 2 8 117V 1 6 100V 2 6 Notice that these settings cannot be made on machines produced accor ding to UL standard NOTE Never connect the fluorescent supply to other contact If you intend to change the power vol tage for a higher voltage e g from 117V to 230V it is...

Page 54: ...ogrammed a CD will be placed on turntable but is not spinning Fuse F2 T4A supply 26V Fuse F3 T4A supply 26V The colour tubes of the One More Time do not rotate the heating of the bubble tubes is off no bubbles will appear Possibly defect of the power stage of the amp lifier Fuse F4 T4A supply 12 V SCC unit dead digital display dark except red LED M still lighting up on coin insertion The LEDs K an...

Page 55: ...REO ANAL HANNEL TEREO 2 K 2 C S S F ICHERUNG USE F1 F4 100 240V 50Hz 60Hz 117 V 60Hz 3 0 AMP 250 V AC SLOW BLOW T 4 A 30V AC F1 26V AC F2 26V AC F3 12V DC F4 I L NTERNER AUTSPRECHER NTERNAL PEAKER I S O PTION O PTION R L E L E S 8 80 W XTERNER AUTSPRECHER XTERNAL PEAKER W CD T CD T RAFO RANSFORMER B T UBBLE UBES N T ETZTRAFO RANSFORMER E E RWEITERUNG XTENSION F R C ERNREGLER EMOTE ONTROL RS 232 BG...

Page 56: ...rs The external buttons control the volume of the K99 RCA jacks for an optional external amplifier In 2 channel mode you can control the external speakers by the buttons and of the external channel Beam the jukebox directly if possible You can connect the wire remote control box as well The power on volume level is always set by the channel 1 and 2 pots on the amplifier or on the control box if co...

Page 57: ...AKER I S O PTION O PTION R L E L E S 8 80 W XTERNER AUTSPRECHER XTERNAL PEAKER W CD T CD T RAFO RANSFORMER B T UBBLE UBES N T ETZTRAFO RANSFORMER F R C ERNREGLER EMOTE ONTROL RS 232 BGM I R I R NFRAROT EGLER NFRARED EMOTE A O L R USGANG UTPUT E CD I CD L R INGANG NPUT E E 300mV XTRA XTRA E 300mV I L R INGANG NPUT M M IKROFON ICROPHONE MECHANIK MECHANISM D A R C ECKEL BNEHMEN EMOVE OVER D A R C ECK...

Page 58: ...Make sure that all spea kers are connected in correct polarity Position of the Stereo Mono DIP switch 1 the mode switch in the 6 sw group 2 the stereo 2 channel switch 3 and the external speaker terminals 4 CAUTION TO REDUCETHE RISK OF FIRE REPLA CE ONL Y WITH SAMETYPE AND RATING FUSE Bass Treble BGM M S ONO TEREO ANAL HANNEL TEREO 2 K 2 C S S F ICHERUNG USE F1 F4 100 240V 50Hz 60Hz 117 V 60Hz 3 0...

Page 59: ...4A 100 117V F 6A Leuchtstofflampen Fluorescent Lamps 230V 117V Verstärker Amplifier Externer Hauptschalter External Mains switch Schein annehmer Bill acceptor Achtung Vor Abnahme der Kappe den Netzstecker ziehen Warning Shock hazard Do not open Zur Beachtung Nur Sicherungen mit gleicher Größe und gleichem Wert verwenden um Schäden zu vermeiden Caution To reduce the risk of fire replace only with s...

Page 60: ...ion leaflets TI MA 116 for F91 12 14 Input selector With the 5th DIP switch of the 6 sw group you can set either CD or tape input as active AVC RS232 MICRO TAPE MUTE A D NZEIGE ISPLAY BGM ok S S CHALTER WITCHES A O US FF A O US FF E O IN N E O IN N A A VC VC MODE STEREO 2 K 2C ANAL HANNEL INPUT CD TAPE BGM 1 1 3 5 2 2 4 6 SEPARATE NORMAL AUTO VOLUME RS232 MUTE HIGH LOW PARALLEL SERVICE AUS OFF ERW...

Page 61: ...its own line with sufficient cross section 6 When an output transformer is used no speakers should be connected to the screwing terminals on the power amplifier board P4A 7 Note The 2 channel option can not be used in connection with an output transformer without modifying the pre amp board The internal speakers can be operated with lower volume switches on the connecting board In po sition HIGH p...

Page 62: ...rs per channel is lower than the delivered amplifier outlet power all speakers may work with the maximum power a power reserve additionally For an efficient use of the speaker power the optimum impedance in conjunction with the output transformer connection possibilities has to be determined Delivered maximum power in Watt if speakers with an impedance of xx Ohm are connected F91 K99 Voltage ap pl...

Page 63: ...r has to be connected in cor rect polarity with the 70V terminals of the Deutsche Wurlitzer GmbH output transformer It is not allowed to consume more power than the amplifier is able to supply 23W or 45W minus the additi onal speakers eventually connected to the output transformer At some 70V systems the load is ca pable of variation KL 32 8V 30V HIGH HIGH LOW 22V 6V 2V 0V 0V 70V KR 1 2 3 4 5 6 32...

Page 64: ...h buttons 4 Press selection button 4 Service level 4 is reached Display shows 4_ _ _ 14 1 1 Retrieval of the last occured mechanism faults The SCC unit stores up to 9 of the last occurred mechanism error codes procedure step codes If more errors have occured only the latest 9 are stored 1 Press selection button 8 display shows flashing 1 1st error code then eg 1st error code is always 000 memory c...

Page 65: ...67 In this example the machine has placed and replaced the CDs 1 603 467 times in rest in action meaning 32 160 selection sledge has reached the vertical take out position 33 161 open gripper before taking a CD 34 162 move gripper into magazine 35 163 close gripper get a CD 36 164 get a CD from magazine and move to the vertical transport level LH or RH side 37 165 move the CD player move sledge to...

Page 66: ...ll be displayed with 8 digits too To display the complete value 1 Press selection button 8 as often as display shows flashing 15 next displayed value are the 4 high value digits of the power up counter then e g value 2 Press selection button 8 again display shows flashing 16 next displayed value are the 4 low value digits of the power up counter then e g value In this example the power was switche...

Page 67: ...ss selection button 0 than release both buttons The display is dark 4 Press selection button 4 Service level 4 is reached Display shows 4_ _ _ 15 2 1 Take CD to turntable level 4 button 0 Press selection button 0 and enter the desired CD number This function is not supported by program versions below 4 09 15 2 2 Step selection sledge upwards level 4 button 2 Press selection button 2 The button has...

Page 68: ...lection button 4 A CD is taken from the actual sledge CD position and placed on the turn table The service program automatically jumps to service level 5 15 2 6 Mechanism continuous tests level 4 button 9 To locate certain faults occurring only from time to time it may be helpful to run continuous tests Du ring the tests described below the display shows special procedure step codes These codes ar...

Page 69: ...vel 21 149 move sledge to magazine return position 22 150 move gripper with CD into magazine 23 151 open gripper 24 152 move gripper out of magazine 25 153 move sledge to 0 position 26 CD is taken back end of procedure 32 160 selection sledge reaches the vertical take out position 33 161 open gripper before taking a CD 34 162 move gripper into magazine 35 163 close gripper get a CD 36 164 get a CD...

Page 70: ...e 15 3 1 Light gate snapshot level 4 button 7 To start the test Press selection button 7 By pressing selection button 7 a snapshot of the actual gate state will be made Then this state will be displayed in a co ded form An interrupted gate sends a 0 to the corresponding digit in the display Two gates are combined in the second and fourth digit from RH side of the display Both left and right gates ...

Page 71: ...ected test you can carry out special actions by means of the selection buttons 3 and 4 If you use the selection buttons 5 or 6 each action will be stopped at an occurring bright dark or dark bright change auto edge stop of the gate Meaning of the tests 0 Test VLL VLR together VLL is dis played in the RH digit INT1 VLR in the second digit from RH INT2 1 gate is interrupted 0 gate is open Button 3 5...

Page 72: ...64 because these tests are parts of complete test procedures 1 Set the slide switch service at the SCC unit to ON 2 Press LT button Display shows e g _ 4 0 9 409 or higher SCC program version 3 Press selection button R hold down and press selection button 0 than release both buttons The display is dark 4 Press selection button 5 Service level 5 is reached Display is 5_ _ _ 15 4 1 CD player check S...

Page 73: ...ed 15 4 3 PREVIOUS level 5 button 9 Service level 5 has to be reached and a CD has to be placed on the turntable ref to chap 7 2 4 Press selection button 9 several times too The player jumps to the previous track with each button actuation If track 1is reached it will be played continuously If button 6 is pressed in between the remaining tracks of the CD will be played 15 4 4 STOP level 5 button 5...

Page 74: ...h a dark phase of ap prox 1 sec followed by the digits shown one after another with dark phase of 100 msec between each digit The most significant digit will be dis played at first After power on and after a general reset command display shows 8 the pro gram version number of the Deutsche Wurlitzer GmbH CD control unit will be displayed with four digits followed by the version number of the CD PRO...

Page 75: ...ll flash During this time no commands given by the buttons will be accepted While the table of contents TOC is read an 8 flas hes in the display In this way the necessary time to read the TOC can be prolonged So bad CDs can be recognised and taken out CAUTION play selected track read TOC if necessary button 1 mode button 2 button 3 mode display 0 mode 1 start stop 1 mode 2 next track previous trac...

Page 76: ...es to the next test step The button 3 switches to the previous test step Quit Press button 2 while test 98 is running Control unit steps over test 99 to mode 0 automatically Test 91 You can check the laserlight with an in frared indicator Test 93 Without a CD laser lense moves up and down If you put a CD on the turntable while the test runs the lens stops moving if it finds the focus point Test 95...

Page 77: ...Connector This equipment offers two features 1 The sound of an external source 300mV 1V e g radio or tape will be reproduced over the speakers of the jukebox with adjustable volume A selection over the jukebox will mute this source and it returns only after all selections have been played Time lag can be adjusted 2 Connecting the jukebox to an existing back ground system amplifier the sound of thi...

Page 78: ... corresponding compartment 5 Switch on the jukebox it will be run automatically Error elimination Initializing phase jukebox ok 6 No success Step to chapter 18 3 18 3 Set the mechanism to 0 position 1 Power OFF 2 Open the Jukebox 3 Open the mechanism housing replace any CDs that may have been dropped 4 Move gripper to RH 0 position Move by pressing against the gripper motor gripper holder of selec...

Page 79: ...isplay of the program version 13 Programming insert CDs if necessary program number of inserted CDs in service level 1 button 5 as follows 14 Press selection button R hold down and press selection button 0 than release both buttons Press selection button 1 Service level 1 is reached Display is 1_ _ _ To reprogram press selection button 5 hold down and press selection button R Enter the desired num...

Page 80: ...2 2 Elektromagnetische Verträglichkeit Fachgrundnorm Störaussendung Electromagnetic Compatibility Generic Emissions Requirements Compatibilité electromagnétique Norme générique emission EN 60335 1 Sicherheit elektrischer Geräte für den Hausgebrauch und ähnliche Zwecke Safety of household and similar Electrical appliances Sécurité des appareils electrodomestiques et analogues EN 60335 75 Grenzwerte...

Page 81: ......

Page 82: ...utsche Wurlitzer GmbH Niederdorf 5 D 32351 Stemwede Levern Tel 0 57 45 28 0 Fax 0 57 45 2 82 20 contact deutsche wurlitzer de Wurlitzer Registered Trademark of The Wurlitzer Company Part no 0071126 Edition 4502 R ...

Reviews: