

24
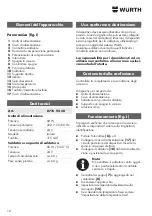
Composants de l'appareil
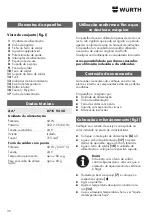
Vue d'ensemble (fig. I)
1
Unité d'alimentation
2
Ligne de raccordement
3
Fiche de connexion du fer à souder
4
Prise de compensation du potentiel
5
Potentiomètre d'ajustement
6
Interrupteur d'alimentation
7
Éponge visqueuse
8
Récipient à éponges
9
Pointe de soudage
10
Fer à souder
11
Support
12
Trémie
13
Indicateur de fonctionnement
14
Graduation de température
15
Bouton rotatif
16
Fusible / disjoncteur
17
Ligne de raccordement au réseau
Caractéristiques techniques
Art.
0715 94 50
Unité d'alimentation
Puissance
60 W
Primaire
220 V, 50/60 Hz
Tension secondaire
24 V
Version
Isolation de pro-
tection
Fusible
315 mAT
Fer à souder avec pointe de soudage
Puissance
60 W / (350 °C)
Tension
24 V
Temps de chauffe
Env. 60 s
Poids sans alimentation
env. 60 g
Utilisation conforme aux
prescriptions
L'appareil doit être utilisé conformément aux disposi
-
tions. Cela signifie qu'il doit être raccordé et exploité
uniquement comme décrit dans les instructions de
service. L'appareil est conçu pour le soudage avec
recours aux accessoires d'origine du système Würth.
Toute autre utilisation est considérée comme non
conforme.
L'utilisateur est tenu responsable des dom-
mages imputables à une utilisation non
conforme aux prescriptions.
Volume de livraison
Vérifiez à la réception que l'appareil est complet et
dans un état réglementaire.
L'appareil est composé de :
■
Unité d'alimentation
■
Ligne de raccordement au réseau
■
Fer à souder avec pointe de soudage
■
Support avec éponge visqueuse
■
Mode d'emploi
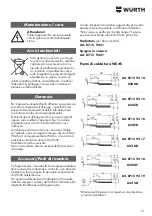
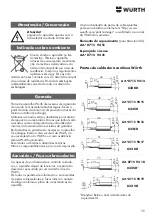
Mise en service [fig. I]
Veuillez vérifier que la tension de service corres
-
pond à celle mentionnée sur la plaque signalétique.
■
Placer l'interrupteur d'alimentation
[6]
sur 0.
■
Brancher la ligne de raccordement au réseau
[17]
au dos de l'appareil. Brancher la fiche
secteur dans la prise.
■
Raccorder le fer à souder
[10]
à l'unité d'ali-
mentation et poser sur le support.
Remarque
Ne pas cogner le fer à souder contre
des objets durs car le corps de chauffe
en céramique est fragile.
■
Bien humidifier l'éponge
[7]
et la mettre dans le
réservoir à éponges
[8]
.
■
Démarrer l'appareil.
■
Régler la température souhaitée avec le bouton
rotatif
[15]
.
■
Si des températures fixes sont souhaitées : conf.
« Réglage de températures fixes ».
Summary of Contents for 0715 94 50
Page 3: ...3 I 1 2 7 3 4 6 8 5 9 10 15 13 14 12 11 17 16 7 6...
Page 4: ...III II 1 2 3 4 IV 4 1 2 3 4 5 6 7 8 9 10 11...
Page 71: ...71 Adolf W rth GmbH Co KG W rth GR...
Page 73: ...73 450 II H 4 220 k III...
Page 74: ...74 IV 10 11 6 Ohm 7 Ohm 1 2 3 8 SW12 4 5 6 3 7 3 9...
Page 119: ...120 Adolf W rth GmbH Co KG W rth BG...
Page 121: ...122 450 4 220 k III...
Page 122: ...123 IV 10 11 6 7 1 2 3 SW12 8 4 5 6 3 7 3 9...
Page 143: ...145 Adolf W rth GmbH Co KG W rth RU...
Page 145: ...147 450 II 4 220 III...
Page 146: ...148 IV 10 11 6 7 1 2 3 12 8 4 5 6 3 7 3 9...
Page 149: ...151...
Page 150: ...152...
Page 151: ...153...