13
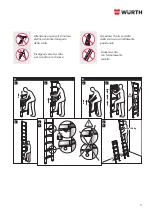
openable rung (third rung from the bottom) and
pull upwards until the rung section locks.
7. Continue to open the rung above and then one
rung section at a time until the ladder reaches
the required length. Check that the locking catch-
es protrudes to 60º.
NOTE!
Lock the topmost
opened rung section by pulling the rung above
out halfway (15 cm), the locking catches under
the rung shall protrude 60º.
8.
Check that all opened rung sections are
locked:
The locking catches shall protrude to
60º. The 2nd step from the bottom has locking
catches with pull rings. They are locked when
fully
inserted
in the rung. Only the pull rings
can be seen under the rung when the ladder is
locked. If necessary, adjust the ladder so that all
rung sections are in the locked position.
9. Once you have checked that all opened rung
sections are locked, you can use the ladder. Posi-
tion the ladder steadily with an angle of inclina-
tion of 75º in relation to the ground.
NB! You cannot shorten an already
opened ladder. If you need to make the
ladder shorter, you must first close the
ladder completely and then open it to
the intermediate length required.
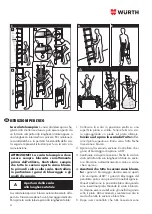
Collapse the telescopic ladder as follows:
10. Clean the ladder if required (see below).
11. Hold the ladder upright in such a way that you
do not catch your fingers when you are unlock-
ing and closing the ladder: hold the telescopic
tube a short way up the ladder to gain better
balance.
12. Pull down the pull rings with the other hand,
one at a time, until the locking mechanism is
released and the ladder can be closed. (Some-
times you need to pull the first ring a second
time).
13. Hold the ladder’s telescopic tubes a little way
up the ladder and close it carefully using both
hands.
CAUTION RISK OF INJURY! Do not put
your hands on or between the rungs
when you are unlocking and closing the
ladder. Close each rung section carefully.
For reasons of safety and functionality, the telescopic
ladder must always be kept clean, particularly the
telescopic tubes and rungs. Dirt, filings, paint spots,
glue etc. must be wiped away after each use, and
before the ladder is closed. Clean the ladder using
a rag and a small amount of solvent. Once clean,
the telescopic tubes can be treated with silicon spray.
Spray in the tube and wipe dry with paper or a cloth.
The ladder must always be kept dry so that dust does
not cling to it.
Carry the telescopic ladder upright in its compact
format so that it does not expand and open up.
Always transport the telescopic ladder completely
closed and compacted. This protects the telescopic
tubes against impact and damage that could impair
the functionality of the ladder. When transporting the
ladder on roof bars or in a truck, ensure it is suitably
placed to prevent damage.
The telescopic ladder shall be stored
• completely closed in compact format
• away from areas where its condition could deterio-
rate more rapidly (e.g. dampness, excessive heat,
exposed to the elements)
• where it cannot be damaged by vehicles, heavy
objects, or contaminants
• where it cannot cause a trip hazard or an obstruc-
tion
• where it cannot be easily used for criminal purpos-
es, preferably padlocked
• secured against unauthorised climbing (e.g. by
children) if it is permanently positioned (e.g. on
scaffolding).
• The owner of the ladder shall provide the user with
the user manual.
• Inspect the ladder after delivery and before first
use to confirm condition and operation of all parts.
• Ensure that you are fit enough to use a ladder.
Certain medical conditions or medication, alcohol
or drug abuse could make ladder use unsafe.
• Visually check the ladder is not damaged and is
safe to use at the start of each working day when
the ladder is to be used, see “Care and mainte-
nance” below.
• For professional users regular periodic inspection
is required.
Closing the ladder
C
Cleaning
D
Transport and storage
E
Before Use


