81
10
1. Opis funkcij
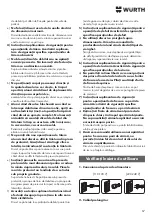
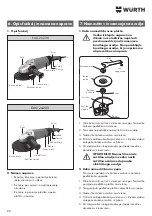
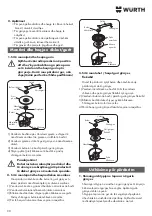
1. Kako namestiti brusno ploščo
Vedno izklopite napravo na
stikalu in iz električne napetosti
pred namestitvijo ali zamenjavo
brusilnega orodja. Ne uporabljajte
brusilnega orodja, ki je neprimerno
ali preveliko za napravo.
1. Obrnite kotni brusilnik z vretenom navzgor. Namestite
zatezno podložko na vreteno.
2. Na zatezno podložko namestite brusilno orodje.
3. Namestite zatezno matico na vreteno.
4. Pritisnite zaklep obračanja vretena in s ključem dobro
zategnite zatezno matico s ključem.
5. Za menjavo brusilnega orodja, postopek izvedite v
obratnem vrstnem redu.
OPOZORILO! Namestiti morate
zaščitno orodje in vedno nositi
zaščitna očala med uporabo
električnega orodja.
2. Kako namestiti brusni papir
Ne smete uporabiti iste zatezne matice in zatezne
podložke za uporabo
1. Obrnite kotni brusilnik z vretenom navzgor. Namestite
gumijasto podložno ploščo na vreteno.
2. Na gumijasto podložno ploščo namestite brusni papir.
3. Namestite zatezno matico na vreteno.
4. Pritisnite zaklep obračanja vretena in s ključem dobro
zategnite zatezno matico s ključem.
5. Za menjavo brusilnega orodja, postopek izvedite v
obratnem vrstnem redu.
2. Namen naprave
• Rezanje, brušenje in poliranje železa,
jekla, aluminija in ulitkov.
• Brušenje po varjenju in odstranjevanje
oksidacije.
• Brušenje in poliranje plastike, opeke,
ploščic in kamna.
6. Opis funkcij in namena naprave
7. Namestitev in zamenjava orodja
18
2. List of contents
1. Description of functions
1. Noise emission
Noise emission values determined according to EN
60745.
2. The operator to wear hearing protection
3. Vibration emission
Vibration total values (triaxial vector sum) determined
according to EN 60745
4. The following information
The declared vibration total value has been measured
in accordance with a standard test method given in
EN 60745 and may be used for comparing one tool
with another.
The declared vibration total value may also be used in
a preliminary assessment of exposure.
5. A warning
The vibration emission during actual use of the power
tool can differ from the declared total value
depending on the ways in which the tool is used.
Identify additional safety measures to protect the
operator that are based on an estimation of exposure
in the actual conditions of use (taking account of all
parts of the operating cycle such as the times when the
tool is switched off and when it is running idle in
addition to the trigger time).
1. Specifications
Noise and Vibration Emissions
Specifications and List
of Contents
Check before Use
Description of Functions and
Applications
EAG 20-230
EAG 24-230
EAG 20-230 EAG 24-230
8.5 m/s²
2.0 m/s²
1.5 m/s²
4.5 m/s²
Vibration emission value (a )
h
Vibration emission value (a )
h
Uncertainty (K)
Uncertainty (K)
Grinding mode
Disk-type sanding mode
Items
Rated speed
Model
Power source
Motor
Weight (witout cord)
Cord
A Type : AC 110-127 V 50/60 Hz
~
B Type : AC 220-240 V 50/60 Hz
~
Single phase series commutator series motor
15 A
2000 W
110-127V
220-240V
2400 W
230x6x22.23
n
6500 /min
2-core cabtyre cord
4.3 kg
4.9 kg
M 14
Spindle Thread
Protection Class
Size of grinding stone
(outsize dis. x thick x minor dia. mm)
Rated curent (A)
Rated input (W)
Grinding stone
Model
Items
Spanner
Carbon brush
Side handle
D handle
Optional
Optional
Optional
Optional
Optional
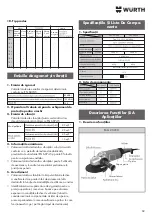
EAG 20-230
Stopper
Handle
Trigger switch
Brush cap
Wheel guard
Side handle
Grinding Stone
Lock pin
EAG 24-230
Grinding Stone
Handle
Lock pin
Trigger switch
Stopper
Handle Lock
Damper
Brush cap
Side handle
Wheel Guard
The A-weighted emission sound
level (L )
pA
level (L )
wA
The A-weighted emission sound power
Uncertainty (K)
pressure
89 dB(A)
103 dB(A)
3 dB
Ročaj
Ročaj
Zatič
Zatič
Stikalo
Stikalo
Zavora
Zavora
Pokrov krtačk
Pokrov krtačk
Blažilec
Zaklep ročaja
Brusna plošča
Brusna plošča
Stranski ročaj
Stranski ročaj
Zaščitna obroba
Zaščitna obroba
19
3. How to install and remove the flexible
grinding stone
You can use the same wheel nut and wheel washer that
used for the grinding stone.
1) Set the wheel washer of the spindle as the installing of
the grinding stone. And then, set the pad and flexible
grinding stone one by one.
2) Set the wheel nut to the spindle above the flexible
grinding stone.
3) Fix the axis of the spindle by pressing the lock pin. And
then, fasten the wheel nut with a spanner tightly.
4) Do the same process reversibly to remove the sanding
disc.
1. Avoid excessive pressure on the grinding
stone
Avoid excessive pressure on the grinding stone.
Grinding is done by tool's weight. Apply the grinding
stone lightly to the work.
Excessive pressure on the grinding stone will decrease
grinding speed and cause rough finishing surface. Also,
it may cause overheating and motor failure.
2. Applications
To do finishing work and removing splinters of iron,
bronze, aluminum, cast.
To grind of welding section part and removing rust.
To do finishing work for the surface of synthetic resin,
slate, brick and marble.
To groove and cut tile and stone.
1. How to install and remove the Grinding Stone
Always turn off the switch and
disconnect the plug from the power
supply before installing and removing
grinding stone. Never use the grinding
stone below the peripheral velocity (See
to specifications).
Installing and Removing
1) Place the spindle upwards. Insert the depressed part of
the wheel washer onto the plane part of the spindle.
2) Place the prominent part of the grinding stone onto the
wheel washer.
3) Set the wheel nut onto the spindle over the grinding
stone by a screw.
4) Insert the lock pin in the gear cover, then fasten the
wheel nut with the spanner.
Warning
You must install the wheel guard and
wear the safety goggles during using of
the disc grinder with the special parts.
2. How to install and remove the sanding disc
Do not use the wheel washer and wheel nut for the
grinding stone. Please use other washer nut for the
sanding disc.
1) Set the rubber pad and sanding disc to the spindle.
2) Set the washer nut to the spindle above the sanding disc.
3) Fix the spindle by pressing the lock pin with fingers. And
then, fasten the washer nut with a spanner tightly.
4) Do the same process reversibly to remove
the sanding disc.
Operating Instructions
Spanner
Fastening
Projection
Lock pin
Wheel
guard
Wheel
washer
Grinding
stone
Wheel nut
Spindle
Spanner
Spanner
Fastening
Fastening
Sanding
disc
Flexibile
grinding stone
Rubber
pad
Pad
Lock pin
Lock pin
Washer
nut
Wheel
washer
Wheel
nut
17
Check before Use
2. The extension cord
When the power source is located far from your
location, you may use the extension cord. However, you
should use the extension cord with proper length and
thickness not to prohibit the current. When you use too
long or thin extension cord, the voltage drop will be
higher. In result, the power of the motor will be
decreased. Please use the shortest extension cord
possible.
When the extension cord is damaged,
you must change or repair it
immediately.
3. The power source
You must use the tool in the power source specified in
the nameplate. When you use the tool for 110V in
220V/230V, the speed of the motor will be increased
abnormally. In result, the grinding stone and the tool
may be damaged.
When you use the tool for 110V in
220V/230V, the motor can be damaged
by a fire.
4. The switch
When you plug in the power source with
the tool switched on, you may be injured
seriously by sudden rotating of the tool.
Make sure the switch lever is returned to its original
position by pushing or pulling it.
5. The wheel guard
The wheel guard is a protective wall
preparing for the damage of the
grinding stone. You must install the
wheel guard.
You can set the desired angle of the wheel guard by
unfastening two small screws. Please use the tool after
adjusting the angle of the wheel guard for the work.
After adjustment, please fasten two small screws tightly.
6. Checking and installing the grinding stone
Be sure the grinding stone is in normal
condition and free from cracks or
damage. Make sure the grinding stone is
installed securely. To install the grinding
stone, see to the section installing and
removing grinding stone.
7. Mains Outlet
When inserting the plug, if a sound is heard or if it is a
taken out easily, you must repair it. Please contact
nearby electric shop.
When you use the mains outlet as it is, it causes the
accident by overheating.
8. Trial run
Always make a trial run before operation with grinding
stone pointed away from people to check the tool.
Before switching on the disc grinder, be
sure the rotating part of the disc grinder
is not contacted work material.
Accidental switching on with contacted
other objects may cause personal injury
by damaged grinding stone.
9. An explanation of any symbols or
pictograms marked on the tool relevant to
safe use
10. Product type
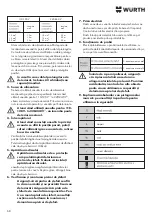
Nominal cross
section of
conductor
1.0 mm²
1.5 mm²
2.5 mm²
Nominal cross
section of
conductor
1.0 mm²
1.5 mm²
2.5 mm²
Max.
lenght
10 m
15 m
25 m
Max.
lenght
20 m
30 m
50 m
110-120 V
220-240 V
Trial run time
When replacing grinding stone
When using grinder initialy
3 minutes or more
1 minute or more
n
V
A
Hz
W
/min
~
rated speed
volts
amperes
hertz
watts
Handle
Only
plastic
Soft-
starter
Restart-
pro
Soft-starter
plastic
+
rubber
Lock-off
(2pole,
2 terminal)
Lock-on
(2pole,
2 terminal)
Lock-on
(1pole,
4 terminal)
Switch
Controller
Product
TYPE 1
TYPE
TYPE 2
TYPE 3
TYPE 4
TYPE 5
TYPE 6
TYPE 7
TYPE 8
revolutions or reciprocations per minute
alternating current
Class II construction
Disposal of Old Electrical &
Electronic Equipment
1. Connection to Power Supply
[110-120 V ]
[220-240 V ]
~
~
Zatezna matica
Brusna
plošča
Zatezna
podložka
Zaščitna
obroba
Ključ
Smer
Zatič
Vreteno
Smer
zategovanja
11
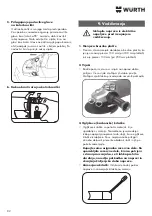
1. Izogibajte se pretiranemu pritisku na
brusilno orodje
Izogibajte se pretiranemu pritisku na brusilno orodje.
Brušenje se izvaja le s težo brusilke. Pri delu brusilno
orodje uporabljajte zmerno.
Pretiran pritisk na brusilno orodje lahko zmanjša
hitrost obratov in povzroči grobe poškodbe na
obdelovancu. Lahko povzroči tudi pregrevanje in
odpoved motorja naprave.
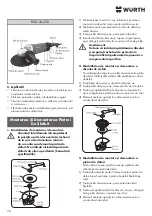
2. Kot brušenja
Ne uporabljajte celotne površine brusilne plošče. Za
dobro brušenje je dovolj uporaba rob brusilne plošče.
Za efektivno brušenje je primeren kot brusilke med
15°in 30°, kot je prikazano na sliki.
3. Smer brušenja
Ko uporabljate novo brusilno ploščo jo najprej
uporabljajte v smeri proti sebi, da zaobljite rob ploče.
Ko je plošča po robu zaobljena se lahko uporablja v
vse smeri.
Brusilne plošče z grobo granulacijo (granulacija
#36) je najbolj primerna za grobo brušenje na
kovinskih materjalih. Brusilno ploščo uporabljajte
brez pretiranega pritiska za gladko površino. Za
bolj gladko površino in ostale materjale uporabljajte
brusilne plošče višjih granulacij.
4. Opozorila ob koncu uporabe naprave
Izklopite napravo na stikalu za zaustavitev vrtenja.
Napravo shranjujte na varnem mestu.
Če shranjujete napravo, ko se brusilna plošča še
vrti, lahko zajame prah in nevarne dele, kar lahko
povzroči poškodbe naprave.
Kotna brusilka se pri padcu ali udarcu lahko
poškoduje. Če kotna brusilka pade ali utrpi
udarec preverite brusno ploščo in brusilko,
če so nastale poškodbe.
3. Kako namestiti fleksibilno brusilno ploščo
Uporabite lahko iste zatezne matice in zatezne
podložke za uporabo
1. Obrnite kotni brusilnik z vretenom navzgor. Namestite
podložno ploščo na vreteno.
2. Na podložno ploščo namestite brusni papir.
3. Namestite zatezno matico na vreteno.
4. Pritisnite zaklep obračanja vretena in s ključem dobro
zategnite zatezno matico s ključem.
5. Za menjavo brusilnega orodja, postopek izvedite v
obratnem vrstnem redu.
8. Navodila za uporabo
20
2. Pressing angle
Do not press the whole surface of the grinding stone to
the grinding surface. It is recommended to use the disc
grinder by inclining it in 15-30 degrees as the picture to
do grinding work with circumference of the grinding
stone.
3. Grinding direction
When using a new grinding stone, be certain to grind
while pulling tool backwards (B direction) until the
grinding stone becomes rounded on its edge. Then, the
grinder can be moved to any direction.
This grinding stone (Grinding particle: A, Mesh: #36) is
best for heavy grinding in general steel materials. Also,
it can be used in wide range of other materials. For its
lower mesh, apply the grinding stone to the work
material lightly and grind steadily to create smooth
finishing surface that can be made by the grinding stone
with higher mesh.
4. Caution after use
Switch off to stop the rotation of the grinding stone, and
keep the disc grinder in safe place.
When you keep the disc grinder with the grinding stone
rotated in the place filled with dust and shavings, dust
and shavings can be gotten into the disc grinder.
The grinding stone can be cracked or
grooved by an impact. Please take care
not to impact on the disc grinder. If the
disc grinder is hit against something or
fallen down, you must check the
grinding stone and disc grinder.
5. How to rotate the head of the disc grinder
Remove the plug from plug socket before any operation.
For the above purpose, rotate the head of the disc
grinder in a 90-degree turn instead of rotating the
handle. And then, unscrew four screws and the head.
Do not remove the head from the main body wholly but
rotate to new position. After that, set four screws and
fasten them.
20
6. How to rotate the handle of the disc grinder
Disconnect the plug from the power
supply before making any maintenance.
1. Change of the grinding stone
Please change the grinding stone with new one when
outer diameter of the grinding stone in 180mm is worn
to
100mm
(For
the
grinding stone in 230mm is
130mm).
2. Screws
Make sure screws in each part are set tightly at regular
intervals. When screws are loose, fasten them tightly.
The loose screw causes the danger situation.
3. Carbon brush
Disposable carbon brush is used in the motor. The
heavily worn carbon brush causes the trouble of the
motor.
When the length of the carbon brush is reached at the
wear tolerance line, change it with new carbon brush.
Also, keep the carbon brush clean to be moved in the
brush holder freely.
Maintenance
Side handle
19
3. How to install and remove the flexible
grinding stone
You can use the same wheel nut and wheel washer that
used for the grinding stone.
1) Set the wheel washer of the spindle as the installing of
the grinding stone. And then, set the pad and flexible
grinding stone one by one.
2) Set the wheel nut to the spindle above the flexible
grinding stone.
3) Fix the axis of the spindle by pressing the lock pin. And
then, fasten the wheel nut with a spanner tightly.
4) Do the same process reversibly to remove the sanding
disc.
1. Avoid excessive pressure on the grinding
stone
Avoid excessive pressure on the grinding stone.
Grinding is done by tool's weight. Apply the grinding
stone lightly to the work.
Excessive pressure on the grinding stone will decrease
grinding speed and cause rough finishing surface. Also,
it may cause overheating and motor failure.
2. Applications
To do finishing work and removing splinters of iron,
bronze, aluminum, cast.
To grind of welding section part and removing rust.
To do finishing work for the surface of synthetic resin,
slate, brick and marble.
To groove and cut tile and stone.
1. How to install and remove the Grinding Stone
Always turn off the switch and
disconnect the plug from the power
supply before installing and removing
grinding stone. Never use the grinding
stone below the peripheral velocity (See
to specifications).
Installing and Removing
1) Place the spindle upwards. Insert the depressed part of
the wheel washer onto the plane part of the spindle.
2) Place the prominent part of the grinding stone onto the
wheel washer.
3) Set the wheel nut onto the spindle over the grinding
stone by a screw.
4) Insert the lock pin in the gear cover, then fasten the
wheel nut with the spanner.
Warning
You must install the wheel guard and
wear the safety goggles during using of
the disc grinder with the special parts.
2. How to install and remove the sanding disc
Do not use the wheel washer and wheel nut for the
grinding stone. Please use other washer nut for the
sanding disc.
1) Set the rubber pad and sanding disc to the spindle.
2) Set the washer nut to the spindle above the sanding disc.
3) Fix the spindle by pressing the lock pin with fingers. And
then, fasten the washer nut with a spanner tightly.
4) Do the same process reversibly to remove
the sanding disc.
Operating Instructions
Spanner
Fastening
Projection
Lock pin
Wheel
guard
Wheel
washer
Grinding
stone
Wheel nut
Spindle
Spanner
Spanner
Fastening
Fastening
Sanding
disc
Flexibile
grinding stone
Rubber
pad
Pad
Lock pin
Lock pin
Washer
nut
Wheel
washer
Wheel
nut
Zatezna
matica
Zatezna
matica
Brusni papir
Fleksibilna
brusilna plošča
Zatezna
podložka
Gumijasta
podložna
plošča
Podložna
plošča
Ključ
Ključ
Zatič
Stranski ročaj
Zatič
Smer
zategovanja
Smer
zategovanja

