


4
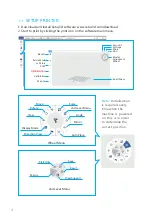
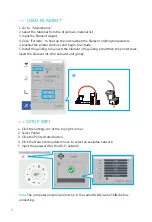
>> SETUP PRINTER
1. Download and Install Cetus3D software: www.cetus3d.com/download
2. Start to print by clicking the print icon on the software main menu.
Note:
Initialization
is required every
time when the
machine is powered
on, this is in order
to determine the
correct position.
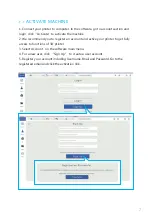
Account
Back to
Add a Model
or Picture
Initialization
Calibration
Mainte
-
S
ettings
Share
Skin
Model
Adjustment
Wheel
Build Space
Wheel Menu
Scale
Move
Rotate
View
Display Mode
Undo
Mirror
Auto Place
Disection View
2nd Level Menu
2nd Level Menu
Save
Reset
Merge
View Support
Fix Errors


