264
Getting Help
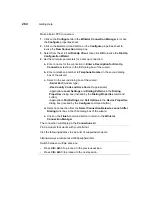
Make a basic PPP connection:
1. Click on the Configure tab in the Winterm Connection Manager to invoke
the Configure properties sheet.
2. Click on the Add command button on the Configure properties sheet to
invoke the New Connection dialog box.
3. Select from the scroll list Dial-Up Client, then click OK to invoke the Dial-Up
Configuration Wizard.
4. Set the minimum parameters for a dial up connection:
a. Enter a name for the connection in Enter a Description for Dial-Up
Connection: text box in the first dialog box of the wizard.
b. Enter a telephone number in Telephone Number in the second dialog
box of the wizard.
c. Select in the second dialog box of the wizard:
•Serial Port (modem type)
•Use Country Code and Area Code (if appropriate)
•Appropriate Local Settings and Dialing Patterns in the Dialing
Properties dialog box (invoked by the Dialing Properties command
button)
•Appropriate Port Settings and Call Options in the Device Properties
dialog box (invoked by the Configure command button)
d. Select a connection from the Select Connection Below to Launch After
Dialing In list box in the third dialog box of the wizard.
e. Click on the Finish command button to return to the Winterm
Connection Manager.
The connection will display in the Connections list.
Find a modem that works with your terminal:
Visit the following address to see a list of supported modems:
http://www.wyse.com/service/3000peripheral.htm
Switch between multiple sessions:
•
Press Ctrl+Alt+
↑
to proceed to the previous
session.
•
Press Ctrl+Alt+
↓
to proceed to the next session.
Summary of Contents for Winterm 3200LE
Page 1: ...Winterm 3000 Series Windows based Terminal Administrators Guide ...
Page 2: ......
Page 4: ......
Page 32: ...xxx ...
Page 34: ...2 ...
Page 38: ...6 Terminal Installation ...
Page 73: ...41 Figure 5 4 3720SE Recall Mode R G B 9300 K 1 2 3 R G B USER 1 1 2 3 RECALL 9300K ...
Page 74: ...42 Terminal Installation ...
Page 76: ...44 ...
Page 102: ...70 Advanced User Interface Figure 9 1 Apps Properties Sheet SE Model Terminals ...
Page 116: ...84 Advanced User Interface ...
Page 118: ...86 ...
Page 122: ...90 Connection Configuration ...
Page 132: ...100 Connection Configuration ...
Page 156: ...124 Connection Configuration ...
Page 164: ...132 Connection Configuration ...
Page 172: ...140 Connection Configuration ...
Page 188: ...156 Connection Configuration ...
Page 190: ...158 ...
Page 196: ...164 External Devices ...
Page 206: ...174 External Devices ...
Page 217: ...185 Figure 26 2 Printers Properties Sheet ...
Page 220: ...188 External Devices ...
Page 232: ...200 ...
Page 238: ...206 Firmware Upgrades ...
Page 250: ...218 Firmware Upgrades ...
Page 256: ...224 Firmware Upgrades ...
Page 258: ...226 ...
Page 264: ...232 Security Properties ...
Page 272: ...240 Client Security ...
Page 286: ...254 ...
Page 294: ...262 Getting Help ...
Page 304: ...272 Getting Help ...
Page 306: ...274 Getting Help ...
Page 310: ...278 Getting Help ...
Page 344: ...Glossary 312 ...
Page 351: ...Index 319 ...


