


Radio Remote Control FFB2000-Pro
X-Floc Dämmtechnik-Maschinen GmbH
Page 7 of 9
Rosine-Starz-Straße 12 · 71272 Renningen · Germany
Phone +49-7159-80470-30 · Fax -40 | info@x-floc.com · www.x-floc.com
Important battery information
Only from the manufacturer approved batteries must be inserted. The specifications are listed in the
Tech-
nical data. Exception: For controls delivered until 07/2012 only batteries with a capacity between 900mAh
and 1000mAh must be used.
Only use the nickel metal hydride (NiMH) AAA (micro) rechargeable batteries approved by X-Floc. The limit-
ing values of the batteries follow.
Altogether, 3xAAA (micro) rechargeable batteries are required for the hand held controls. The batteries are
connected in series. When replacing / changing the batteries, ensure that they are inserted correctly accord-
ing to polarity.
Only use rechargeable batteries. The charging device should not be connected to the hand held controls if it
contains non-rechargeable batteries. This could cause battery leakage and could cause damage to the hand
held controls.
The rechargeable batteries may become warm when charging. This is completely normal. The charging cir-
cuit is equipped with temperature monitoring and reacts accordingly.
Please note: The charger should not be connected to the hand held controls without batteries, and equally
the batteries should not be removed when charging.
Caution: Batteries must not discharged entirely! Discharged batteries must be recharged at the latest within
three weeks (standby-consumption). If this has been missed, batteries must be replaced.
Disposal of empty / defect rechargeable batteries
Batteries and rechargeable batteries must not be disposed of in domestic waste. They must be specially dis-
posed of. More detailed information can be obtained from the local waste disposal authority.
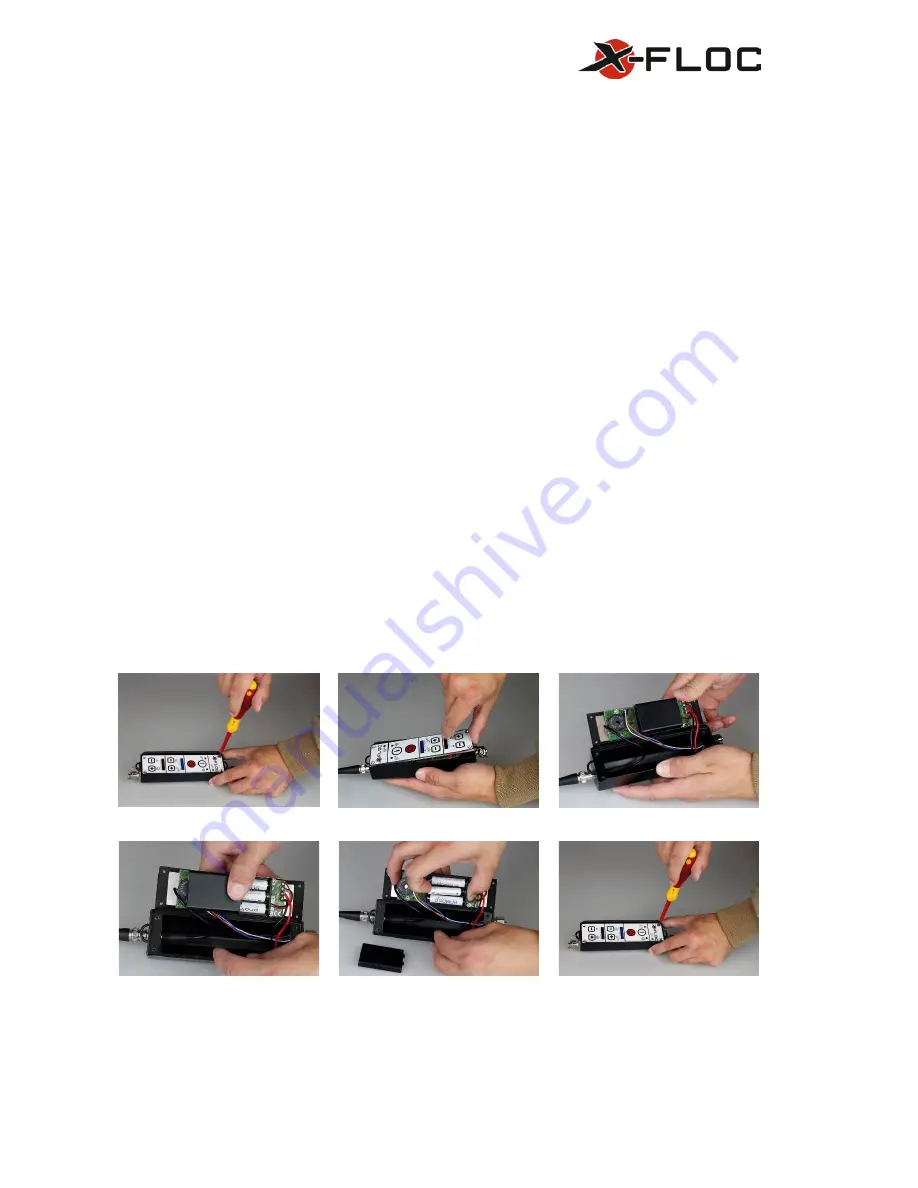
Battery replacement
Important notes:
The remote control must not be connected to the charging device when the batteries are replaced! Only the
in the Technical data described batteries has to be used. Charging without batteries can lead to damage to
the remote control’s electronic system. Risk of damage!
Step 1: Remove 4 screws in order to
unfasten the keypad.
Step 2: Open control / keypad with
attached circuit board carefully.
Step 3: Batteries are located on the
rear in the battery case.
Step 4: Open battery case through
pushing the cover.
Step 5: Replace batteries.
Step 6: Assemble control in reverse
order. Watch not to jam cables during
assembly.


