background image

27

6. 

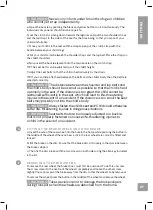
WARNING:

 Always use the restraint system.

7. 

WARNING:

 This product is not suitable for running or skating.  (Not 

applicable to the jogger version).

8. 

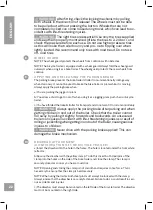
WARNING:

 Prevent injury to children from accidentally falling or 

sliding out.

9. 

WARNING:

 When using this child carrier with only one child, the 

child should sit on the right side.

10. 

WARNING:

 The user of this child carrier must be aware of the 

hazards of cold wind and heat exhaustion when a child is either less 

active due to sitting in colder temperatures for extended periods 

of time or sitting in warm temperatures for extended periods of 

time without adequate ventilation or hydration."

11. 

WARNING:

 If the child carrier is used as a bicycle trailer, the weather 

cover should be closed to prevent dirt and dust from entering the 

carrier.

12. 

WARNING:

 If the child carrier is used for cycling, a reflector with a test 

mark must be visibly attached to the rear.

13. 

WARNING:

 Before each ride, make sure that the hitched child carrier 

does not interfere with the brakes, pedals or steering of the bicycle.

14. 

WARNING:

 The use of a trailer changes the stability, handling and 

braking characteristics of your bicycle.

15. 

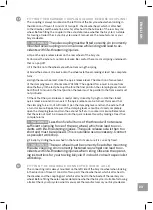
WARNING:

 When turning right, the angle between the towing bicycle 

and the child carrier must not exceed 45°.

16. 

WARNING:

 When turning left, the angle must not exceed 90°.

17. 

WARNING:

 Always use a safety pennant.

18. 

WARNING:

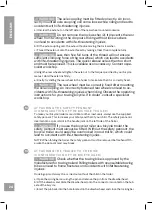
 The quick release nut must be fully tightened with at 

least two turns of the bolt over the end of the quick release nut 

on the quick release to ensure that the rear wheel of the bicycle 

does not come loose. Always ensure that the quick release system 

is correctly fitted. An incorrectly fitted quick release system can 

cause the rear wheel to accidentally come loose.

19. 

WARNING:

 The rear axle nut must be tightened with at least 5 full 

turns to ensure that it is tight. You can replace the original nut on 

some axles to make room for the axle coupling. To be sure, ask 

your specialist bicycle dealer. Depending on the type of hub, the 

original washer must remain on the frame as a torque support. Please 

follow the hub assembly instructions and the manufacturer's torque 

specifications when tightening the axle nut.

20. 

WARNING:

 Be aware that a hitched trailer increases the braking 

distance of the bicycle.

21. 

WARNING:

 Store your trailer and accessories in a dry place out of 

direct sunlight. 

22. 

WARNING:

 Before storage, the child carrier must be dry to prevent 

the formation of mold or bacteria.

23. 

The parking device should be engaged when child is being placed in or removed 

from the stroller.

24. 

When parking always use the parking brake.

25. 

Always remove the child before folding the stroller.

26. 

Never park the stroller on a hill, uneven or slippery surface.

27. 

Do not carry a child in a stroller.

28. 

Any load attached to the handle and/or on the back of the backrest and/or on the 

sides of the vehicle will affect its stability.  

29. 

Never use the product if any of its parts is faulty or damaged. The use of a defective 

ENGLISH

Summary of Contents for BOOSTER2

Page 1: ...New adventure ahead PL EN CZ DE x lander com Dzi kujemy e wybrali cie X lander Thank you for choosing X lander Vielen Dank f r Ihr X lander D kujeme e jste si vybrali X lander U S E R M A N UA L...

Page 2: ...POLSKI 9 ENGLISH 20 ESK 31 DEUTSCH 42...

Page 3: ...2 1 1...

Page 4: ...3 2 a ab b c e d c d e 3...

Page 5: ...4 4 5 6 7 8 f a a b e...

Page 6: ...5 9 10 11 12 a a bc b c d e...

Page 7: ...6 13 14 15 16 d a a b c...

Page 8: ...7 17 18 b a a c b b c d e f 1...

Page 9: ...awbar H del Deichsel Tarcza hamulca Brake disc Brzdov kotou Bremsscheibe cznik dyszla Drawbar coupling Spojka oje Achskupplung Szybkozamykacz Quick release Rychloup n k Schnellspanner Widelec Front wh...

Page 10: ...NIE RAMY a Ustaw r czk w najni szej pozycji UWAGA K t pochylenia r czki mo na regulowa naciskaj c jednocze nie oba te przyciski b Odczep rzep na tylnej cianie tkaninowej i rozepnij zamki b yskawiczne...

Page 11: ...e do siedziska Je li odleg o jest zbyt du a dziecko nie mo e by wystarczaj co unieruchomione w siedzisku co mo e prowadzi do zagro enia ycia obra e w razie wypadku Je li odleg o jest zbyt ma a pasy be...

Page 12: ...ka podczas jazdy Zawsze w czaj hamulec postojowy gdy a Parkujesz joggera lub w zek b Pozwalasz dziecku wsi lub wysi gdy u ywa si jej jako w zka do biegania w zka spacerowego lub przyczepki do roweru c...

Page 13: ...mniej wi cej od po owy W ostatniej fazie tu przed po o eniem ko cowym d wignia zaci skowa powinna by trudna do przesuni cia W po o eniu ko cowym d wignia musi by r wnoleg a do ramy i nie mo e wystawa...

Page 14: ...a aj cymi yciu Wtedy cznik dyszla nie mo e by montowany Nale y skontaktowa si ze specjalistycznym serwisem rowerowym d Wyr wnaj tylne ko o i dokr nakr tk osi momentem dokr cania podanym w instrukcji o...

Page 15: ...Y Je eli przyczepka rowerowa ma zamontowany dyszel lub zestaw do joggingu najpierw zdejmij te elementy i w bolce tych zacisk w mocuj cych z powrotem w prze widziane do tego otwory Upewnij si e zaciski...

Page 16: ...a do us yszenia klikni cia c OSTRZE ENIE Pami taj aby wyregulowa amortyzator zgodnie z wag lub liczb pasa er w REGULACJA TWARDO CI ZAWIESZENIA OBCI ENIE MAX 22KG Istniej dwie pozycje zawieszenia tyln...

Page 17: ...rzyczepki tylko z jednym dzieckiem dziecko powinno siedzie po prawej stronie 10 OSTRZE ENIE U ytkownik tego pojazdu musi mie wiadomo e d u sze siedzenie dziecka bez aktywno ci ruchowej w ni szych temp...

Page 18: ...Nale y skontaktowa si z punktem serwisowym celem usuni cia usterki 30 U ywaj tylko tych cz ci zamiennych kt re s dostarczane lub rekomendowane przez producenta 31 Produkt powinien by regularnie sprawd...

Page 19: ...ko podczas transportu wymaga specjalistycznej opieki medycznej skonsultuj si ze swoim lekarzem 48 Zalecenia dotycz ce bezpiecze stwa zawarte w tej instrukcji nie dotycz wszystkich mo liwych warunk w i...

Page 20: ...19...

Page 21: ...lcro FOLDING THE FRAME a Move the handle to the lowest position NOTE The angle of the handle can be adjusted by pressing both yellow buttons simul taneously b Unfasten the velcro on the back fabric wa...

Page 22: ...ined sufficiently in the seat which can lead to life threatening injuries in the event of an accident If the distance is too small the seat belts may possibly cut into the child s body WARNING Always...

Page 23: ...as a jogging pram pushchair or bicycle trailer c You have folded the trailer stroller for transport and do not want it to roll uncontrollably WARNING Always apply the parking brake after parking and...

Page 24: ...te the closed quick release around its own axis If the quick release can be turned this means that the clamping force is not sufficient Open the clamping lever and turn the axle nut half a turn clockw...

Page 25: ...uries when riding Observe the operating instructions for your towing bicycle If in doubt consult a specialist workshop ATTACHING THE SAFETY PENNANT CONFIGURATION OF THE BICYCLE TRAILER To make your bi...

Page 26: ...ont of the trailer or tilt it backwards b Insert the stroller wheel into the socket as far as possible until you hear and feel it snap into place c To remove the stroller wheel press the yellow button...

Page 27: ...EN 1888 2 2018 EN 15918 2011 A2 2017 EK2 AK2 3 14 02 2 2021 Booster2 is a 3 in 1 model Each version has separate and specific restrictions and uses BE SURE TO READ THE FOLLOWING WARNINGS WARNING The...

Page 28: ...fully tightened with at least two turns of the bolt over the end of the quick release nut on the quick release to ensure that the rear wheel of the bicycle does not come loose Always ensure that the...

Page 29: ...rollers which public transport operators are obliged to provide 41 Crossing train tramway rails can pose a particular threat because the wheels of the stroller can get stuck in them We recommend locki...

Page 30: ...use aggressive cleaners or solvents Upholstery should not be washed in the washing machine Clean wheel axles and lubricate all exposed moving parts with grease or oil Always check the wheels and carr...

Page 31: ...30...

Page 32: ...hel rukojeti lze nastavit sou asn m stisknut m obou lut ch tla tek b Rozepn te such zip na zadn l tkov st n a rozepn te zipy c Chcete li lut upev ovac h ky uvolnit zatla te je dol dokud se neuvoln d...

Page 33: ...Zabra te zran n d t n hodn m p dem nebo vyklouznut m V dy pou vejte bezpe nostn p s UPOZORN N P li voln nastaven bezpe nostn p sy nebo p ezka kter nen spr vn zapnut mohou v p pad nehody zp sobit ivot...

Page 34: ...zdu M rn m tahem dop edu a dozadu zkontrolujte zda se p v s nem e rozjet Nezaji t n p v s m e p i nastupov n a vystupov n z p v su zp sobit nehodu se ivot ohro uj c mi zran n mi kter zp sob v n zran n...

Page 35: ...p l ot ky proti sm ru hodinov ch ru i ek Pamatujte e matice osy mus b t na roubov na na rychloup nac z vit proveden m alespo p ti pln ch oto en UPOZORN N M n ne p t pln ch oto en z vitu nezajist do st...

Page 36: ...nost va eho d t te Bezpe nostn praporek se vkl d do speci ln t rbiny v kloubu rukojeti na lev stran p v su UPOZORN N Pokud pou v te p v s za kolo jako p v s za kolo bezpe nost praporek mus b t v dy na...

Page 37: ...mena jsou namontov na podobn m zp sobem jako oj Lev rameno se zasune do obj mky oje a prav rameno se zasune do obj mky identick ho proveden na prav stran a Zvedn te p edn st p v su nebo jej sklopte do...

Page 38: ...ORN N Ko rek na b h n lze pou vat i pro sportovn aktivity b h a j zdu na kole kov ch brusl ch a ve v ku 9 m s c a um sed t stabiln bez opory a nep esahuje v hu 15 kg a v ku 111 cm UPOZORN N P v s za k...

Page 39: ...N Matice zadn n pravy mus b t uta ena alespo o 5 pln ch ot ek ujist te se e je t sn Na n kter ch m ete vym nit p vodn matici n pravy aby bylo m sto pro spojku n pravy Pro jistotu se zeptejte sv ho odb...

Page 40: ...vatel hromadn dopravy povinni um stit v dopravn ch prost edc ch 41 elezni n nebo tramvajov koleje jsou zvl t nebezpe n proto e v nich mohou b hem p ej d n uv znout kole ka Doporu ujeme aretaci zabloko...

Page 41: ...lujte l tku zda nen natr en od en nebo jinak po kozen Pravideln ist te sedadlo teplou vodou a jemn m m dlov m roztokem Nikdy nepo u vejte agresivn istic prost edky nebo rozpou t dla aloun n by nem lo...

Page 42: ...41...

Page 43: ...rbunden wenn die Verbindung wie auf dem Bild d aussieht e Schlie en Sie die Rei verschl sse der Stoffklappe oben und hinten und sichern Sie sie mit dem Klettverschluss ZUSAMMENKLAPPEN DES RAHMENS a St...

Page 44: ...erheitsgurte k nnen an die Gr e des Kindes angepasst werden f Stellen Sie die Sicherheitsgurte so ein dass das Kind sicher von den Gurten gehalten wird TIPP Wenn Sie eine flache Hand zwischen die Gurt...

Page 45: ...enprofil zu verwenden Ver wenden Sie keine Gel ndereifen RADABDECKUNG TIPP Der Radschutz sch tzt R der vor Kollisionen mit Hindernissen ACHTUNG Der Fahrradanh nger ist mit einer Radabdeckung ausgesta...

Page 46: ...ob Ihr Fahrrad zum Ziehen des Anh ngers geeignet ist berpr fen Sie die Bedienungsanleitung des Fahrrads oder fragen Sie den Hersteller oder Fahrrad h ndler WARNUNG Der Deichselanschluss muss korrekt m...

Page 47: ...ersteller oder Fahrradh ndler WARNUNG Der Deichselanschluss muss korrekt montiert werden Eine unsachgem montierte Kupplung kann sich w hrend der Fahrt l sen und zu einem Unfall mit lebensgef hrlichen...

Page 48: ...assen ist Das Ziehen eines Anh ngers hinter einem Fahrrad das nicht zum Ziehen geeignet ist kann zu einem Rahmenbruch und einem Unfall mit lebensgef hr lichen Verletzungen f hren Die Verbindung sollte...

Page 49: ...en hnlich wie die Deichsel montiert Der linke Arm wird in die Deichselhalterung gesteckt w hrend der rechte Arm in die identisch konstruierte Halterung auf der rechten Seite gesteckt wird a Heben Sie...

Page 50: ...Norm EN 1888 2 2018 EN 15918 2011 A2 2017 EK2 AK2 3 14 02 2 2021 Der Booster2 ist ein 3 in 1 Modell Jede Version hat eigene und spezifische Anforderungen und Verwendungszwecke LESEN SIE UNBEDINGT DIE...

Page 51: ...ss ein Reflektor mit einem Kontrollschild an auff lliger Stelle am Heck angebracht werden 13 WARNUNG Vergewissern Sie sich vor jeder Benutzung dass der angeh ngte Anh nger nicht die Bremsen Pedale ode...

Page 52: ...wissern Sie sich dass die H nde Ihres Kindes au erhalb der Reichweite von Stellen bleiben an denen sie eingequetscht oder eingeklemmt werden k nnten z B wenn Teile des Wagens wie Haube oder Bauchb gel...

Page 53: ...treten k nnen Es ver steht sich von selbst dass gesunder Menschenverstand Vorsicht und Sorgfalt Fak toren sind die nicht in dieses Erzeugnis eingebaut werden k nnen Diese Faktoren liegen in der Verant...

Page 54: ...53...

Reviews: