background image


a. Install the battery

Take the battery out, find the female plug in the battery and the male plug in the bike. Match the 

female plug to the male plug, then press the battery case until the two plugs are completely locked. (Move the battery 
slowly, if it is a movable battery, it means the plugs are not locked completely. Should press the front part of battery case 
heavily to make sure the battery is installed.)     

b. remove the battery out: Left hand hold the bike, put the index finger of right hand into the battery handle, thumb and 
middle finger hold the battery case, then pull the whole battery case out.   


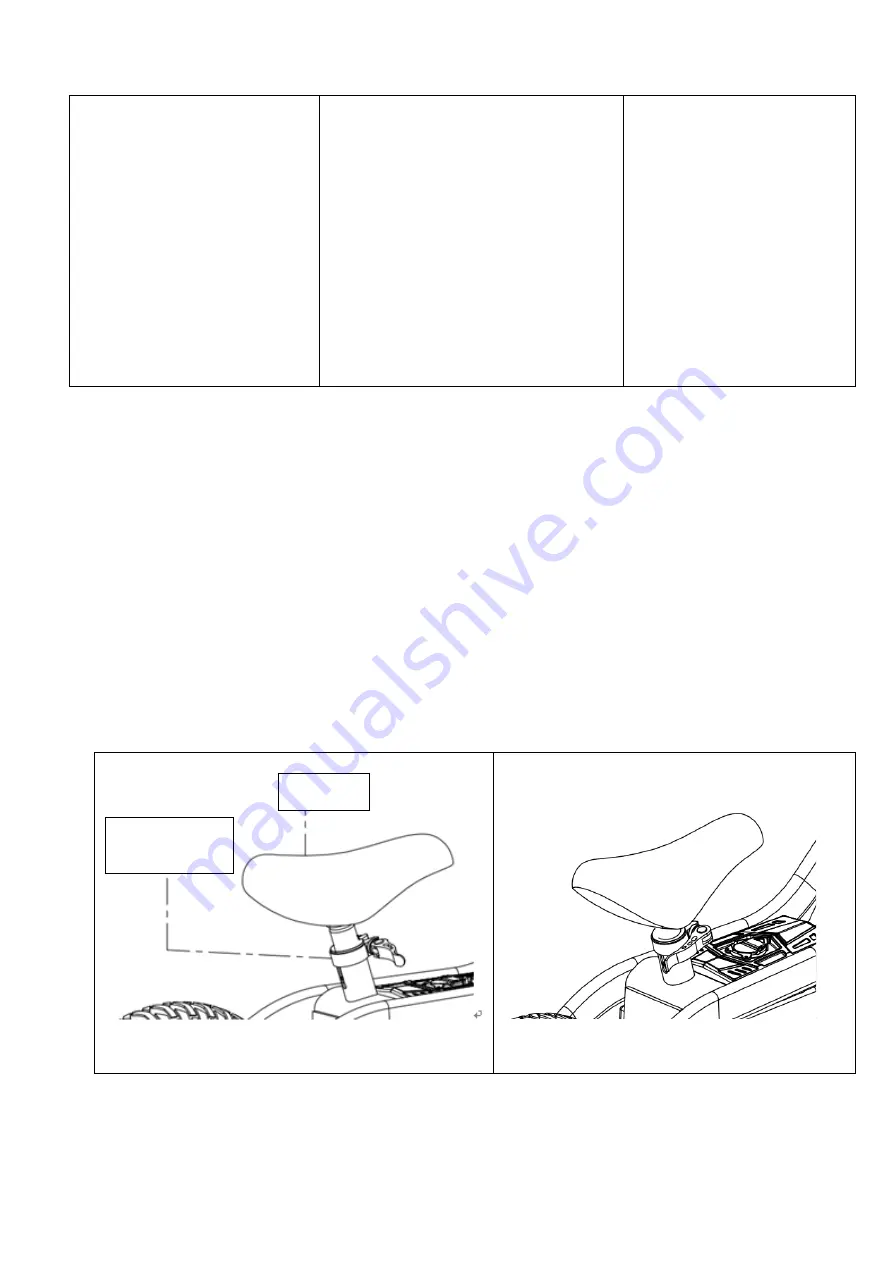
Step 3 Adjust the saddle 


Release the lock, adjust the saddle into the right position, then lock it. 


Quick release 
Locker 

Saddle 

Summary of Contents for BALANCE

Page 1: ...User Product Manual PRODUCT USE AND CARE INSTRUCTIONS ELECTRIC BALANCE BIKE...

Page 2: ...g instructions and precautions users must read carefully and follow the instructions All users are responsible for any consequences that are caused by violating warning contents or prompt operations W...

Page 3: ...d production processes have strict testing for every pair of electric balance bike Riding without attention to contents of this manual may cause injury Falling losing control collision or failure to f...

Page 4: ...3 1 2 1 Prepare install the electric balance bike Main product Charger with tool Battery Manuel...

Page 5: ...0 Max climbing angle 6 9 Max weight capacity 50KG Battery Capacity 4 0Ah Types 18650 high rate discharge battery Charging duration 3 6 hours Charging times 300 times Motor Type Brush motor Highest spe...

Page 6: ...2 3 Description of parts Brake bar Battery Saddle Rear wheel Brake Motor cover Foot pedal Chain cover Charging pot Front rim Handle grip Front fork Front tire Handlebar Throttle bar Headset Handlebar...

Page 7: ...6 1 2 4 How to assemble the X PRO BALANCE STEP 1 Assemble the handlebar...

Page 8: ...n block 1 Put C into location D then cover B 2 Put A into B then use the tools screw to D NOTE When assemble the handlebar the brake wire should go to the Left side from front side see STEP 2 Install...

Page 9: ...e battery it means the plugs are not locked completely Should press the front part of battery case heavily to make sure the battery is installed b remove the battery out Left hand hold the bike put th...

Page 10: ...reen light off Low battery capacity Red light on green and yellow light off 2 Safe using of electric balance bike We hope every user can ride electric balance bike safely and enjoy the fun You can rec...

Page 11: ...ill keep children safe 9 Do not ride on slippery and wet surfaces or on rainy days Do not ride in dark place 10 Do not ride on obstacles such as twigs litter or small stones etc Avoid riding in narrow...

Page 12: ...s low power or it may affect battery lifetime Don t use the battery if it emits odor or overheats If the electric balance bike is not used for long time the battery must be charged every 2 3 months Do...

Page 13: ...cable into the electric balance bike connect the cable with power supply Please refer to power supply for charging state The Red light of charger indicates that it has begun to charge otherwise check...

Page 14: ...g Temperature 10 40 Storage Time 20 35 12 months Charge every 2 3 months Storage Humidity 65 3 5 Shipping Notes Lithium battery contains dangerous articles Ship lithium only according to local law 4 M...

Page 15: ...t dust from entering you should cover Electric balance bike Do not connect the power Store Electric balance bike indoors in a dry and suitable temperature If you do not use it for a long time please d...

Page 16: ...T COVER Product repair and or part replacement because of improper installation connections to improper voltage supply abuse neglect accident unauthorized repair or other cause not within control of o...

Reviews: