background image

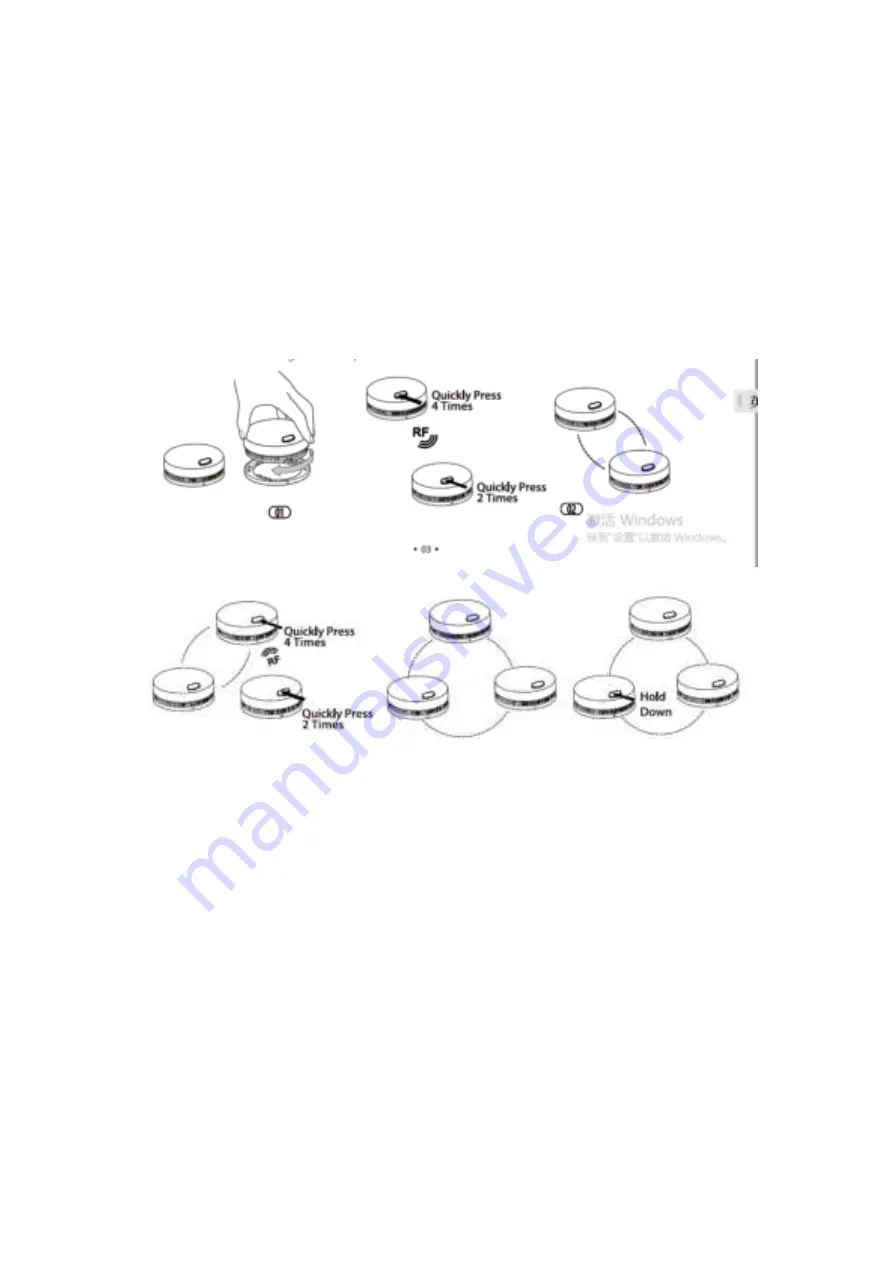
connect to. After the third unit successfully joins the interconnected network, both units will beep 

once and automatically exit the interconnection mode.   

5.


If you want to connect more units, simply repeat step 4.Up to 24 alarms can be interconnected this 

way. 

To ensure that all alarms enter the same interlinked network, make sure you only work 

with 2 units at a time

one unit enters the pairing mode and the other unit enters the 

searching mode. 

6.


Test the alarms according to th

e steps in the section “Alarm Test”. 


Quickly press 4 times 

Quickly press twice 

RF 

Hold down 


NOTES 

1.


The alarm will enter the searching mode or the pairing mode for 60 seconds with the red LED 

flashing. After 60 seconds, repeat step 2 to connect the alarms. If needed, press the test/silence 

button once while the alarm is in the searching mode or the pairing mode, and the red LED will 

stop flashing and the alarm will quit the pairing mode to enter normal status. 

2.


Test all wireless alarms to ensure they are interconnected before installation.   

Summary of Contents for SD19-W

Page 1: ...X Sense Wireless Interlinked Smoke Alarm Model SD19 W SD20 W SD19 W SD20 W ...

Page 2: ...RUCTIONS OR TO POTENTIALLY HAZARDOUS SITUATIONS PAY SPECIAL ATTENTION TO THESE SITUATIONS 2 THIS ALARM IS NOT INTENDED TO ALERT HEARING IMPAIRED INDIVIDUALS THE USE OF ALCOHOL OR DRUGS MAY ALSO IMPAIR ONE S ABILITY TO HEAR THE SMOKE ALARM 3 FIRES IN CHIMNEYS WALLS ROOFS DIFFERENT LEVELS OR BEHIND CLOSED DOORS MIGHT NOT BE DETECTED 4 THIS DEVICE DOES NOT DETECT FLAMES HEAT CARBON MONOXIDE OR OTHER ...

Page 3: ...ked alarms only How to Interconnect 1 Make sure you only work with 2 units at a time and make sure that they are both turned on to ensure successful connection NOTE To turn on SD19 W SD20 W attach the alarm to the mounting bracket and turn clockwise to lock it To learn how to turn on different models of wireless interlinked alarms please refer to their specific user manual for more details 2 Quick...

Page 4: ...other unit enters the searching mode 6 Test the alarms according to the steps in the section Alarm Test Quickly press 4 times Quickly press twice RF Hold down NOTES 1 The alarm will enter the searching mode or the pairing mode for 60 seconds with the red LED flashing After 60 seconds repeat step 2 to connect the alarms If needed press the test silence button once while the alarm is in the searchin...

Page 5: ... the first time or when the group configuration has changed In addition to the weekly tests you should perform it is recommended to test the alarm after returning from a long trip or vacation If your X Sense Link SD19 W SD20 W is interconnected to other wireless smoke alarms we recommend that every individual smoke alarm is tested during the weekly test Test a single alarm Test all interconnected ...

Page 6: ...lled in a kitchen ensure it has an accessible silence button and install it as far away from the stove and sink as possible to avoid false alarms Study Bedroom Garage Living Room Kitchen Basement Smoke Detectors Carbon Monoxide Detectors Smoke Carbon Monoxide Detectors Fire Extinguishers 1 Prioritize the installation of an alarm in the bedroom and walkways and make sure you can hear the alarm from...

Page 7: ...length of a room or hall is beyond 30 feet 900 cm several alarms should be installed in the same room 7 When the wall or ceiling is angled the alarm needs to be installed within 3 feet 90 cm of the highest wall or ceiling point measured horizontally in the room 8 In multi level houses or apartments install at least one wireless smoke alarm on each level and keep them installed in a straight vertic...

Page 8: ...tion we recommend that you test the interconnected smoke alarms in the rooms where you plan on installing them to ensure they are within range of each other and that nothing will interfere with their communication 1 Use the mounting bracket to mark the screw holes on the ceiling or the wall 2 Drill holes at the 2 marks using an appropriately sized drill bit Insert the anchor plugs and screw the mo...

Page 9: ...y 4 seconds All alarms in the interconnecte d network Test Single Smoke Alarm Red LED flashes 3 times every 4 seconds 3 quick beeps every 4 seconds Press the test silence button once All interconnected smoke alarms in the network Red LED flashes 3 times every 4 seconds Continuous beeping until you release the test silence button Hold down the test silence button Silence Mode Red LED flashes once e...

Page 10: ...ke alarm the unit that detected the smoke to silence all connected units you must also press the test silence button on the initiating smoke alarm 2 While interconnected the initiating smoke alarm cannot be triggered again during the 9 minute silence duration However all other interconnected alarms can be triggered again if they detect dangerous smoke levels during the silence mode Technical Speci...

Page 11: ... brush attachment to remove dust and dirt 3 Never use detergents or other solvents to clean the unit 4 Avoid spraying air fresheners hair spray or other aerosols near the alarm 5 Do not paint the unit Paint will seal the vents and interfere with the sensor s ability to detect fire 6 Never attempt to disassemble the unit or clean inside Doing so will void your warranty 7 When removed place the smok...

Page 12: ...adio communications However there is no guarantee that interference will not occur in a particular installation If this equipment does cause harmful interference to radio or television reception which can be determined by turning the equipment off and on the user is encouraged to try to correct the interference by one or more of the following measures Reorient or relocate the receiving antenna Inc...

Page 13: ...Manufacturer and Service Information X Sense Innovations Co Ltd Address B4 503 Kexing Science Park 15 Keyuan Road Shenzhen 518057 CHINA Email support x sense com ...

Reviews: