background image

STEP 4: 


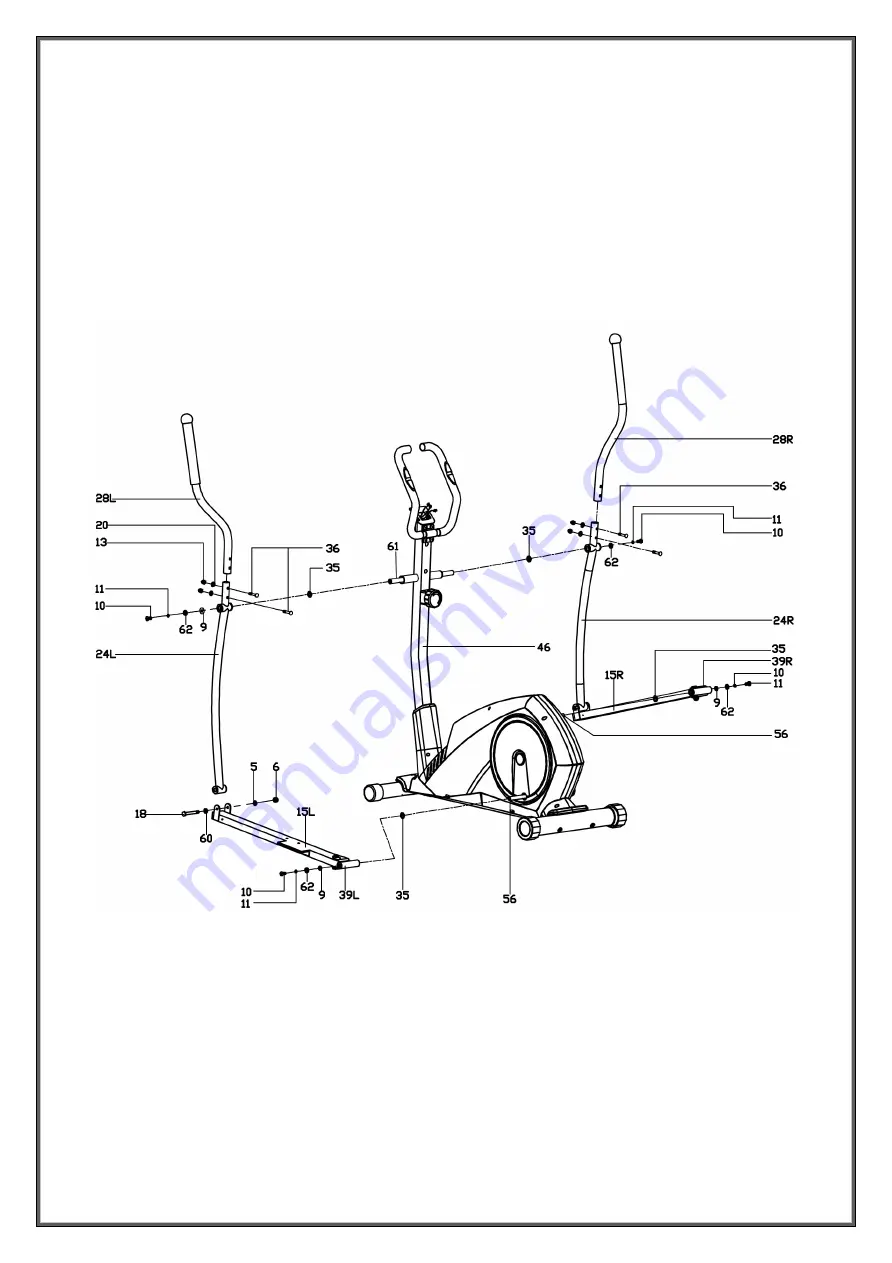
1. Attach the swing tube (24L/R) to the long axle (61) of handlebar post (46) with Allen bolt (10), spring 

washer (11), flat washer (62), D shape washer (9) and Waved washer (35). (NOTE: 

DO NOT Tighten

 via 

this step.) 

2. Attach the pedal tube joint (39L/R) to the crank (56L/R) with Allen bolt (10), spring washer (11) , flat 

washer (62), D shape washer (9) and Waved washer (35). (NOTE: 

DO NOT Tighten

 via this step.) 

3. Connect the swing tube (24L/R) to the pedal support (15L/R) with Hex bolt (18), flat washer (5), flat 

washer (60) and nylon nut (6), and then tighten Allen bolt (10), Hex bolt (18) and nylon nut (6). 

4. Secure the handlebar (28L/R) to swing tube (24L/R) with carriage bolt (36), arc washer (20) and nylon 

nut (13). 


Summary of Contents for XFIT INDOOR

Page 1: ...Elliptical User s Manual The specifications of this product may vary slightly from the illustrations and are subject to change without notice...

Page 2: ......

Page 3: ...doctor before beginning a training program He can define the maximum setting Pulse Watts Duration of training etc to which you may train yourself and can get precise information during training This m...

Page 4: ...EXPLODED DIAGRAM...

Page 5: ...pr 45 Allen bolt M8x16 8 15L R Pedal support 1 pr 46 Handlebar post 1 16 Phillips pan head screw M5x10 4 47 Protective guard 1 17L R Protective guard 2 pr 48 Tension controller 1 18 Hex bolt 12 M10 80...

Page 6: ...EMBLY INSTRUCTIONS Note Assembly requires 2 people PREPARATION Before assembling make sure that you will have enough space around the item Use the present tooling for assembling before assembling plea...

Page 7: ...e from upper tension cable 51 ensured the Cable has been mounted correctly as shown 3 Secure the handlebar post 46 to the main frame 1 with Allen bolt 45 and spring washer 44 and flat washer 12 STEP 3...

Page 8: ...39L R to the crank 56L R with Allen bolt 10 spring washer 11 flat washer 62 D shape washer 9 and Waved washer 35 NOTE DO NOT Tighten via this step 3 Connect the swing tube 24L R to the pedal support...

Page 9: ...ective guard 26a b and protective guard 55a b to the joint of handlebar 28L R and swing tube 24L R and then secure with Phillips tapping screw 27 2 Attach the protective guard 17L R to the pedal tube...

Page 10: ...1 to the bracket of handlebar post 46 with Phillips pan head screw 57 2 Finally attach the protective guard 32 47 to handlebar post 46 and then fix with tapping screw 59 Check and tighten the screws a...

Page 11: ...ght 45 kg Console Mode Distance time calories speed special case for mobile phone and tablet Certification CE ROHS EN957 CAUTION During exercise heavy sweating can cause mechanical and electrical dama...

Page 12: ...til pointer lock on to TIME The total working time will be shown when starting exercise 2 SPEED Press the MODE key until the pointer advance to SPEED The current speed will be shown 3 DISTANCE Press t...

Page 13: ...and pulse rate and delivering more oxygen to your muscles COOL DOWN at the end of your workout repeat these exercises to reduce soreness in tired muscles WARM UP EXERCISES Inner Thigh Stretch Sit wit...

Page 14: ...ach down as far as you can and hold for 15 counts Side Stretch Open your arms to the side and continue lifting them until they are over your head Reach your right arm as far upward toward the ceiling...

Page 15: ...achinery and are governed by European regulations Upon expiry of the warranty any replacement part is covered by a 6 month warranty THE WARRANTY SHALL NOT APPLY When the machine is used for any purpos...

Page 16: ...34 koupi Avenue Koropi P C 19441 P O Box 6201 Tel 210 66 20 921 2 Fax 210 66 20 923 E mail info xtr gr f xtrstores xtr gr Tel for all of Greece 801 11 15 100 www xtr gr...

Reviews: