background image


Page20 

Troubleshooting: Loose Wire? 

Please  check  the  wires  in  your  battery  and  controller  area.    Give  each  wire  at  the 

connection a firm but gentle tug pulling away from the connection.    Look for any loose, 

bare, blackened, broken, or disconnected wires.     

1.    Check the wires at the rear of the charging socket 

2.    Check the wires at the rear of the fuse holder 

3.    Check all fuses 

4.    Check the wires that connect the batteries together 

5.    Check the connections on the controller 


Troubleshootin

g:  Scooter  Won’t  Run,  Charger  Light  Stays 

Green 

When you plug your charger into your scooter and the wall outlet the charger light stays 

green. This is telling you that somewhere between charger socket, controller, fuse holder 

and batteries you have an open circuit. Please remove the floor plate and check the wires 

in  this  area.  You  may  find  a  wire  that  is  not  connected,  a  connector  that  is  not  pushed 

together properly or a fuse holder that is not letting the fuse connect properly. 


Troubleshooting: Scooter 

Won’t Run, Charger Light Stays Red 

& Green 

When you plug your charger into your scooter and the wall outlet the charger light stays 

green. This is telling you that somewhere between the batteries, fuse, and charger socket 

you have an open circuit. Please remove the floor plate and check the wires in this area. 

You may find a wire that is not connected, a connector that is not pushed together properly 

or a fuse holder that is not letting the fuse connect properly. 


Summary of Contents for X-140

Page 1: ...Page1 X 140 Electric Scooter Owner s Manual PLEASE BE SAFE WHEN RIDING ALWAYS WEAR A HELMET AND OBEY ALL LAWS X Treme TM Electric Scooters ...

Page 2: ...6 8 hours after the light on the charger turns green 5 DO NOT allow this unit to deep discharge the battery 6 For safety purposes DO NOT charge for over 8 hours 7 Turn the unit OFF when not in use This PRODUCT IS NOT INTENDED FOR EXTREME or OFF ROAD Use Please take care of your X 140 DO NOT JUMP or ABUSE THIS PRODUCT DO NOT RIDE IN WET ICY CONDITIONS Failure to follow these instructions will VOID ...

Page 3: ... this product See Product Handbook for more information This product is recommended for riders 14 YEARS OF AGE and older SAFETY Persons without excellent vision balance coordination reflex muscle and bone strength and good decision making capabilities should not use this product Minors without adult supervision should not use this product Persons unwilling or unable to take responsibility for thei...

Page 4: ...nds face feet and hair away from all moving parts Do not touch the motor or wheels while they are rotating Brakes are designed to control speed as well as stop the scooter Practice braking for proper slowing down and smooth stops Maintain your X Treme X 140 as recommended in this Product Handbook Use only quality replacement parts as recommended by the manufacturer Inspect the entire scooter prior...

Page 5: ...JUSTMENTS 13 MAINTENANCE SCHEDULE OTHER QUESTIONS 13 GENERAL INFORMATION TECH SUPPORT 14 TROUBLESHOOTING 16 20 TROUBLESHOOTING NO POWER 16 TROUBLESHOOTING AFTER FULLY CHARGING POWERS ONLY FOR SHORT DISTANCE USE 16 17 TROUBLESHOOTING SCOOTER TAKES OFF WILL NOT STOP 17 TRBOULESHOOTING HOW TO CHECK CHARGER BATTERY CONTROLLER TO SEE IF THEY ARE FUNCTIONAING PROPERLY 18 TROUBLESHOOTING COULD IT BE A BA...

Page 6: ...W TO ADJUST DRUM BRAKES 22 HOW TO CHANGE CHARGER SOCKET 22 23 HOW TO CHECK CHARGER LIGHT STATUS UNDERSTAND LIGHT SEQUENCE 23 HOW TO REPLACE INSTALL FUSE 23 24 HOW TO CHECK CHARGER OUTPUT 24 HOW TO INSTALL BEARINGS 24 HOW TO REMOVE INSERT PIN CONNECTORS 24 25 HOW TO REPLACE A CONTROLLER 25 HOW TO TEST MOTOR DIRECT TO BATTERY 25 26 HOW TO TEST THROTTLE VOLTAGE 26 27 HOW TO INSTALL SEAT POST 27 HOW T...

Page 7: ...until you have inflated the tires to the correct PSI and completely charged the battery Failure to follow these instructions may damage your vehicle and void your warranty CALL TOLL FREE OR GO ONLINE 1 253 777 0690 www x tremescooters com support For General Information or Parts Visit www x tremescooters com ...

Page 8: ...Page8 Getting To Know Your X 140 Scooter Photo s may vary ...

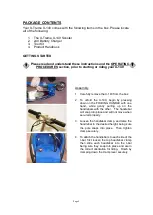
Page 9: ...d the X 140 begin by pressing down on the FOLDING HANDLE with one hand while gently pulling up on the handlebars with the other The handlebar will snap into place and will not move when secured properly 3 Loosen the handlebar clamp and raise the handlebar to the desired height being sure the pole snaps into place Then tighten clamp securely 4 To attach the handlebars to each side of the t bar firs...

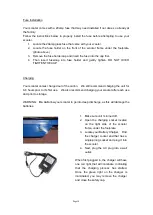
Page 10: ...he carton We still recommend charging the unit for 6 8 hours prior to it s first use We also recommend charging your scooter after each use and prior to storage WARNING Do not allow your scooter to go into deep discharge as this will damage the batteries 1 Make sure unit is turned off 2 Open the charging socket located on the right side of the scooter frame under the footplate 3 Locate your Batter...

Page 11: ...els like it is loosing power or not accelerating to full speed the scooter is ready to be re charged FOLDING STORAGE When you are done riding the X 140 you can fold it down for compact storage and transportation To fold down the X 140 first detach the left right handlebar grips and lower the t bar See Assembly on page 7 for more information Next use one hand to push down on the folding handle whil...

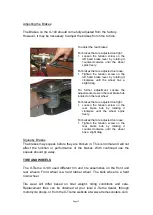
Page 12: ... local X Treme dealer through motorcycle shops or from the X Treme website at www x tremescooters com To adjust the rear brakes For brakes that are adjusted too tight 1 Loosen the tension screw on the left hand brake lever by rotating it counter clockwise until the wheel spins freely For brakes that are adjusted too loose 1 Tighten the tension screw on the left hand brake lever by rotating it cloc...

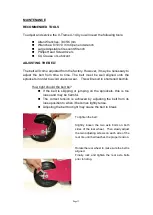
Page 13: ... uneven wear This will result in shortened belt life How tight should the belt be If the belt is skipping or jumping on the sprockets this is too loose and may be harmful The correct tension is achieved by adjusting the belt from its loose position to when it becomes lightly tense Adjusting the belt too tight may cause the belt to break To tighten the belt Slightly loosen the two axle bolts on bot...

Page 14: ...you ride your X 140 Clean the exterior of the unit with a soft damp rag Check that all nuts and bolts are securely tightened Check battery charger for any frayed cut wires OTHER QUESTIONS For additional questions service instructions further information and important phone numbers please go to the X Treme website at www x tremescooters com Thank you for purchasing an X Treme X 140 and please tell ...

Page 15: ...Page15 DO NOT RETURN TO STORE IF YOU NEED HELP CALL OR GO ONLINE 1 253 777 0690 www x tremescooters com support For General Information or Parts Visit www x tremescooters com ...

Page 16: ...brake lever has a power cut off switch The throttle variably controls the speed of the scooter The scooter On Off switch can be defective Without a good switch the scooter has no power but the test of this is the power light Does the power light come on when the switch is activated to the On position Troubleshooting After Fully Charging Powers Only For Short Distance Use 1 Suspect the battery char...

Page 17: ...l box Scooter not moving and Lights do not work using battery but lights do work when you plug the charger into the side of the scooter and also plug the charger into the wall Scooter will not move at all and all lights do not work lights do work when you plug the charger into wall A No fuse in fuse assembly add one of the fuses includes with the scooters B Bad Fuse unscrew the cap only on the fus...

Page 18: ...e plugged into the port labeled Charger on the Controller Confirm the Black Black wires coming from the On Off Switch are plugged into the port labeled Lock on the Controller Confirm the Red Black wires coming from the handlebars are plugged into the port labeled Brake on the Controller Confirm the Red Black Green wires coming from the handlebars are plugged into the port labeled Derailleur on the...

Page 19: ...ire and terminal out of the connector Carefully angle the tab back out slightly so it will catch when re installed Check the wire to terminal connection condition solder etc and repair accordingly It s suggested to do this one wire at a time to confirm the wires remain in the correct position or label or diagram in such a way you can reassemble in the correct positions Troubleshooting Scooter Is O...

Page 20: ...his is telling you that somewhere between charger socket controller fuse holder and batteries you have an open circuit Please remove the floor plate and check the wires in this area You may find a wire that is not connected a connector that is not pushed together properly or a fuse holder that is not letting the fuse connect properly Troubleshooting Scooter Won t Run Charger Light Stays Red Green ...

Page 21: ...axle nut 6 Then locate the belt tension bolts These bolts go from the rear axle to the frame 7 When you tighten the nuts on these bolts they pull the whole axle and wheel back tightening the belt 8 Adjust the belt until there is very little deflection when pushing down in middle of your belt 9 These bolts also controls wheel alignment be sure to center the wheel in the center of frame 10 After you...

Page 22: ...ng is achieved 4 Lock this position down by tightening the nuts Avoid adjusting brakes on handlebars because there is a safety switch built into the handles to kill motor while using the brakes How To Change Charger Socket 1 Remove the 4 bolts that attach the seat post to deck and 2 bolts on deck up front Remove foot deck if bolts get stripped you need to drill off the heads using 1 4 drill bit or...

Page 23: ...or bad fuse fuse holder If the charger just turns Red for a minute or two this may indicates a defective cell in one of the batteries and batteries will need to be replaced A defective cell reacts like a fully charged battery and will bring other batteries down to its level If a flashing Red light appears on the charger this may indicate the charger wires are crossed and or touching each other In ...

Page 24: ...the scooter Attention Do Not allow the two probes to touch each other while in the charger socket as it may cause a short and or spark This will give you the charger output reading to compare with what your scooter requires How To Install Bearings 1 Remove the rear front wheel 2 Remove the old bearing To do this you will need to insert something like a screw driver from the opposite side and simpl...

Page 25: ...connectors 5 With the Original Controller free of all wire connectors remove from frame 6 Install the New Controller in its place with the original screws if equipped or with Double Sided Tape 7 Install Main Fuse 8 With Drive Wheel Not touching Any surface test run the motor and check accessories to confirm that they are functioning correctly 9 Re assemble and test ride This is also a good time to...

Page 26: ...ttle Voltage Tools Multi meter to read DC voltage 1 Set the scooter bike so that the rear wheel is not touching the ground 2 Access the Controller Wire Harness area and locate the Throttle control connector at the Controller It is the set of Red Green Black Yellow wires coming from the handle bars and going into a connector on the controller You will be testing the Red Green and Black wires 3 Set ...

Page 27: ... battery compartment Find the white connector on the controller marked Throttle Disconnect this white connector Mark the color of the wires on the white connector so you can insert the new wires in the correct place 3 Look down inside the white connector that goes to the throttle you will see metal pins The pins are held in place by a small tab that bends outward 4 Reach inside the front of the co...

Page 28: ...Page28 Battery Wiring Diagram ...

Page 29: ...Page29 ...

Reviews: