background image

The   XG-470   uses   both   front   wheel   and   rear   wheel   Hub   Brake   systems 
activated by  hand levers (on either  side of  the handlebar). Squeezing the 
BRAKE LEVER with your left hand activates the rear brake, and squeezing 
the BRAKE LEVER with your right hand activates the front brake.  Make sure 
to release the THROTTLE GRIP when engaging the brakes.

Practice   braking   on   a   smooth,   dry  surface   to   get   used   to   the   feel   of   the 
braking system. Braking distance is affected by wet conditions and loose and 
uneven riding surfaces.

Adjusting the Brakes.
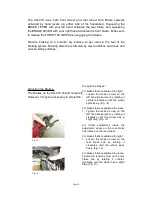
The Brakes on the XG-470 should come fully adjusted from the factory. 
However, it may be necessary to adjust the brakes from time to time.

Fig. 12

Fig. 13

Page14

To adjust the brakes::

For brakes that are adjusted too tight:
1. Loosen the tension screw on the 

left hand brake lever by rotating it 
counter-clockwise   until   the   wheel 
spins freely. (Fig. 12)

For brakes that are adjusted too loose:
1. Tighten the tension screw on the 

left hand brake lever by rotating it 
clockwise   until   the   wheel   has   a 
slight drag. (Fig. 12)

For   further   adjustment,   locate   the 
adjustment   screw   on   the   rear   brake 
hub located on the rear wheel.  

For brakes that are adjusted too tight:
1. Loosen the tension screw on the 

rear   brake   hub   by   rotating   it 
clockwise   until   the   wheel   spins 
freely. (Fig. 13)

For brakes that are adjusted too loose:
Tighten the tension screw on the rear 
brake   hub   by   rotating   it   counter-
clockwise until the wheel has a slight 
drag. (Fig. 13)

Summary of Contents for XG-470

Page 1: ...PLEASE BE SAFE WHEN RIDING Page1 X Treme TM Gasoline Scooters Model XG 470 Product Handbook ...

Page 2: ...for every gallon of High Octane gasoline 3 Tanaka Perfect Mix or similar quality 2 Cycle Engine Oil is recommended Oil can be purchased from your local X Treme Dealer Outdoor Power Equipment Dealer or a Power Sports Dealer 4 High Octane Fuel recommended 90 octane or higher This PRODUCT IS NOT INTENDED FOR EXTREME or OFF ROAD Use Please take care of your XG 470 Page2 IMPORTANT Failure to follow the...

Page 3: ...of drugs and or alcohol Avoid uneven surfaces potholes surface cracks and obstacles DO NOT use a water hose to clean this product See Product Handbook for more information This product is recommended for riders 16 YEARS OF AGE and older SAFETY Persons without excellent vision balance coordination reflex muscle and bone strength and good decision making capabilities should not use this product Mino...

Page 4: ...others away while making carburetor adjustments Use only quality replacement parts as recommended by the manufacturer Transportation and Storage Allow the engine to cool empty the fuel tank and fold the X Treme XG 470 before carrying or storage It is recommended that you empty the fuel tank prior to shipping or storage to prevent fuel leaks Clean the X Treme XG 470 carefully and store in a cool dr...

Page 5: ...GETTING TO KNOW YOUR X TREME XG 470 6 PACKING CONTENTS 7 GETTING STARTED 7 ASSEMBLY 7 GAS TANK INSTALLATION 8 FUELING 9 RIDING BRAKING 9 TRANSPORTING AND STORAGE 9 OPERATING PROCEDURES 10 STARTING 10 MAINTENANCE 10 RECOMMENDED TOOLS 10 CARBURETOR ADJUSTMENT 10 BRAKE SYSTEM 12 Page5 ...

Page 6: ...TIRES AND WHEELS 14 ADJUSTING THE HEAD UNIT 14 ADJUSTING THE CHAIN 14 MAINTENANCE SCHEDULE 15 OTHER QUESTIONS 16 GENERAL INFORMATION TECH SUPPORT 16 GETTING TO KNOW YOUR X TREME XG 470 Page6 ...

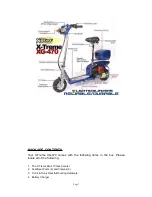
Page 7: ...ur X Treme XG 470 comes with the following items in the box Please locate all of the following 1 The X Treme XG 470 Gas Scooter 2 Seat Seat Posts 2 and Clamps 2 3 Trunk Trunk Rack Mounting Hardware 4 Battery Charger Page7 ...

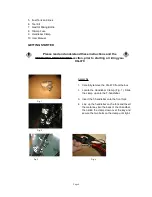
Page 8: ...tarting or riding your XG 470 Fig 1 Fig 2 Fig 3 Fig 4 Page8 Assembly 1 Carefully remove the XG 470 from the box 2 Locate the Handlebar Clamp Fig 1 Slide the clamp up onto the T handlebar 3 Insert the T handlebar onto the front fork 4 Line up the handlebar on the fork and Insert the metal key into the back of the t handlbar then slide the clamp down over the key and secure the two bolts on the clam...

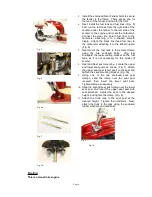
Page 9: ... scooter frame using the two enclosed bolts Fig 6a Disregard the top mounting bracket on the fuel tank as it is not necessary for this model of scooter 8 Seat and Seat post mounting Locate the upper and lower seat posts as shown Fig 7 Attach the upper seat post short post to the seat and tighten the seat mounting bracket Fig 7a 9 Using one of the two enclosed seat post clamps slide the clamp over ...

Page 10: ... sure that all of the exposed bolts and screws are tightened 2 Raise the kickstand to its upright position 3 Make sure the engine is running 4 Put one foot on the deck of the XG 470 while pushing off with the other foot gently rotate the THROTTLE GRIP on the right side of the handlebars The XG 470 will begin to move on its own power 5 Control your speed by rotating the accelerator grip The more yo...

Page 11: ...stage if the engine does not start repeat the starting procedure After starting the engine allow the engine 2 3 minutes to warm up prior to riding Stopping Gradually decrease the engine speed to an idle speed and press the stop switch on the handlebar tube MAINTENANCE RECOMMENDED TOOLS To adjust and service the X Treme XG 470 you will need the following tools Allen Wrenches 3 4 5 6 mm Wrenches 10 ...

Page 12: ...ontinues to move after idle speed adjustment contact X Treme or your local X Treme service center Page12 Note Standard idle RPM is about 2500 3000 RPM Idle Speed Adjustment 1 Start the engine 2 Using a long Philips head screwdriver gently turn the top screw clockwise until the XG 470 starts to move forward Fig 9 3 Then back out by turning the screw counterclockwise until the XG 470 stops Correct i...

Page 13: ...M Page13 To clean the air filter 1 Using a Philips head screwdriver remove the carburetor cover by turning the cover screw counter clockwise Fig 10 2 Remove and clean the air filter the spongy material on top of the air intake with a damp rag Fig 11 3 Put the air filter back into its original position and replace the cover ...

Page 14: ...sary to adjust the brakes from time to time Fig 12 Fig 13 Page14 To adjust the brakes For brakes that are adjusted too tight 1 Loosen the tension screw on the left hand brake lever by rotating it counter clockwise until the wheel spins freely Fig 12 For brakes that are adjusted too loose 1 Tighten the tension screw on the left hand brake lever by rotating it clockwise until the wheel has a slight ...

Page 15: ...me purchasable from any motorcycle shop to avoid inconvenient punctures ADJUSTING THE HEAD UNIT The head unit should come adjusted from the factory However riding on rough terrain and general use may cause the head unit to become loose over time It may be necessary to adjust the head unit from time to time Page15 To adjust the head unit 1 Rotate the handle bar to expose the HEAD UNIT 2 Using a lar...

Page 16: ...ping on the sprockets this is too loose and may be harmful If the chain is making a humming sound when the wheel is turning this is too tight and may cause the chain to snap The correct tension is achieved by adjusting the chain from its loose position to when it becomes lightly tense Page16 To tighten the chains Slightly loosen the two axle bolts on both sides of the rear wheel Fig 14 Then slowly...

Page 17: ...o 0 6mm or change the spark plug Clean the cooling fins on the cylinder head and check that the air intake at the starter is not clogged Clean the air filter OTHER QUESTIONS For additional questions service instructions further information and important phone numbers please go to the X Treme website at www x tremescooters com Thank you for purchasing an X Treme XG 470 and please tell your friends ...

Reviews: