background image


Page1 


XG-499 

Gas Scooter 

Product Handbook 


PLEASE BE SAFE WHEN RIDING 

ALWAYS WEAR A HELMET AND OBEY ALL LAWS! 

X-Treme 

TM

 Electric Scooters 

Summary of Contents for XG-499

Page 1: ...Page1 XG 499 Gas Scooter Product Handbook PLEASE BE SAFE WHEN RIDING ALWAYS WEAR A HELMET AND OBEY ALL LAWS X Treme TM Electric Scooters ...

Page 2: ...hased from your local X Treme Dealer Outdoor Power Equipment Dealer or a Power Sports Dealer 4 High Octane Fuel recommended 90 octane or higher This PRODUCT IS NOT INTENDED FOR EXTREME or OFF ROAD Use Please take care of your XG 499 DO NOT JUMP or ABUSE THIS PRODUCT DO NOT RIDE IN WET ICY CONDITIONS Failure to follow these instructions will VOID YOUR WARRANTY If you have any questions please conta...

Page 3: ...ct See Product Handbook for more information This product is recommended for riders 16 YEARS OF AGE and older SAFETY This product should not be used by persons without excellent vision balance coordination reflex muscle and bone strength and good decision making capabilities This product should not be used by minors without adult supervision This product should not be used by persons unwilling or ...

Page 4: ...others away while making carburetor adjustments Use only quality replacement parts as recommended by the manufacturer Transportation and Storage Allow the engine to cool empty the fuel tank and fold the X Treme XG 499 before carrying or storage It is recommended that you empty the fuel tank prior to shipping or storage to prevent fuel leaks Clean the X Treme XG 499 carefully and store in a cool dr...

Page 5: ...0 Riding Braking 11 Transporting and Storage 11 Operating Procedures 12 Maintenance 13 17 Recommended Tools 13 Carburetor 13 14 Brake System 14 15 Tires and Wheels 15 Adjusting The Head Unit 16 Adjusting The Chain 16 17 Maintenance Schedule 17 Other Questions 17 How To Guide 18 24 How To Adjust Chain Tension 18 How To Adjust Handle Bars 18 How To Install Front Brake 18 How To Mount Wheel 18 19 How...

Page 6: ...1 How To Remove Engine 21 How To Check Restricted Fuel Lines 22 How To Remove and Replace Transmission Bell Housing 22 How To Install Bearings 22 How To Check For Spark 22 23 How To Adjust Air Fuel Mixture 23 How To Change Charger Socket 23 24 How To Change Fuse Holder 24 Troubleshooting 24 25 Getting Broken Bolts Out 24 Scooter Won t Move 25 Diagrams 26 27 Rear Wheel Assembly 26 Engine Diagram 27...

Page 7: ...he first time until you have inflated the tires to the correct PSI Failure to follow these instructions may damage your vehicle and void your warranty CALL CUSTOMER SUPPORT OR GO ONLINE 1 253 777 0690 WWW X TREMESCOOTERS COM SUPPORT For General Information or Parts Visit WWW X TREMESCOOTERS COM ...

Page 8: ... of the carburetor fuel tank fuel supply line and the fuel return line To install the tank Assembly 1 Carefully remove the XG 499 from the box 2 Insert the handlebar down tube over the front fork completely until the gold pin snaps into place Slide the clamp down to the base of the tube and tighten the two bolts securely Fig 1 3 Attach the handlebars by first attaching the large handlebar clamp to...

Page 9: ...h the slot Fig 3 4 Make sure the two fuel lines connect to the engine correctly Fueling This is a two stroke engine Only run the engine using a mixture of gasoline and 2 cycle engine oil PLEASE READ OPERATING PROCEDURES BEFORE FUELING 1 Mix fuel minimum 90 octane and 2 cycle engine oil in separate container Use Tanaka Perfect Mix or a quality 32 1 2 cycle oil Make sure the fuel is well mixed by sh...

Page 10: ...o snap back let it back slowly You may want to give it a little throttle by gently squeezing the GAS LEVER It may be necessary to repeat step 2 several times until the motor starts When starting the XG 499 for the first time it may be necessary to pull the starter handle multiple times until it starts This is because the gas needs to be drawn into the carburetor 3 Once the engine has started quick...

Page 11: ...place Riding 1 Make sure that all of the exposed bolts and screws are tightened 2 Raise the kickstand to its upright position 3 Make sure the engine is running 4 Put one foot on the deck of the XG 499 while pushing off with the other foot gently rotate the THROTTLE GRIP on the right side of the handlebars The XG 499 will begin to move on its own power 5 Control your speed by rotating the accelerat...

Page 12: ...ine off before refueling Slowly open the fuel tank so that possible over pressure disappears Before fueling clean the tank cap area carefully to insure that no dirt falls into the tank Make sure that the fuel is well mixed by shaking the container Tighten the fuel cap carefully after fueling Always move the unit at least 10 feet from the fueling area before starting Starting Set the CHOKE LEVER to...

Page 13: ...e speed adjustment US Models only option available EPA approved Due to EPA air quality regulations on US models the Air Fuel Mixture adjustment is pre set on these carburetors by the factory and can t be adjusted by the consumer 2 Air Fuel Mixture adjustments Note Standard idle RPM is about 2500 3000 RPM Idle Speed Adjustment 1 Start the engine 2 Using a long Philips head screwdriver gently turn t...

Page 14: ... BRAKE LEVER with your left hand activates the front brake and squeezing the BRAKE LEVER with your right hand activates the rear brake Make sure to release the THROTTLE GRIP when engaging the brakes Practice braking on a smooth dry surface to get used to the feel of the braking system Braking distance is affected by wet conditions and loose and uneven To clean the air filter 1 Using a Philips head...

Page 15: ... a special spacer to accommodate the chain sprocket while the front wheel has a bracket for the disc brake Tire wear will differ based on rider weight riding conditions and care Replacement tires can be obtained at your local X Treme dealer through motorcycle shops or from the X Treme website at www x tremescooters com Tire Pressure The tire must be inflated to a maximum of 50 P S I It is also rec...

Page 16: ...ping or jumping on the sprockets this is too loose and may be harmful If the chain is making a humming sound when the wheel it turning this is too tight and may cause the chain to snap The correct tension is achieved by adjusting the chain from its loose position to when it becomes lightly tense To adjust the head unit 1 Rotate the handle bar as far right as it will go to expose the HEAD UNIT Fig ...

Page 17: ...rd and return spring Remove the spark plug and check the electrode gap Adjust it to 0 6mm or change the spark plug Clean the cooling fins on the cylinder head and check that the air intake at the starter is not clogged Clean the air filter OTHER QUESTIONS For additional questions service instructions further information and important phone numbers please go to the X Treme website at www x tremesco...

Page 18: ...ghten this bolt until it is snug but not so tight that the brakes will not move in and out 2 Once the brake assembly is mounted the pads are held in place magnetically with the Wide Side up the pad with One Slot to the outside and the pad with Two Slots on the wheel side 3 The brake cable should be adjusted loose until the wheel is installed and then adjusted first where it goes through the bolt t...

Page 19: ...s or vice grips and pull tight 5 Move the gold brake arm up the cable until the brake just begins to drag on the brake drum 6 Tighten the 10mm nut on the gold brake arm 7 Further adjustment can be done with the adjusters at the brake lever This will need to be adjusted over time as the brakes are used How To Adjust Rear Hub Brakes 1 Block rear wheel off the ground 2 Loosen the 10mm pinch nut on th...

Page 20: ...nd deck plate How To Install Fuel Lines 1 Attach the larger diameter hose on the nipple that is straight 2 Attach the smaller diameter hose on the nipple that is bent at a 90 degree angle It also has the fuel filter attached 3 Squeeze the arms together on the retaining clip to increase the diameter and slide it over the hose How To Install Ignition Coil 1 Unplug spark plug from wire 2 Remove air b...

Page 21: ...on 8 Remove the bolts on the outside corners of the transmission 9 Remove the transmission 10 Reassemble is reverse order and add 1 ounce of 30 weight oil to the transmission How To Remove Engine 1 On the rear of your scooter there is a chrome fender remove the 7 5mm allen head bolts 2 Remove the plate on the side of the scoot that has two 10mm nuts and three 5mm allen head bolts 3 Remove the air ...

Page 22: ...d to remove Remove that and you should be able to place the new bell on 4 Tighten that down and put the transmission back on How To Install Bearings 1 Remove the rear wheel 2 Remove the old bearing To do this you will need to insert something like a screw driver from the opposite side and simply push it out 3 Put the new bearings in You will want to use something like a rubber mallet so you do not...

Page 23: ...ates adjust the mixture screw open till it no longer hesitates 5 Test ride the scooter 6 If the scooter does not seem to develop full power adjust the mixture screw in or out 1 8 of a turn at a time until motor has full power and does not hesitate when the throttle snapped open Alternative Method 1 Run the motor full throttle and adjust slowly until you achieve max rpm 2 Give a 1 4 turn counterclo...

Page 24: ...tly flat Once you do you can use a drill bit or center punch to locate the center of the shaft then to create a starter hole for the drill bit Choose a bit that s smaller than the diameter of the bolt shaft and start drilling In this case it s going to work better if you have a left hand drill set because once you ve drilled far enough into the bolt the drill will bind up and probably unscrew the ...

Page 25: ... has the sprocket attached Inside you will find the clutch bolted to the engine and you will find a circular piece that is gold or brass in color It will be bolted to the transmission This is called the bell housing Either thee spring on the clutch may be gone or the bell has come off the transmission ...

Page 26: ... 6 Left inner wheel spindle The brake disk is mounted on the left wheel spindle and the caliper is mounted to frame Use the knurled screw to center caliper to disk Right Side consists of these parts from outside nut to inner wheel 1 Nut 2 Washer 3 Chain tension bolts 4 Spacer 5 Right inner wheel spindle 6 Freewheel clutch is screwed into right inner hub ...

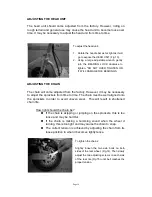
Page 27: ...Page27 ENGINE DIAGRAM ...

Page 28: ... DO NOT RETURN TO STORE IF YOU NEED HELP CALL CUSTOMER SUPPORT OR GO ONLINE Call 1 253 777 0690 WWW X TREMESCOOTERS COM SUPPORT For General Information or Parts Visit WWW X TREMESCOOTERS COM REVISED 10 26 111 ...

Reviews: