background image

21

20

Note that the mouse pad and the buttons

on the back of the remote are always

active, no matter what mode the remote

is in (PC, TV, VCR, etc.). Note however

that the special function buttons (WEB,

PHONE, CD, DVD) are only active after

the PC button has been pressed. Note

also that the mouse cursor will move

faster as you press harder on the mouse

pad. It actually has three distinct speeds.

Note also that speed, mouse trails, etc.

can be set from the Remote Mouse

Properties Sheet in the Control Panel.

Normally you will configure the Mouse

Remote’s buttons by clicking on the Tray

icon (Windows 95) and then clicking

Configure. If the tray icon is NOT visible

in the system tray (because you closed it)

Select Start, then Programs, then Remote,

then Remote Mouse Buttons, to again

show the Remote Mouse tray icon. Click

on the tray icon then click Configure.

Alternatively: If the tray icon is NOT

visible a Configure button will be

available in the properties sheet (in the

Control Panel) allowing you to configure

the Mouse Remote Buttons from there. If

the tray icon IS visible in the system tray

there is no Configure button in the

Properties Sheet, so the Mouse Remote

Buttons can be configured by clicking on

the tray icon and then selecting

Configure.

There is extensive on-line help available

for the Mouse Remote software, so it is

suggested that you refer to this help for

more details. Note also that information

on what each button does is available

with the right-click of the mouse.

T

YPICAL

 A

PPLICATION

 S

CENARIO

Here’s a typical scenario that gives you

an idea of what you can do with the

power of the Mouse Remote:

Program 10 WEB sites into the numeric

keys (e.g. 1 for www.x10.com, 2 for

www.orcaweb.com...), then sit back in

your armchair and press the PC key

followed by the WEB key to launch your

WEB browser. Then position the cursor

over the URL field and press 1, 2, etc. to

go directly to the address and read the

latest information from each WEB site.

Then using the channel up and down

keys and volume up and down keys as

scroll functions page through the site,

while listening to a CD that you set to

play on your PC’s CD player earlier. After

a while, skip back to track 7 on the CD

by pressing CD followed by 7. Then

return to WEB browsing mode by

pressing the WEB key. Later still, as it

starts to get dark, press the X-10 key and

turn on the living room lights.* Then press

the CD key and press pause while you

answer the phone. Press the Power button

to close your WEB browser and then

press the PHONE button that you

previously configured to launch Pointcast

Sit back and relax while you read the

latest issue of Wired

 magazine on-line.

To configure the above:
Click the tray icon and select Configure.

Click the PC button then double-click the

WEB button, then click Launch. Type in

the name of your browser, or Browse to

find its location. Click OK twice.
Click the PC button, then double-click

button 1. Click WWW, then type the

desired WEB address. Click OK. Repeat

the process for each address you want to

program for each numeric button.
Click PC, then CD, then double-click

Play. Click Multimedia. Select your media

device and function (Play). Repeat the

process for Stop, Pause, FF, REW, MUTE,

numeric keys, etc.
Get the idea?

* Required X-10 Transceiver and Modules

(sold separately).

Summary of Contents for DD-6006

Page 1: ...MODELODD 6006 WIRELESS MOUSE REMOTE SYSTEM INCLUYE Mando MOUSE REMOTE y base SubD 9 PS2 WIRELESS RECEIVER MANUAL PROPIETARIO...

Page 2: ...rencias Si es necesario consulte a su distribuidor para otras posibles sugerencias NOTA Modificaciones de cualquier tipo estan totalmente prohibidas con motivo de no alterar las caracteristicas origin...

Page 3: ...spositivos electricos trabajen por ti El 6006 controlara la mayoria de tus dispositivos de Audio y Video pero lo que lo hace diferente del resto de mandos universales es que ademas puedes controlar cu...

Page 4: ...to perform PC functions UP ARROW Used for shift when in PC mode ENTER Used to confirm certain entries Here are just some of the things you can do with your X 10 Mouse Remote Control your entire audio...

Page 5: ...amps in X 10 mode Works as Line Up Down in PC mode CHANNEL UP DOWN Works like your original remote Also works as on and off in X 10 mode Also works as Page Up Down in PC mode MOUSE PAD Moves the curso...

Page 6: ...wn Vol Line Up Vol Line Down CH Page Up CH Page Down Mute Minimize A B Display Maximize When WEB mode is selected the keys default to the following Key WEB WEB Default Browser Power Enter Play Rew FF...

Page 7: ...Maximize When CD mode is selected the keys default to the following Key CD Power Enter Play Play CD Rew Previous Track FF Next Track Stop Stop CD Rec Pause Pause CD 0 CD Track 10 1 CD Track 1 2 CD Tr...

Page 8: ...eft mouse button on back right mouse button on back mouse pad You can at any time still use your existing mouse which always overrides the Mouse Remote If you want to stop the JR21A receiver from rece...

Page 9: ...s such as PC WEB DVD PHONE CD etc You can configure these buttons to perform special functions such as launching your WEB Browser for example If you prefer you can just use the defaults Listed on page...

Page 10: ...on page 17 displays a window similar to the one below The actual window you see depends on what button you clicked and will be different for Launch WWW Multime dia Edit System and Messages In this ca...

Page 11: ...io that gives you an idea of what you can do with the power of the Mouse Remote Program 10 WEB sites into the numeric keys e g 1 for www x10 com 2 for www orcaweb com then sit back in your armchair an...

Page 12: ...C 051 055 DAEWOO 017 018 022 029 030 031 055 098 139 140 184 DAYTRON 017 022 184 DIMENSIA 013 DUMONT 017 164 DYNASTY 055 DYNATECH 191 ELECTROBAND 015 189 ELECTROHOME 016 017 022 034 035 EMERSON 017 02...

Page 13: ...095 096 118 183 184 187 TELECAPTION 130 TELERENT 096 TERA 199 TMK 017 022 TOSHIBA 062 084 102 118 122 130 131 173 214 TOTEVISION 184 UNIVERSAL 065 100 FISHER 062 063 064 193 FUJITSO 059 FUNAI 051 055...

Page 14: ...15 024 026 027 034 035 036 039 042 062 063 109 RADIX 027 RANDEX 027 RICOH 141 RUNCO 117 SAMSUNG 018 026 028 046 066 125 SANKY 014 117 SANSUI 023 105 124 136 VICTOR 079 195 VIDTECH 017 018 022 VIKING 1...

Page 15: ...106 129 SEARS 024 027 034 036 061 062 063 064 068 069 120 131 SHARP 014 015 030 042 107 108 109 SHINTOM 017 069 074 111 145 SHOGUN 026 SIGNATURE 015 SINGER 034 074 SONY 017 111 112 132 141 STS 034 120...

Page 16: ...037 042 070 SHARP 037 042 SHERWOOD 034 042 051 059 SHURE 043 SONY 060 061 STS 013 SYLVANIA 019 SYMPHONIC 062 TEAC 029 042 052 062 063 064 TECHNICS 069 086 089 THETA DIGITAL 084 TOSHIBA 074 VECTOR RESE...

Page 17: ...spond try the Code Search method on page 34 If the LED blinks rapidly when you enter the code you may have entered an invalid code Recheck the code in the code list and try again VICTOR 035 YAMAHA 018...

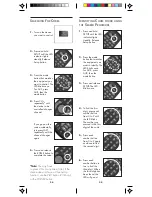
Page 18: ...number button in turn to find the third digit When the third digit has been found the LED will go out SEARCHING FOR CODES 1 Turn on the device you want to control 2 Press and hold SETUP until the LED...

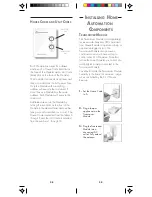
Page 19: ...used with a remote control such as the X 10 Mouse Remote When the Transceiver Module receives a command from a remote control it sends digital signals over your existing house wiring to a Module which...

Page 20: ...ceiver Module 3 Plug the Transceiver Module into a convenient AC outlet Fully extend the antenna UNIT CODE DIAL HOUSE CODE DIAL HOUSE CODES AND UNIT CODES Each Module has a specific address made up of...

Page 21: ...or brighten an Appliance Module If the module was off and you press Bright or Dim VOLUME or VOLUME this will simply turn the module on CONTROLLING X 10 MODULES LAMP MODULE The Lamp Module sold separat...

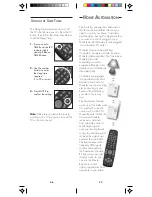
Page 22: ...and release the X 10 button Note The Housecode you choose must match the Housecode on the Transceiver Module you are using it with 2 Press and hold TIMER until the LED indicator lights steadily Releas...

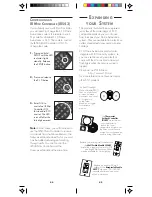
Page 23: ...ve energy No wiring needed to your existing thermostat Replace your existing wall switches with the Wall Switch Module WS467 Installs like a regular dimmer On Off and Bright Dim functions Other models...

Page 24: ...p then AUX then CD then enter the code from the code listings under the heading CD Codes page 30 31 Plug in a Heavy Duty Module HD245 to control 220V appliances such as air conditioners and water heat...

Page 25: ...elated problems No mouse control even the standard mouse or no cursor in Windows Ensure that the JR21A Mouse Receiver is plugged into your serial or PS 2 port and your mouse is plugged into the receiv...

Page 26: ...NO REPRESENTATIVE OR PERSON IS AUTHORIZED TO ASSUME FOR US ANY OTHER LIABILITY IN CONNECTION WITH THE SALE OF OUR PRODUCTS SOME STATES DO NOT ALLOW LIMITATIONS ON HOW LONG AN IMPLIED WARRANTY LASTS A...

Page 27: ...X 10 USA Inc 91 Ruckman Rd Closter NJ 07624 0420 http www x10 com Printed in China DR MK19A 10 97...

Reviews: