background image

13

12

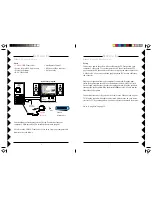
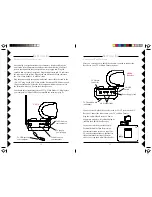
DC 9V

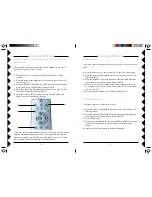
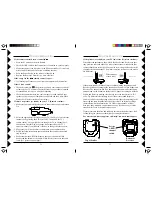
Connect a set of Audio/Video cables to the A/V OUT jacks on the A/V
Receiver. Connect the other end to your TV or Home Theater.

Plug the Audio/Video Receiver’s Power
Supply into a regular wall outlet and plug its
jack into the Audio/Video Receiver.

Turn power switch on (on side of unit).

Position the Audio/Video Receiver in a
convenient location such as on top of the
TV and orient the antenna so that the flat
side points in the direction of the room
where you set up the Audio/Video Sender.

TV Output
Connector

Power Supply Jack

TV Channel Switch
(on bottom)

 ON-OFF
Switch

A/V Output Jacks

VR38A
Receiver

After you’ve set up your Audio/Video Sender, you need to connect the
Receiver to your TV or Home Theater System.

C

ONNECTING

 T

HE

 R

ECEIVER

S

ETTING

  U

P

W

IRELESS

 VGA S

YSTEM

CONT

.

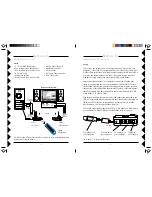
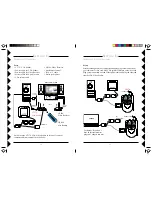
Next, unplug your speakers from your computer’s sound card. Plug the
mini-stereo jack splitter into the audio out (sometimes labeled “Line Out”)
jack on the sound card that your speakers were plugged into. Plug the
speakers into one side of the splitter. Plug the mini-stereo to RCA cable into
the other side of the splitter. Plug the red and white ends of the cable into
the VGA Video Sender’s “Audio In” jacks.

Plug the power supply into a power outlet and connect the other end to the
“DC 12V” plug on the VGA Video Sender. Switch the VGA Sender on and
flip up the antenna. Point the side of the antenna with four squares on it in
the direction where you’ll set up the Video Receiver.

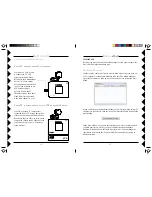
You should have already plugged the VT37A Video Sender’s USB plug into
your computer’s USB port when you installed the software (page 4).

To VGA out on
your computer.

To Audio out on
your computer.

To plug-in
power supply.

VT37A

S

ETTING

  U

P

To USB port on
your computer.

Summary of Contents for MK10A

Page 1: ...OWNER S MANUAL Direct Connect Model MK10A UR89A CM19A Wireless A V Model MK11A UR89A VT42A VR38A Wireless VGA Model MK12A UR89A VT37A VR38A...

Page 2: ...d album artwork to use in Lola The Lola Media Player and the Lola Remote show you your music organized by Artist Album and Genre so you can find exactly what you want to hear With the Lola system you...

Page 3: ...irst step to installing Lola is to install the software from the X10 web site Use the link in the e mail subject New Software Download Link that was sent to you shortly after you placed your order Fol...

Page 4: ...n how you want to listen to the music from Lola Go to Using Lola on page 15 DIRECT CONNECT SYSTEM CONT SETTING UP AUDIO PC LEARN SETUP CH TOP FIND END SCAN SCAN F F PLAY REW PAUSE STOP REC CH VOL PLAY...

Page 5: ...dy plugged the VT42A Video Sender s USB plug into your computer s USB port when you installed the software page 4 To Video out on your computer To Audio out on your computer To plug in power supply VT...

Page 6: ...on PC WIRELESS VGA SYSTEM CONT Setup Start by shutting down your computer and unplugging your monitor from your computer s video card Plug VGA splitter cable into your video card Plug your monitor in...

Page 7: ...WIRELESS VGA SYSTEM CONT Next unplug your speakers from your computer s sound card Plug the mini stereo jack splitter into the audio out sometimes labeled Line Out jack on the sound card that your spe...

Page 8: ...io Video Receiver on bottom to the same channel 3 or 4 I I I I IF F F F F Y Y Y Y YOUR OUR OUR OUR OUR TV TV TV TV TV IS IS IS IS IS ALREAD ALREAD ALREAD ALREAD ALREADY Y Y Y Y HOOKED HOOKED HOOKED HO...

Page 9: ...MANAGER CONT If you only want to include certain types of files change the setting in the File Types to Search For menu Use the Exclude Files Smaller Than option to tell Media Player to ignore smaller...

Page 10: ...c will start playing You can also select and play individual tracks from within the track list USING L L L L LOLA OLA OLA OLA OLA CHANGING MUSIC VIEWS View Buttons When you are in a list view you can...

Page 11: ...e volume of your computer s sound output for your computer s volume control You can also use the Lola remote to adjust the volume of your TV or Home Theater System In the Album Artist or Genre views p...

Page 12: ...ally Select lets you change the way tracks are played Regular Repeat Track Repeat All Shuffle or Preview See page 22 Play Stop Pause FF REW Scan Used like you would use on your CD player Play Also pla...

Page 13: ...blinks off the button you pressed when it blinked is the first digit of the code set in the remote 5 Repeat step 4 twice to find the second and third digits ADVANCED OPTIONS USING THE REMOTE TO CONTR...

Page 14: ...14 CITIZEN 001 004 008 009 042 053 058 105 109 177 CLAIRTONE 014 CLASSIC 042 214 COLORTYME 004 009 010 CONCERTO 004 009 CONCIERGE 121 CONTEC CONY 012 013 014 042 053 CRAIG 042 053 CROWN 042 053 CURTIS...

Page 15: ...062 068 069 074 075 076 087 095 119 133 WHITE WESTINGHOUSE 097 100 130 155 YAMAHA 004 005 009 133 ZENITH 000 001 004 023 038 058 059 064 121 135 136 153 Cable ABC 461 462 463 464 465 466 467 ADELPHIA...

Page 16: ...en you listen to something relaxing why not dim the lights too If it s time for a little wake up music how about hitting a button to make coffee From simply turning on a lamp to a full blown automatio...

Page 17: ...ase the PC button 3 While the indicator is on enter a new number for this remote 1 16 and then press Setup The indicator blinks back the new setting and then stays off 2 Press and hold Setup until the...

Page 18: ...control doesn t control Lola Lola Lola Lola Lola Press the PC button on the Lola Remote Check the USB cable on the Transceiver is connected to your computer Make sure the tray icon is present in the...

Page 19: ...nplugging the equipment try to correct the interference by one or more of the following measures Reorient the antenna of the radio TV experiencing the interference Relocate the equipment with respect...

Reviews: