7
6
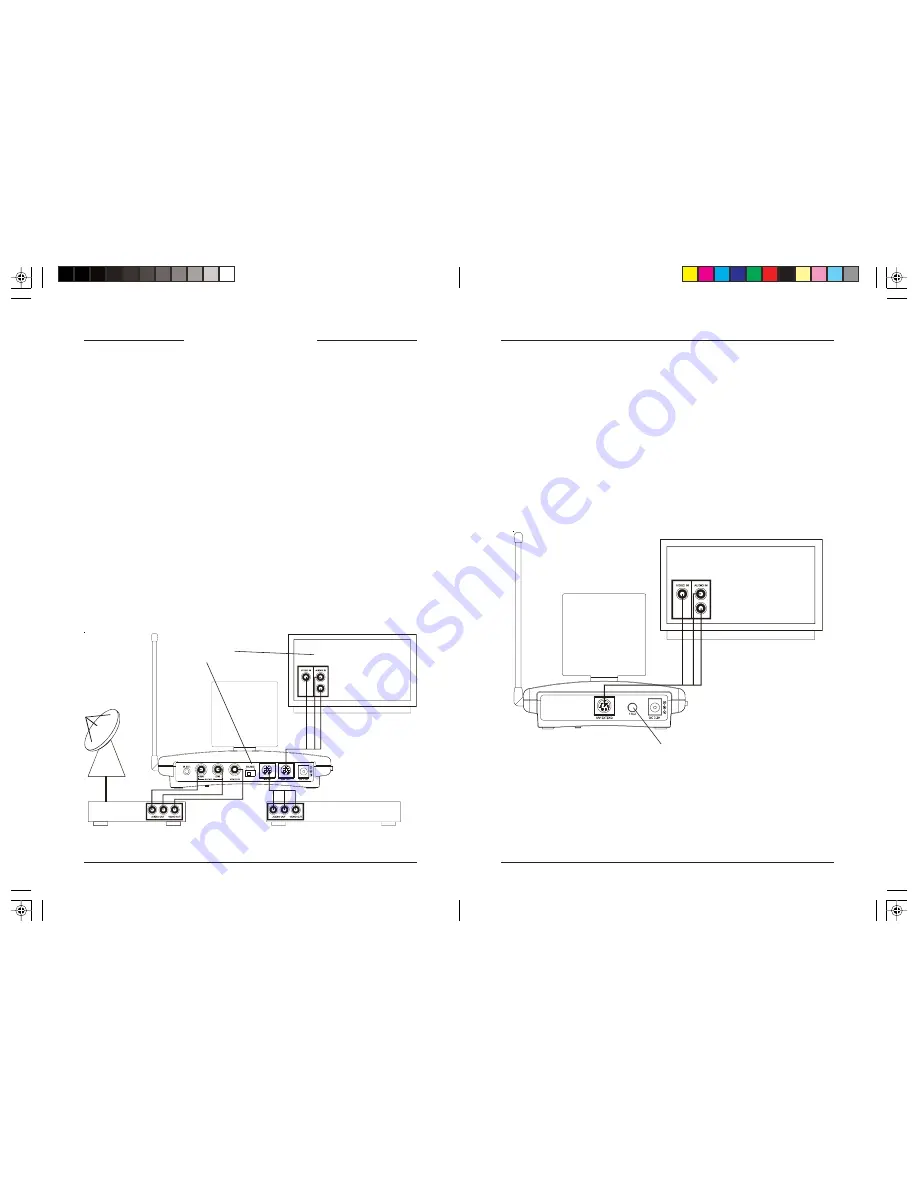
Satellite Box
(source 1) Back
DVD Player
(source 2) Back
Hooking up the Audio/Video Receiver
1. Using the special cable supplied connect the A/V OUT jack on the
Audio/Video Receiver to your TV.
2. Plug the Audio/Video Receiver’s Power Supply into a 120 volt wall
outlet and plug its jack into the Audio/Video Receiver.
3. Position the Audio/Video Receiver in a convenient location such as on
top of your TV and orient the antenna so that the flat side points in the
direction of the room where you set up the Audio/Video Sender.
C
ONNECTING
U
P
Hooking up the Audio/Video Sender
1. Connect one end of the supplied Audio/Video cable to an A/V device
and the other end to the VIDEO and AUDIO jacks of the Audio/Video
Sender. Take care to match the colors of the plugs on the cable with
the jacks on the Audio/Video Sender.
2. If desired connect a second A/V device to the Audio/Video Sender
using the special cable provided.
3. Using the cable supplied connect the A/V OUT on the Audio/Video
Sender to the Audio/Video IN jacks on your TV. See diagram below.
4. Plug the Audio/Video Sender’s Power Supply into a convenient 120 volt
wall outlet and plug its jack into the Audio/Video Sender.
5. Position the Audio/Video Sender in a convenient location such as on top
of your TV and orient the antenna so that the flat side points in the
direction of the room where you will be installing the Receiver.
Selects which of the
2 sources is viewed
on this TV.
Press the button on the back of the Receiver to select the source that’s
connected to the Sender unit (source 1 or source 2) that you want to view
on the TV connected to the Receiver. See next page for how to switch
sources by remote control.
Source 1 or 2
selector button


