background image

21

then switch off. If no action is taken the device will switch off 
after the 20 seconds.

To take out the Micro SD-card, remove the cover, press the 
card down until you feel the click. The card will now eject itself 
automatically.

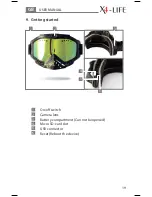
  10.2. Switching the Camera On/Off

To switch on the camera, press the On/Off button (1) for 
approximately 2 to 5 seconds. The blue LED in the top right 
hand corner will come on and start blinking slowly.
Note: if the LED lights up permanently, the SD-card is missing 
or has not been inserted correctly.

To switch off the camera, press the On/Off button (1) for 
approximately 5 to 7 Seconds. The blue LED will switch off.

  10.3. Video and photo function

Starting the recording:

The recording will automatically start approximately  
2 seconds after the device has been switched on. The LED 
in the top right hand corner of the goggles will blink slowly 
when recording.

Note:

 if the recording is not stopped, the file will automatically 

be saved to the SD card after 10 minutes with a date and time 
stamp.

Stop the recording:

To stop the recording, click go to the On/Off (1) button.  
The blue LED will stop blinking and become permanent.  
The device is now in Standby Mode.

USER MANUAL

GB

Summary of Contents for Video Ski Goggles HD1

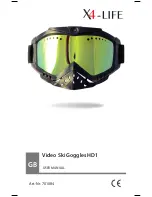
Page 1: ...GB USER MANUAL Video Ski Goggles HD1 Art Nr 701084 ...

Page 2: ...al notes 16 7 Importer and service 17 8 Safety Guide 18 9 Getting started 19 9 1 Charging the goggles 20 10 Camera functions 20 10 1 The SD Card 20 10 2 Switching the Camera On Off 21 10 3 Video and photo function 21 10 4 Viewing videos and pictures 22 11 Settings 22 12 Cleaning and maintenance 23 13 Troubleshooting 23 14 Disposal 24 GB ...

Page 3: ...before assembling and using the product 2 Checking the contents When unpacking your package make sure that all compo nents are there and intact If any components are missing or damaged please contact a specialist or your local dealer immediately Keep the packing and user manual in a safe place for future transport When passing on the product to another person be sure to include the user manual 3 C...

Page 4: ...only to protect the eyes but also have the possibility of recor ding the activity onto a SD card with the integrated camera The designated use is also defined by the instruction manual and in following the appliance and the warnings mentioned in this user manual This device is not designed for commercial or industrial use 6 General notes All mentioned company and product names are registered trade...

Page 5: ... declared and proven and the corresponding documents have been deposited with the manufacturer For the reason of safety and CE licensing it is not allowed to modify this unit in any way and or use it for functions other than the designated use 7 Importer and service Service Address lived non food GmbH TOR 8 9 Donaustraße 20 D 38120 Braunschweig Phone 49 0 531 224356 82 E Mail service x4 life de In...

Page 6: ... only be opened and or repaired by an expert or a person who is qualified to do so Only original spare parts may be used The product may not be subjected to extreme heat or cold Do not expose the product to intense sunlight open fire or other heat sources Working temperature 30 C to 40 C These sports glasses may not be used when driving on public roads Broken visors should be replaced immediately ...

Page 7: ...USER MANUAL GB 19 9 Getting started 4 5 2 3 1 6 1 On off switch 2 Camera lens 3 Battery compartment Can not be opened 4 Micro SD card slot 5 USB connector 6 Reset Reboot the device ...

Page 8: ...lat from time to time and then recharge it again fully for several hours This refreshes the battery 10 Camera functions 10 1 The SD Card To be able to record the pictures from a camera Micro SD card is needed The card can have a capacity of up to 32 GB If it is not formatted it can be preformatted on your Notebook or PC It should be formatted in FAT 32 1 GB corresponds to approximately 15 minutes ...

Page 9: ...as not been inserted correctly To switch off the camera press the On Off button 1 for approximately 5 to 7 Seconds The blue LED will switch off 10 3 Video and photo function Starting the recording The recording will automatically start approximately 2 seconds after the device has been switched on The LED in the top right hand corner of the goggles will blink slowly when recording Note if the recor...

Page 10: ...off goggles to your PC Open the removable medium Click on your right mouse button select New and choose Text Document Rename the new file size and open it Enter one of the following digits to change resolution 0 1920 x 1080 pixel 25 frames sec 1 1280 x 720 pixel 50 frames sec 2 1440 x 1080 pixel 30 frames sec Note default setting is 2 1440 x 1080 pixel 30 frames sec Save and close the file The fil...

Page 11: ...eaning and maintenance Always use a soft dry and lint free cloth to clean the unit s exterior If the device is extremely dirty you can use a soft cloth dampened with water or a mild cleaning solution to clean Never use any abrasive or harsh cleaning agents e g alcohol petrol or thinners as these could damage the controls casing or any markings and labels found on the device 13 Troubleshooting The ...

Page 12: ...sed of in the regular household waste Consumers are legally obligated and responsible for the proper disposal of electronic and electrical devices by returning them to collecting sites designated for the recycling of electrical and electronic equipment waste For more information concerning disposal sites please contact your local authority or waste management company Do not throw batteries and rec...

Page 13: ...25 USER MANUAL GB ...

Page 14: ...8 2013 ...

Reviews: