background image

P3002-A

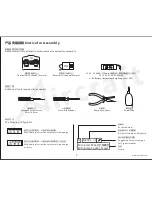
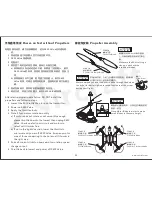
螺旋桨正桨

Clockwise Blade

P3002-B

螺旋桨反桨

Counter-Clockwise Blade

螺旋桨必须贴紧电机,以保证四个螺旋桨的
高度一致性。

Close 

 to motor to make 

sure 4 blades in the same height.

Motor Blade

用螺

丝刀穿过桨夹上的孔来拧紧桨夹。

We recommend you use the driver to poke through the hole on 
the locker for better tighten in case of any loose of the screw 
during your flight.

桨夹必须拧紧,以免飞行时脱桨造成危险。建议

螺丝刀

Screw


Driver

电路安装完成后,请勿安装螺旋桨,进行

X650 Value

无桨通电测

试。

1

将遥控器油门收到最小后打开遥控器开关。

2  X650 Value

接通电源。

轻推油门。

观察四个电机启动是否顺畅,旋转方向是否正确。

a

)


如果电机没有启动或启动不畅,则将油门收到最小,断开

X650 Value

的电源,检查电路和电机后重新测试,直到正

常。

b

) 如果旋转方向不正确,则将油门收到最小,断开

X650 

Value

电源,对调任意两条电机线,直到电机旋转方向都正

确。

5

推动各操纵杆,观察电机的转速是否有变化。

测试完成,将油门收到最小,断开

X650 Value

的电源。

无桨通电测试  

Power-on Test without Propellers

After electronic parts installation, DO NOT install the 
propellers and follow in steps.

1 Lowest the RC throttle then turn on the 

transmitter

.

2 Power on X650 Value.
3 Apply the throttle slowly.
4 Note if four motors rotate smoothly

a) If motor does not rotate or not smoothly enough, 

please throttle down to the lowest then unplug X650 
Value. Check on electronic circuit and motors to 
retest until it works fine.

b) If not in the right direction, lower the throttle to 

minimum and power off X650 Value. Swap any motor 
wire of three connecting to the holes until it works in 
the right way.

5  Poke all control sticks to observe motor rotation speed 

changes or not.

6 Throttle back to lowest and power off X650 Value.

15

螺旋桨印有

XAircraft

标志面朝

上,并确保螺旋桨旋转时方向正
确。

Make


sure


the


XAircraft Logo 

side up, and check the 
rotation of blades.

螺旋桨安装  

Propeller Assembly


P3002-B
螺旋桨反桨

Counter-Clockwise Blade

P3002-A
螺旋桨正桨

Clockwise Blade

P3002-B
螺旋桨反桨

Counter-Clockwise Blade

P3002-A
螺旋桨正桨

Clockwise Blade

www

.

xaircraft.com

Summary of Contents for X650 Value

Page 1: ...XAircraft X650 Value 安装说明书 INSTRUCTION MANUAL 在使用XAircraft X650 Value之前 请仔细阅读此说明书 Read the manual carefully before using XAircraft X650 Value 2011 07 V1 1 Model X650 V 4 ...

Page 2: ...fter Sale Service 6 Before Flight 3 Features 4 Frame Arm Assembly 7 Frame Assembly 8 Landing Gear Assembly 9 Flight Controller and AHRS Assembly 10 Circuit Wiring 11 Common Receiver Wiring 12 Frame Cover Assembly 13 Battery Mounting Assembly 13 RC Mode Illustration 14 Power on Test without Propellers 15 Propeller Assembly 15 Stick Function Test On Ground 16 AHRS Function Test 17 Part List 18 www x...

Page 3: ...eaning Of Symbols 六角螺丝刀 Hexagon Screw Driver 2mm 2 5mm 十字螺丝刀 Cross Screw Driver 尖嘴钳 Sharp nose pliers 螺丝胶 Screw Glue 自备工具 Additional tools required for assembly M M2001 2 M2 6mm 杯头内六角螺丝 M2 6mm Socket Screw 袋编号 Packet Number 物品编号 与 所需数量 Product Number and Quantity 建议使用螺丝胶加固 Suggested to use screw glue for higher intensity 名称 Name 疏忽这些操作说明 可能导致设备损坏 Mishandling instructions may result in damage 疏忽这些操...

Page 4: ... 建议在无桨状态下试运行X650 Value 检查遥控设备和电机的工作是否 正常 一切正常之后再安装螺旋桨 以免造成安全事故 12 请使用XAircraft提供的零件 用户使用其它来源的零件或改装本产品需 独立承担相应的飞行责任 4 检查接收机是否扎紧 5 检查天线是否安装稳固 6 检查无刷电机与无刷电机调速器连接线是否稳固 另外 如果接收机的安装或电调 ESC 与飞行控制器的连接方式不是 XAircraft出厂默认的方式或更改过遥控器设置和飞行模式 请检查遥控器的各个 通道的操作和电机的反应是否一致 飞行控制说明 1 启动 把遥控器油门杆拉到最低后打开遥控器电源开关 然后接通X650 Value的电源 轻微推杆以启动所有电机 2 停止 油门杆收到最低 约1秒后四旋翼电机停止工作 断开X650 Value电源后 再关闭遥控器电源开关 3 起飞或降落时一旦发生紧急情况 请立即把遥控器油门杆拉...

Page 5: ...y at night or work in about one second First cut off the X650 Value then the RC powers in windy conditions off 4 Stay away from any fire resulting in damage of the electronic parts or others 3 Any emergency occurs when taking off or landing please move the throttle such as the flight battery stick to the lowest position immediately to keep safe 5 Do not fly alone during your preliminary flights If...

Page 6: ...300mAh battery payload under 1200g Cell Chemistry 11 1V 3S 2200mAh 5500mAh Lithium Polymer and instant discharge capacity 20C Input Support a 12 CH receiver at most Compatible with all the RC devices It needs at least 4 channels to fly your aircraft We recommend you to use RC device with 6 channels or more for expansion Output Support 12 CH outputs at most Compatible with XAircraft UltraPWM Hi Spe...

Page 7: ...销商集中维修处理 以节省昂 2 以下情形不在质保范围内 贵的物流费用 1 未按照XAircraft官方说明书的指示进行安装或操作 2 因磨损 滥用 不当操作或化学试剂而引起的性能故障 3 因与非XAircraft提供的X650 Value部件一起使用而引起的性能故障 4 因进行改装而引起的性能故障 5 因液体滴入引起的电子设备的性能故障 6 因电子干扰而引起的性能故障 7 使用了劣质电源或连接不合理电压的电源导致XAircraft电子产品性能故 障 8 意外或人为因素引起的性能故障 如搬运 碰撞 操作失误 输入不合适电 压等 9 不可抗拒力因素 包括但不限于火灾 地震 雷电等 引起的性能故障 10 在邮寄过程中造成配件损坏或丢失 遇到此类情况请向相关物流公司咨 询 3 有偿服务 当产品性能故障超出质保范围的 您可以选择有偿服务 1 自购买产品之日起一年内 有偿服务不收取除工本和运输之外的费...

Page 8: ... repairment necessarily according to parts damage assessment which XAircraft or global distributor seller will 4 Performance failure caused by modifications with non X650 contact you to confirm whether it s satisfied for you For the Value parts unrepairable parts you can choose to replace under the range of 5 Performance failure on electronic device caused by liquid drop in warranty scope otherwis...

Page 9: ...05 6 2 5 0 5mm 垫片 6 2 5 0 5mm Washer F2 F3013 ESC 电调盖 ESC Cover M M3001 M2 5 6 圆头内六角螺丝 M2 5 6 Socket Screw 3 M M3002 M2 5 20 Socket Screw 杯头内六角螺丝 M2 5 20 F3014C 机身管 Frame Arm F3016 机身管支撑件2 Frame Arm Strengthener 2 F3015 机身管支撑件1 Frame Arm Strengthener 1 7 安装时 注意电机固定板与无刷电机的安装孔 距 通过调整固定板的安装位置 使安装样式如 右图 Notice the hole distance of motor and motor mounting plate Assembled style as shown in right figure...

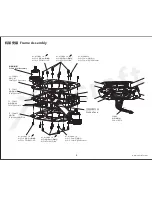
Page 10: ...机身下板 Fuselage Lower Plate F2 F3011 机身固定件1 Fuselage Strut 1 F2 F3012 机身固定件2 Fuselage Strut 2 机身杆装配 Frame Arm Assembly M M3001 8 M2 5 6 圆头内六角螺丝 M2 5 6 Socket Screw M M3008 4 6 3 1 5mm 尼龙垫片 6 3 1 5mm Nylon Wahser M M3004 M3 8 圆头内六角螺丝 M3 8 Socket Screw 4 M M3008 4 6 3 1 5mm 尼龙垫片 6 3 1 5mm Nylon Wahser 机架安装 Frame Assembly 8 注意安装方向 Notice face www xaircraft com ...

Page 11: ... damage 起落架安装 Landing Gear Assembly M M3001 8 M2 5 6 圆头内六角螺丝 M2 5 6 Socket Screw 9 步骤1 Step1 先扣入一边的挂载杆 扣入时注意用力 避免损坏 Assemble one side DO NOT OVER EXERT TO AVOID DAMAGE 步骤2 Step2 免损坏起落架 Bend the other side of landing gear as shown in the figure and assemble it 弯曲起落架 将另一边也扣入挂载杆 弯曲时注意用力 以 L3002C 挂载杆 Load Mounting Pipe with Cork L3001C 起落架横杆 Landing Gear Skid Pipe www xaircraft com ...

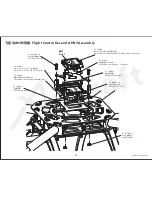
Page 12: ... XAircraft AHRS S Attitude and Heading Reference System E2 E1005 减震海绵 7 7 4mm Shock Absorber Sponge 7x7x4mm x x M M3007 尼龙支柱 M3x12 Nylon Pillar 4 M3x12 F1 F3003C 飞控固定板 FC Mounting Plate F1 F3004C AHRS固定板 AHRS Mounting Plate M M3006 M3 8 尼龙螺丝 M3 8 Nylon Screw 4 M M3009 尼龙螺母 M3 Nylon Nut 4 M3 飞控与AHRS安装 Flight Controller and AHRS Assembly 10 前方 Front www xaircraft com ...

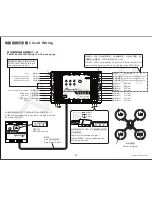
Page 13: ...y port among Port A and Port E on FC1212 S 可插接到FC1212 S的PortA至PortE中的任何一个 黑 Black 红 Red 白 White 信号连接线 E1002 不正确连接会造成电 子设备烧毁 Incorrect installation of signal cables E1002 can cause damage on electronic devices 常见接收机接线示意图在下一页 Common receiver wiring is in the next page 电机示意图 Motor Diagram 感度调节 云台快门 云台滚转 云台俯仰 Gain Camera Mount Shutter Camera Mount Roll Camera Mount Pitch 电调 M5 M8 云台俯仰舵机 云台横滚舵机 云台快门舵机 ...

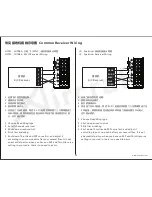
Page 14: ...our radio there is no need to panic HITEC FUTABA 天地飞 WFLY 接收机接线示意图 HITEC FUTABA WFLY Receiver Wiring JR Spektrum 接收机接线示意图 JR Spektrum Receiver Wiring 1 选择飞机类型为固定翼 2 关闭所有混控模式 3 摇杆的微调归中 4 关闭油门与EXP曲线 等试飞1 2个起落后再根据个人习惯调整油门与 EXP曲线 如果您的遥控设备没有EXP和油门曲线设置也不必担心 这不是必须的 1 Choose Fixed Wing type 2 Shut down mixed control 3 Stick trim middling 4 Shut down Throttle and EXP curve first and adjust it according to ...

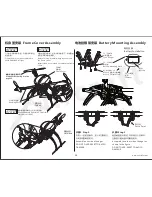
Page 15: ...机身盖安装 Frame Cover Assembly 电池挂载架安装 Assembly Battery Mounting 13 折叠或展开机架时 应先将机身盖取下 待折叠或 展开后再将机身盖装回 Before folding or unfolding please unload the frame cover After folded or unfolded assemble the frame cover 飞行时必须安装机身盖 以防机身杆移位 发生危险 Frame cover must be assembled to avoid DAMAGE in flight 施力点 Force Point M M3001 8 M2 5 6 圆头内六角螺丝 M2 5 6 Socket Screw F3007 机身盖 Frame Cover 电池安装 Battery Installation 方向识别贴...

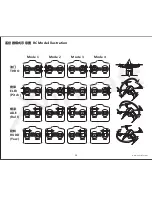
Page 16: ...Mode 1 Mode 2 Mode 3 Mode 4 俯仰 ELEV Pitch 横滚 AILE Roll 旋转 RUDD Yaw 油门 THRO 遥控器模式示意图 RC Mode Illustration 14 www xaircraft com ...

Page 17: ...e propellers and follow in steps 1 Lowest the RC throttle then turn on the transmitter 2 Power on X650 Value 3 Apply the throttle slowly 4 Note if four motors rotate smoothly a If motor does not rotate or not smoothly enough please throttle down to the lowest then unplug X650 Value Check on electronic circuit and motors to retest until it works fine b If not in the right direction lower the thrott...

Page 18: ...owest then turn on the transmitter 3 Power on X650 Value 4 Hold back the lift of X650 Value Be careful not to be hurt and apply Throttle to 20 slowly and keep it for a while 5 Observe whether all propellers spin freely to the right direction a If not in the right direction lower the throttle to minimum and power off X650 Value Reinstall propellers to test again until it works in the right way b If...

Page 19: ...lowest then turn on the transmitter 3 Power on X650 Value 4 Squat and grasp the bottom side of X650 Value to lift it higher than your head 5 Apply throttle slowly to 20 6 Try to bank the aircraft forwards backwards left side and right side and feel it whether aircraft has stopped your moving 7 If no resistance throttle down to lowest and power off X650 Value Check if electronic parts installs prop...

Page 20: ...elage Strut 1 2 F3012 机身固定件2 Fuselage Strut 2 2 F3013 ESC电调盖 ESC Cover 4 F3014C 机身管 Frame Arm 4 F3015 机身管支撑件1 Frame Arm Strengthener 1 4 F3016 机身管支撑件2 Frame Arm Strengthener 2 4 L3001C 起落架横杆 Landing Gear Skid Pipe 2 L3002C 挂载杆 含管塞 Load Mounting Pipe with Cork 2 L3003 挂载杆固定件 Load Mounting Pipe Mount 4 L3004 挂载杆固定胶 Load Mounting Pipe Fixer 4 L3005 起落架 Landing Gear 2 P3001 XAircraft 2215 无刷电机 XAircra...

Page 21: ...ou Geek Intelligence Technology CO LTD service xaircraft com http www xaircraft com MADE IN CHINA 本说明书最终解释权归XAircraft所有 XAircraft has the final power of interpretation on this manual 请妥善保管好标签 Please keep the product label ...

Reviews: