background image

9

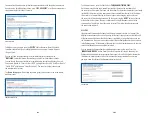
If you want to add more devices, follow the same procedure for each device, but make sure to 
do only one at a time. When you are done, press 

‘STOP DISCOVERY’

, or let the discovery process 

stop automatically after about 15 minutes.

To delete a sensor or camera press the

 ‘DELETE’

 link for the device. You will be asked 

to confirm the deletion. If you accidentally delete a device, you can simply re-discover 
it to get it back.

You can set some configuration details for individual devices by clicking on the 

‘CONFIGURE’ 

link for that device. The resulting pop up will vary from device to device. 

You can change the name of the device to something more descriptive of the way it is used. 
For example, instead of 

“PanasonicCam 1D:ED”

, you might want to call it 

“Front Door Camera”

“Switch 798B”

 might become 

“Living Room Light”

. You can also configure devices from 

the remote monitor account. 

The 

Device Setup

 page will also show any device groups that you have set up in the remote 

monitor account.

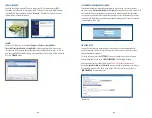
DEVICE SETUP PAGE

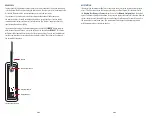
ACCOUNT PAGE

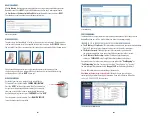
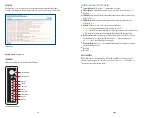
CAMERA DISCOVERY PAGE

To add more cameras, press the link that says

 ‘CAMERA REGISTRATION PAGE’

On the camera registration page, you will see two lists, the one on the top shows all of 
the cameras that the system has found, and the bottom list shows the cameras that are already 
installed. As the system registers new cameras they are moved from the top list to the bottom. 
If the status of a camera in the top list does not appear to be changing, you have to reset 
the camera to its factory default condition. Do this by pressing the 

‘RESET’ 

button on the side 

or the bottom of the camera. Then, wait a few seconds and pull the power cord out of the 
camera and put it back in to force the camera to restart. The system should now recognize 
the camera and register it.

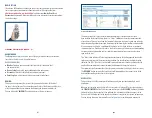
ACCOUNT:

If you ever need to remove the Gateway from the remote monitor account, (ie. to move it to a 
different account) you can do so from this page. At the top of the page you can find the UserID 
of the remote monitor account that this Gateway is registered to. Just below that you can see
the Gateway name. The name can be changed later from the Remote Monitor site, but not here 
in the Gateway pages.  At the bottom of the page, you can select temperature units to be used, 
check the software version and verify the time zone.

You can remove the Gateway from the remote monitor account on this page. Press the 

‘REMOVE FROM SERVICE’

 button. You will be asked to confirm this choice. Removing the 

Gateway from the remote monitor account will cause you to lose all of the device information. 
In other words, you will need to re-do all of the device discovery procedure. The next time 
you log in, you will go through the Gateway setup wizard, again.

I0

Summary of Contents for XG1000

Page 1: ...XG1000 GATEWAY USER S MANUAL ...

Page 2: ...te service account web site For security reasons both the Gateway and Remote Account are protected with ID s and Passwords Once the Gateway is installed most of the interaction with the system will be done through the remote service You will use a standard internet browser to access this web site This can be on the same PC that you used to set the system up or any other PC that has an internet con...

Page 3: ... User Name and Password You may want to use the same User ID and Password that you created when signing up for the remote service Write these down in a safe place you will need these every time you need to access the Gateway On the next screen log in to the Gateway using the new Gateway User Name and Password You should see the Gateway Main page TIME ZONE SETUP You must set the time zone in your G...

Page 4: ...egistering cameras press CONTINUE and then NEXT The setup process is now complete Press MONITOR DEVICES to see the devices you have installed TYPICAL ROUTER PORT FORWARDING PAGE RESET BUTTON PORT FORWARDING You will need to set up your router to allow communication between the Gateway and the Remote Monitor web site This is what allows live video to be viewed remotely IN ORDER TO SET UP THE ROUTER...

Page 5: ...ice In general a green icon indicates proper functionality yellow shows some temporary problem like marginal wireless communication A red icon means that there is a problem with the device such as dead batteries or prolonged communication loss Each device also has a short status message This message varies depending on the device type temperature sensors show the current temperature contact sensor...

Page 6: ...ws the cameras that are already installed As the system registers new cameras they are moved from the top list to the bottom If the status of a camera in the top list does not appear to be changing you have to reset the camera to its factory default condition Do this by pressing the RESET button on the side or the bottom of the camera Then wait a few seconds and pull the power cord out of the came...

Page 7: ...Green indicates good communication with the remote site Amber indicates that the Gateway has not been registered with the remote site yet Red indicates no communication between the Gateway and the remote site Device Status Shows the worst case status of the devices on the Monitor page If all devices are Green then this LED will show Green If one or more devices are Yellow or Red the LED will light...

Page 8: ...tton will reboot the Gateway while retaining all of the internal settings You can use the white reset tool that comes with each sensor device to activate this button The system will go through the normal boot sequence RESET BUTTON If you forget you Gateway User Name or Password you need to reset the system in order to regain access The Video Indicator on the front panel doubles as a Reset button T...

Reviews: