14
Page 17
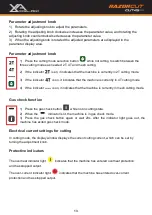
6.6. Electrical current settings for cutting
In cutting mode, the display window displays the current cutting current, which can be set by
turning the adjustment knob.
6.7. Protective indicators
The overheat indicator light
indicates that the machine has entered overheat protection
and has stopped output.
The over-current indicator light
indicates that the machine has entered over-current
protection and has stopped output.
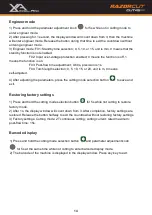
6.8. Engineer mode
1) Press and hold the parameter adjustment knob
for 5s while not in cutting mode to
enter engineer mode.
2) After pressing for 1 second, the display window will count down from 3, then the machine
will enter engineer mode. Release the button during that time to exit the countdown without
entering engineer mode.
3) Engineer mode: F01: Standby time selection; 0, 5, 10, or 15, unit is min, 0 means that the
standby function is not enabled.
F02: Input over-voltage protection enabled; 0 means the function is off, 1
means the function is on.
F03: Post-flow time adjustment; 0-60s, precision is 1s.
F04: Torch length selection; 0, 5, 10, 15, or 20, unit is m, 0 means
self-adjusted.
4) After adjusting the parameters, press the cutting mode selection button
to save and
exit.
6.9. Restoring factory settings
1) Press and hold the cutting mode selection button
for 5s while not cutting to restore
factory mode.
2) After 1s, the display window will count down from 3. After completion, factory settings are
restored. Release the button halfway to exit the countdown without restoring factory settings.
3) Factory settings: Cutting mode: 2T continuous cutting; cutting current: rated maximum;
post-flow time: 15s.
Page 18
6.10. Barcode display
1) Press and hold the cutting mode selection button
and parameter adjustment knob
for 5s at the same time while not cutting to enter barcode display mode.
2) The barcode of the machine is displayed in the display window. Press any key to exit.
7. Cutting function operation
Warning! Before turning on the power supply make sure that the equipment is
disconnected to the output. Otherwise, an unexpected arc may be started
when the power is turned on. This can cause damage to the work piece and to
personnel.
Warning! Be sure to wear appropriate protective equipment during welding or
cutting operation. Arcs, spatter, smoke, and high temperatures produced in
the process may cause injury to personnel.
Warning! After the power supply is turned off, the output voltage of the
machine may continue for a period and then drop slowly. Please do not touch
the conductive part of the output before the panel is extinguished.
7.1. Cutting operation
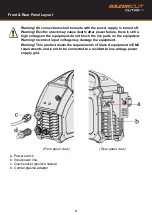
7.1.1 Turn on the power switch.
The power switch is located at the rear panel of the machine; set it in the "ON" position; then
the panel indicator will light up, the fan will start to rotate, and the machine will start to work
normally.
NOTE! Some models are equipped with the smart fan function. When the power supply
is turned on for a period before welding or cutting, the fan will automatically stop
running. It will run automatically when welding or cutting begins.
Engineer mode
Restoring factory settings
Barcode display


