background image

19

 XciteRC Rocket 125 3D

EN

Installation of the rotor guards 

·

 Getting started

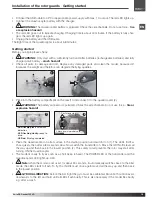
•  Connect the USB cable to a PC or appropriate power supply with max. 1 A output. The red LED lights up.
•  Connect the Quadrocopter battery with the charger. 

• 

 WARNING:

 The Quadrocopter battery is polarized. Check the side channels. Do not use force -

 fire 

or explosion hazard!

•  The red LED goes out to indicate charging. Charging time is about 40 minutes. If the battery is fully char-

ged, the red LED lights up again.

•  Unplug the battery and the USB cable. 
The flight time of the Quadrocopter is about 6-8 minutes.

Getting started

Before you begin please check:

• 

 WARNING:

 Only start with a sufficiently full transmitter batteries (rechargeable batteries) and fully 

charged drive battery – 

crash hazard!

•  Check all parts for damage and dirt. Replace any damaged parts and clean the model, because dirt 

increases the weight and therefore can degrade the flying qualities. 

1

2

•  Place into the battery compartment on the rear (1) and connect it to the quadrocopter (2). 

• 

 WARNING:

 The battery connector is polarized. Check the side channels. Do not use force -

 fire or 

explosion hazard!


2

2

LED flashing fast:

 automatic

  detection

LED flashing slowly:

 ready to

  bind

LED on: 

Binding completed

1. First move up

2. Move down immediately

1

•  Place the Quadrocopter on a flat surface in the starting position and switch it on (1). The LEDs first fla-

shes quickly, then after a few seconds slow. Now switch the transmitter on. Move the left throttle lever all 
the way up and then back in the lowest position (2). This safety circuit prevents the rotor may start after 
turning ON the Quadrocopter

•  The model is ready to fly as soon as a short beep is heard. The POWER LED of the transmitter and the 

Quadrocopters LED lights up solid. 

• 

 Note: 

when the model is not used  for about 30 seconds, it automatically switches back to the bind 

mode, the LEDs starts to flash. To fly, the throttle must once again moved all the way up and then back 
in the lowest position

• 

 GYRO CALIBRATION:

 before the first flight the gyro must be calibrated. Move both control levers 

downwards to the left and hold until all LEDs flash briefly. This is also necessary if the model flies badly 
e.g. after a crash

Summary of Contents for Rocket 125 3D 15006100

Page 1: ...Bedienungsanleitung Manual Mode d emploi 15006100 XciteRC Rocket 125 3D Quadrocopter 2 4 GHz 15006000 XciteRC Rocket 125 3D Quadrocopter 2 4 GHz mit Kamera...

Page 2: ...orbehalten Aus Angaben und Abbildungen dieser Bedienungsanleitung k nnen keine Anspr che abgeleitet werden KEINE HAFTUNG F R DRUCKFEHLER NDERUNGEN VORBEHALTEN Die jeweils neueste Version dieser Anleit...

Page 3: ...riebnahme alle Warn und Sicherheitshinweise in dieser Bedie nungsanleitung und auf der Verpackung Diese Bedienungsanleitung ist Bestandteil dieses Produkts Sie enth lt wichtige Hinweise zum Umgang mit...

Page 4: ...b nur bei ausreichenden Lichtverh ltnissen in direktem Sichtkontakt ab seits von Autos Verkehr und Menschen Unfall und Verletzungsgefahr ACHTUNG bedingt durch die geringe Gr e und Gewicht darf das Mod...

Page 5: ...er gleichwertige Batterietypen Akkus WARNUNG Batterien Akkus nicht gro er Hitze aussetzen oder ins Feuer werfen Brand bzw Explosionsgefahr WARNUNG Batterien Akkus nur mit der korrekten Polarit t einse...

Page 6: ...iepton oder leuchtet gar nicht mehr darf das Modell nicht mehr gestartet werden Absturzgefahr Senderbatterien sofort wechseln WARNUNG Achten Sie auch w hrend des Betriebs auf die POWER LED Beginnt die...

Page 7: ...an der Hinterseite einlegen 1 und den Akku anstecken 2 WARNUNG Der Akku ist verpolungssicher Achten Sie auf die seitlichen F hrungen Wenden Sie keine Gewalt an Brand bzw Explosionsgefahr 2 LED blinkt...

Page 8: ...UNG zum Umschalten des Steuermode Mode 1 oder 2 siehe Grafik RC Funktionen bei ausgeschaltetem Sender den rechten Trimmhebel dr cken und halten und Sender ein schalten Geht der Flugakku zu Neige begin...

Page 9: ...rechten Flip Taster 3 Ein Piepton und die Anzeige 3D im Display 4 signalisieren dass das Modell bereit ist Wenn Sie nun den Steuerhebel zum Endanschlag 5 dr cken rollt das Modell in der Richtung des...

Page 10: ...ge reagiert der Quadrocopter nicht mehr pr zise auf Ihre Steuerbefehle der Flug wird instabil Landen Sie in diesem Fall sofort Nach der Landung das Modell und anschlie end den Sender ausschalten Wartu...

Page 11: ...chwer steuern Gyro nach Crash nicht korrekt initialisiert Gyro neu kalibrieren siehe Abschnitt Starten und Fliegen Gyro Kalibrierung Reparaturen Ersatzteile Normaler Verschlei und defekte Teile die vo...

Page 12: ...ach dem Batteriegesetz BattG verpflichtet Sie auf Folgendes hinzuweisen Batterien und Akkus d rfen nicht im Hausm ll entsorgt werden sondern Sie sind zur R ckgabe gebrauchter Batterien und Akkus geset...

Page 13: ...13 XciteRC Rocket 125 3D DE...

Page 14: ...ved Text and illustrations of this manual no claims can be derived NO LIABILITY FOR PRINTING ERROR SUBJECT TO CHANGE The latest version of this manual can be found on the Internet at www XciteRC com C...

Page 15: ...he manual for future reference and also it must be strictly kept and passed on the subsequent sale of the model to the buyer Failure to follow the operating instructions and the safety instructions ma...

Page 16: ...ated at any public space by implication streets roads squares or lakes Before operation please ask where the operation is allowed This also applies to private property here the consent of the owner is...

Page 17: ...me time never use new and used batteries and batteries with different charge levels simultaneously WARNING Do not use defective or damaged batteries or rechargeable batteries fire hazard Risk of chemi...

Page 18: ...ars or does not light at all the model may not started crash hazard Change transmitter batteries immediately WARNING check the POWER LED also during operation If the POWER LED starts to blink and the...

Page 19: ...e quadrocopter 2 WARNING The battery connector is polarized Check the side channels Do not use force fire or explosion hazard 2 2 LED flashing fast automatic detection LED flashing slowly ready to bin...

Page 20: ...itter off and press the right trim lever Now switch on the transmitter again 5 If the flight battery runs low the LEDs on the motor mounts starts flashing From now on the model is con trollable for on...

Page 21: ...press the FLIPS button 3 A sound and 3D in the screen 4 indicates that the mode is active Now move the right control lever to the desired direction 5 and the model rolls once around its own axis Hold...

Page 22: ...s the control lever to switch the lighting of the Rocket 125 3D on or off Is the lighting on a bulb appears in the transmitter sreen 1 2 L H E AS Y LCD Display Landing Carefully push the left throttle...

Page 23: ...The Quadrocopter does not react to the remote control Loss of control Gyro initialisation failure Quadcopter not bound to the trans mitter Gyro calibration failure after a crash Place the model on a...

Page 24: ...evices containing batteries we are obliged to draw your attention to the following Batteries and rechargeable batteries should not be disposed of with household waste but you are legally obliged to re...

Page 25: ...25 XciteRC Rocket 125 3D EN...

Page 26: ...emploi NOUS DECLINONS TOUTE RESPONSABILITE EN CAS D ERREUR D IMPRESSION NOUS NOUS RESERVONS LE DROIT DE MODIFICATION Veuillez trouver la derni re version de cette notice d emploi dans l internet sous...

Page 27: ...mod le Ce mode d emploi fait partie int grante du produit Il contient des consignes importantes pour l usage du produit Conservez le pour votre lecture mais aussi remettez cette documentation tierce...

Page 28: ...rmettant un contact visuel direct et en espace libre l cart des voitures trafic et personnes Danger d accident et de blessure DANGER du fait de sa petite taille et de son faible poids le mod le ne peu...

Page 29: ...z que des piles accumulateurs homologu s pour ce mod le ou des piles accumulateurs tant de qualit similaire DANGER N exposez pas les piles accumulateurs une source de chaleur Ne les jetez jamais au fe...

Page 30: ...faut pas d coller Risque de Crash Remplacez imm diatement les piles de l metteur DANGER Durant le vol surveillez en permanence la LED POWER Si la LED POWER se met clignoter accompagn e d un bip sonor...

Page 31: ...entrave les caract ristiques de la navigation 1 2 Placez l accu dans le logement accu situ en arri re 1 et branchez l accu 2 DANGER L accu est quip d un d trompeur Il s agit des petites ar tes lat ral...

Page 32: ...nt n cessaire si le mod le par exemple apr s un crash ne vole plus ou vole tr s mal MODE DE PILOTAGE Pour passer du mode de pilotage 1 au mode 2 voir graphique des fonctions RC appuyez sur le trim dro...

Page 33: ...ntenant le manche de commande en but e le mod le en fonction de la direction dans laquelle vous avez d plac le manche ira vers l avant ou se d placera lat ralement autour de son propre axe Pour effect...

Page 34: ...ent en vid o inactive Eclairage Appuyez sur le manche de commande pour allumer ou pour couper l clairage du Rocket 125 3D Si l clairage est allum le symbole d une lampe s affiche l cran 1 2 L H E AS Y...

Page 35: ...bris ou ne pr sentent quelcon ques alt rations en particulier sur les roues dent es Sinon r parez les DANGER retirer les piles ou accus du mod le et de l metteur quand l appareil est l arr t Dan ger...

Page 36: ...d p t de tous les appareils lectriques ou lectroniques dans les points de r cup ration autoris s pr s de chez vous est gratuit Renseignez vous aupr s de votre commune ou mairie o se trouve le centre...

Page 37: ...ereux figurent le symbole d une poubelle barr e et le symbole des m taux dangereux Le symbole de la poubelle barr e signifie que les piles et les accumulateurs ne doivent pas tre jet s dans la poubell...

Page 38: ...n Produkt unter dem Link Ersatzteile EN Spare parts for the XciteRC Rocket 125 3D you may order in your local hobby shop or online at http www XciteRC com en at the respective product under the link S...

Page 39: ...odellbau GmbH Co KG declare that this product complies with the essen tial requirements and other relevant regulations of the directives R TTE 1999 5 EC and RoHS 2011 65 EC The detailed Declaration of...

Page 40: ...XciteRC Modellbau GmbH Co KG Autenbachstra e 12 D 73035 G ppingen Phone 49 7161 40 799 0 Fax 49 7161 40 799 99 E Mail info xciterc de Web www XciteRC com...

Reviews: