background image


function on/off RT button) 


b: LED Monochromatic light settings 

X1(Plus) built in many LED light on


variety buttons, the Back, Start, A, B, X, Y, RB, LB buttons 

are  monochromatic  light  ,  you  are  able  to  adjust  the  LED  brightness  in  5  levels,  the  setting 
method is shown below. 
Press the  P  button consecutively to change  the  brightness of the LED light,  it  will change  in 
the  form  of  “0-1-2-3-4-5-0-1-2…,  0  means  the  LED  light  off,  “1”  means  dim,  “5”  is  the 
brightness.   
 

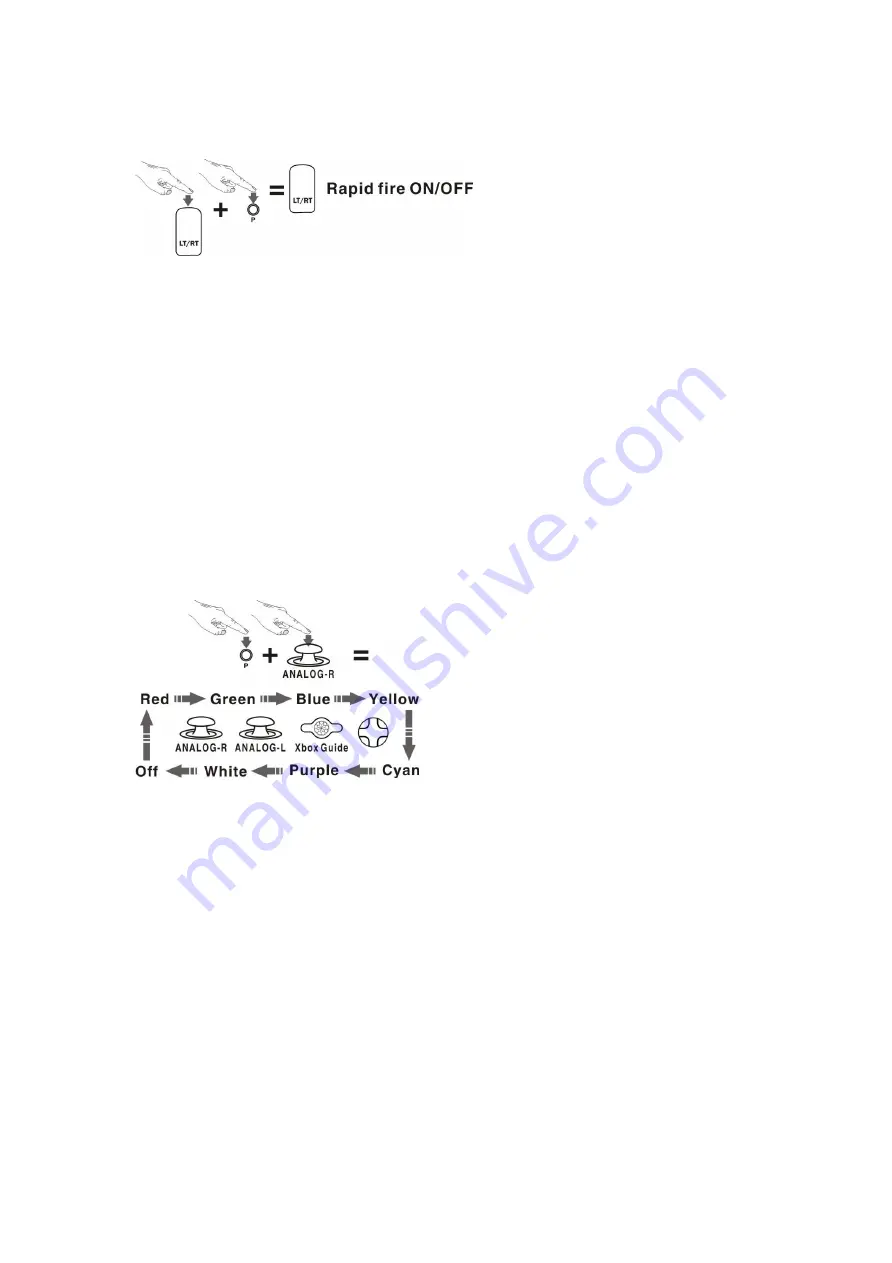
c: the changeable LED light setting. 

The Changeable LED light can be shift to 7 different colors,they are enable on the Right and 
Left analog sticks, Guide key and the D 

–pad , the color setting method is shown below: 

Press  and  hold  the  P  button  and  press  the  RC  button  once, now  all  of  the 

Monochromatic 

light 

blinks, release the P and RC buttons. 

The programming system is entered into the changeable LED light mode, press on LC or RC 
button  consecutively,  the

  changeable  LED  light  will  change  the  color  into  a  loop  (from 

Red  –  Green  –  Blue  –  Yellow  -  light  green  –  Purple  –  White  -  turn  off) 

when  the  color 

changes  to  your favorite color, press the  P button once and it  will exit the 

changeable LED 

light setting program, it will stay on the color you chose. 


d: Rumble function setting   
The X1 (plus) replacement shell built in 2 rumble motors on 2 controller triggers (the LT 
and RT buttons). 
How to turn on/off the Rumble function: 
Press and hold the P button then press the LC button once, now release the P button, 
you  are  enter  the  Rumble  function  setting  status,  all  the  LED  Monochromatic  light 
blinks, press the LC button again to turn on the Rumble function, the vibrator is now 
enabled, you can press the RC to turn off the Rumble function, (pressing the RC button, 
the vibrator is malfunction) press the P button to exit the setting mode. 
 
All  the  setting  (LED  light  mode,  Rapid  fire  mode  or  the  Rumble  function  modes)  are 
saved on the device; you don’t have to re-program it for your next game play. 


Summary of Contents for X1

Page 1: ... the two triggers buttons Includes four 4 LED analog thumb sticks 2pcs of Concave and 2pcs of Convex a LED kit set for lighting up all buttons 2 Package includes A X1 Plus replacement shell B PC board x 1pcs C Screw driver x 2pcs D D pad x 1sets LED analog thumb sticks x 4pcs 2pcs of Concave and 2pcs of Convex E Phillips screws x 2pcs F Rumble motor x 2pcs for RT and LT button as shown on the pict...

Page 2: ... A 1 Place the PCB of X1 Plus on to the 360 wireless controller board A 2 Solder the 5 points arrow indicates ...

Page 3: ...der the point As shown on the pictures A B C D solder the providing wires to its correct position A connects to the Blue wire B connects to the Black wire C connects to the Red wire D connects to the Green wire ...

Page 4: ......

Page 5: ... A 4 Remove the stickers of the double sided tape A 5 Stick the 2 round PCB to the arrow indicated area and solder up the 4 points red circle indicated ...

Page 6: ...B Version 2 of Xbox 360 wireless controllers B 1 Place the PCB of X1 Plus to the 360 wireless controller board ...

Page 7: ...dicates B 3 Solder the indicated area As shown in the pictures A B C D solder the providing wires to its correct place A connects to the Blue wire B connects to the Black wire C connects to the Red wire and D connects to the Green wire ...

Page 8: ......

Page 9: ... B 4 Remove the stickers of the double sided tape ...

Page 10: ... B 5 Stick the 2 round PCB to the arrow indicated area and solder the 4 points white circle indicated 4 As shown in the diagram install the RT and LT buttons step by step ...

Page 11: ...ticks and LT RT buttons Correctly place the PC board to X1 plus replacement shell finally plug the soft flat cable to the socket as shown on the picture below the arrow indicated 6 Now cover up the bottom part of X1 Plus replacement shell and tighten it with screws the installation is now completed ...

Page 12: ...l built in with the rapid fire function on 2 Triggers the RT and LT triggers the rapid fire rate is 20 shots per seconds Turn on off the rapid fire function press and hold the LT button then press the P button once release the LT and P button you are now able to turn on or off the rapid fire function The method to turn on off the rapid fire function on the RT button is as same as the previous step...

Page 13: ... press on LC or RC button consecutively the changeable LED light will change the color into a loop from Red Green Blue Yellow light green Purple White turn off when the color changes to your favorite color press the P button once and it will exit the changeable LED light setting program it will stay on the color you chose d Rumble function setting The X1 plus replacement shell built in 2 rumble mo...

Reviews: