English
26
tion and press the ESC button.
Recording type consists of video,
audio, and voice. You can set the
recording time in 10-minute units.
6.
Finish setup by pressing the
MENU button. If the time is
scheduled, it automatically turns
on the power and start recording.
Notes:
•
If you want to program record
through an external device, the
external device’s power should
be on.
•
When the recording schedule
time overlaps, then you cannot
set program recording.
•
You can consecutively program
recording schedules 1, 2, and 3.
•
After recording, the recorded files
are automatically saved in the
RECORD folder in the MUSIC/
MOVIE folder.
•
The voice recorded files are
saved as VOICE_MMDD_hh-
mmss.
mp3 (VOICE_0902_135045.mp3)
in this order.
•
The audio recorded files are
saved as AUDIO_MMDD_hh-
mmss.
mp3
(AUDIO_0902_135045.mp3)
in this order.
•
The video recorded files are
saved as VIDEO_MMDD_hh-
mmss.avi
(VIDEO_0902_135045.avi) in this
order.
•
While recording, you cannot
change the volume.
•
When the memory is full, record-
ing automatically stops.
Caution:
•
When the remaining battery
power is too low, recording is
not possible. It is recommended
that you connect the unit to the
adapter when recording.
•
Adjust the volume of the external
audio/video equipment to an ap-
propriate level before recording
music. If the volume is too high
or low, the sound quality of the
recorded music may not be good.
•
The supplied line in cable can
only be used to connect an exter-
nal audio device for audio record-
ing.
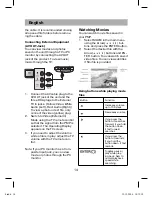
• C
onnect the white plug of
+(4-pole)totheAVInjackand con-
nect the black plug of
+(3-pole) to the line out jack of an
external audio device. If the jacks
are not connected to the corre-
sponding ports, it will not record
properly.
System Configuration
In this mode, you can set up for vari-
ous system environments.
Set up items include Language, Set
time, Display, Power save mode, TV
out type, Time recording, HDD capac-
ity, and such.
To access the CONFIG menu:
1.
Select CONFIG in the main menu
using the Arrow(
) buttons
and press the ENTER button. The
CONFIG menu appears.
2.
Many setup items appear in the
popup menu.
You can set up with the Arrow
(
) buttons and the ENTER
button for each setting.
505IM.indd 26
M.indd 26
19.12.2006 14:12:21
19.12.2006 14:12:21

