background image

17

POLSKI

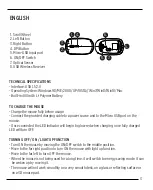
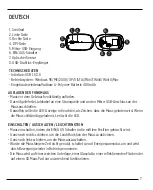
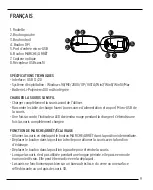
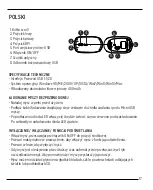
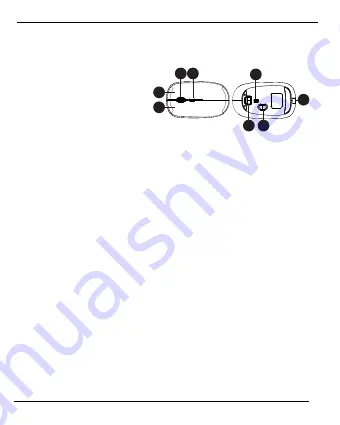
1. Kółko scroll 
2. Przycisk lewy
3. Przycisk prawy 
4. Przycisk DPI 
5. Port wejściowy micro-USB 
6. Włącznik ON/OFF 
7. Czujnik optyczny  
8. Odbiornik bezprzewodowy USB

比例

  1.000

比例

  1.000

3.


1.


4.


1.


5.


6.


7.


8.


2.


SPECYFIKACJE TECHNICZNE

- Interfejs: Przewód USB 1.1/2.0
- System operacyjny: Windows 98/ME/2000/ XP/VISTA/Win7/Win8/Win10/Mac
- Wbudowany akumulator litowo-jonowy 400mAh

ŁADOWANIE MYSZY BEZPRZEWODOWEJ

- Naładuj mysz w pełni przed użyciem.
- Podłącz kabel ładowania znajdujący się w zestawie do źródła zasilania i portu Micro USB
   myszy.
- Po podłączeniu dioda LED włączy się i będzie świecić się na czerwono podczas ładowania.
   Po całkowitym naładowaniu dioda LED zgaśnie.

WYŁĄCZANIE / WŁĄCZANIE / FUNKCJA PODŚWIETLANIA

- Włącz mysz, przesuwając przełącznik ON/OFF do pozycji środkowej.
- Przesuń maksymalnie w prawą stronę, aby włączyć mysz z funkcją podświetlenia.
- Przesuń w lewo, aby wyłączyć mysz.
- Gdy mysz jest nieużywana przez dłuższy czas automatycznie przełącza się w tryb
   oszczędzania energii. Aby ponownie użyć myszy wystarczy ją poruszyć.
- Mysz może nie działać płynnie na gładkich blatach, szkle, powierzchniach odbijających
   światło lub podkładkach 3D.

Summary of Contents for P300.32 Series

Page 1: ...Light up logo wireless mouse Copyright XD P300 32X...

Page 2: ...Content Nederlands p 5 Deutsch p 7 Fran ais p 9 Espa ol p 11 Svenksa p 13 Italiano p 15 Polski p 17 English p 3...

Page 3: ...le to a power source and to the Micro USB port on the mouse Once connected the LED Indicator will begin to glow red when charging once fully charged LED will turn OFF TURNING OFF ON LIGHT UP FUNCTION...

Page 4: ...or slower pointer speed Press the DPI Button to switch between 800 1200 1600 DPI WARNING Do not place or use the product at high temperature or in a humid environment Keep the product out of reach of...

Page 5: ...muis AAN door de AAN UIT schakelaar in de middelste stand te zetten Zet de schakelaar volledig naar rechts om de muis AAN te zetten en de light up logo functie in te schakelen Zet de schakelaar volle...

Page 6: ...wonding tot gevolg Laad de muis niet langer dan 4 tot 6 uur op en laat deze niet onbeheerd achter INSTALLATIE VAN DRAADLOZE ONTVANGER Verwijder de USB ontvanger uit de USB aansluiting onderaan de muis...

Page 7: ...CHTFUNKTION Maus einschalten indem der EIN AUS Schalter in die mittlere Position gebracht wird Ganz nach rechts schieben um die Leuchtfunktion der Maus zu aktivieren Ganz nach links schieben um die Ma...

Page 8: ...g legen und Selbstentz ndung Explosion oder Verletzungsgefahr verursachen Laden Sie die maus nicht l nger als 4 6 Stunden und lassen Sie sie nicht unbeaufsichtigt INSTALLATION DES DRAHTLOS EMPF NGERS...

Page 9: ...mer la souris en d pla ant le bouton MARCHE ARR T dans la position interm diaire D placer le bouton dans la position droite pour allumer la souris avec la fonction d clairage D placer le bouton dans l...

Page 10: ...atteries endommag es ou modifi es peuvent fonctionner de mani re inattendue et ainsi provoquer un incendie une explosion ou induire un risque de blessure Ne chargez pas la souris externe pendant plus...

Page 11: ...icro USB del rat n Una vez conectado el indicador led brillar en rojo durante la carga cuando est completamente cargado el led se apagar APAGADO ENCENDIDO FUNCI N DE ILUMINACI N Encienda el rat n movi...

Page 12: ...redecibles que pueden dar lugar a incendio explosi n o riesgo de lesiones No cargue la rat n durante m s de 4 6 horas y tampoco la deje sin supervisi n INSTALACI N DEL RECEPTOR INAL MBRICO Retire el r...

Page 13: ...ll Micro USB porten p musen Efter anslutningen b rjar LED indikeringen lysa r tt under laddningen och n r musen r f rdigladdad st ngs LED indikeringen av SL AV P T NDFUNKTIONEN Sl P musen genom att fl...

Page 14: ...er risk f r personskada Ladda inte din musen i mer n 4 6 timmar och l mna den inte o vervakad INSTALLERA DEN TR DL SA MOTTAGAREN Ta bort USB mottagaren fr n porten f r USB mottagaren under musen N r d...

Page 15: ...cro USB del mouse Una volta collegato l indicatore LED inizia ad accendersi di colore rosso durante la carica mentre quando completamente carico il LED si spegne SPEGNIMENTO ACCENSIONE ILLUMINAZIONE A...

Page 16: ...io esplosione o di rischio di pregiudizio Non caricare il mouse per pi di 4 6 ore e non lasciare incustodito INSTALLAZIONE DEL RICEVITORE SENZA FILI Rimuovere il ricevitore USB dalla porta del ricevit...

Page 17: ...znajduj cy si w zestawie do r d a zasilania i portu Micro USB myszy Po pod czeniu dioda LED w czy si i b dzie wieci si na czerwono podczas adowania Po ca kowitym na adowaniu dioda LED zga nie WY CZAN...

Page 18: ...mog dzia a niew a ciwie skutkuj c po arem wybuchem lub stwarza ryzyko obra e cia a Nie adowa mysz d u ej ni przez 4 6 godzin i nie zostawia jej bez nadzoru INSTALACJA ODBIORNIKA BEZPRZEWODOWEGO Wyjmi...

Page 19: ...a directive 2014 30 EU La D claration de conformit peut tre consult e dans son int gralit sur www xindao com rechercher le num ro de l article ITALIANO Xindao B V dichiara che il prodotto conforme ai...

Page 20: ...Copyright XD P300 32X...

Reviews: