background image

P

REVENTATIVE

 M

AINTENANCE

P


AGE

 10 

E

E

QUIPMENT

QUIPMENT

M

M

AINTENANCE

AINTENANCE


Use a dampened soft-cloth to wipe equipment free of perspiration after each use. Avoid getting        

excessive moisture on computer or electronic components. Do not use abrasive cleaners or

petroleum-based solvents to clean equipment. 


Do not remove drive train shrouds or attempt any technical service on equipment without consulting  

an authorized service representative.


Regularly inspect product for lose assembly hardware and worn components.  


(If applicable) For added safety, unplug equipment from the wall socket when it is not being used. 


Use a product /exercise mat underneath equipment for protection of floors & carpets. 


(If applicable) Apply recommended component lubricants at the required time periods. 


Keep product assembly manual, purchase receipt, and service records in a safe storage place.  


( If applicable) Periodically check batteries for proper voltage output & replace as needed. 


Do not store or use equipment outdoors.  
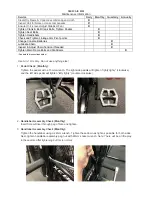
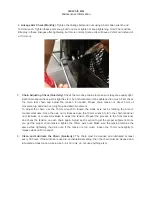
 

Moving equipment:  


Lift up the rear stabilizer and carefully tip the bike forward until the front stabilizer wheels touch


the floor. Do not use the computer or pivot arms to move the unit

You may wish to lock the fan in 


place (which will keep the arms from moving), by turning the safety knob (referenced on page 7) 


until it makes contact with the fan wheel.


TRAINING FOR SUCCESS

TRAINING FOR SUCCESS

How you start an exercise program depends on your physical condition. If you have been inactive 
for awhile or you have pre-existing health condition, you should start slowly. Initially you may only 
be able to exercise for a short amount of time using minimal resistance levels or weight loads.  

Begin  your  desired  training  program  slowly  and  gradually  increase  the  amount  of  time  you       
exercise.  Apply  realistic  goals,  that  have  been  set  by  you  or  your  physician.  You  should  see           
sufficient gains in your personal fitness level within 6-8 weeks of continuous exercise, but do not be 
discouraged  if  it takes  longer. It is  very  important  to  exercise  at  your  own  pace  and  become        
confident in obtaining your goals. It is also important to apply warm-up, stretching, and cool down 
periods with any exercise  program.

As your fitness level increases, so  will  your  confidence  and  sense  of  accomplishment.  Regular      
exercise and a healthy diet will energize you and offer a sense of well-being.


Summary of Contents for AB-1

Page 1: ...TYPRECAUTIONSBEFOREUSINGTHISPRODUCT REFERENCE ALL SAFETYGUIDELINESANDWARNINGLABELS RETAINPRODUCTLITERATURE FORFUTUREREFERENCE A S FETY OPERLYWARMUPAND STRETCHBEFOREEXERCISING IFYOUFEELPAINORDIZZINESSA...

Page 2: ...of stated precautions 2 Read all instructions and enclosed literature carefully Understand the assembly and operation before using the equipment 3 Use equipment on a flat level surface Use adjustment...

Page 3: ...RIGHT PEDAL SPRING WASHER 12 8 5 1 5T WASHER 18 8 5 1 5T BOLTS M5 10 LENGTH PAN HEAD SCREW CONNECTING ARM PREINSTALLED LEFT PIVOT ARM ASSEMBLY RIGHT PIVOT ARM ASSEMBLY FOOT REST LEFT PEDAL CONSOLE CO...

Page 4: ...Y SOMEITEMSMAYBEPREASSEMBLED THEEXPLODEDPARTSVIEWISSHOWNFORREFERENCEONLY SOMEITEMSMAYBEPREASSEMBLED PLEASEREFERTOTHEINDIVIDUALASSEMBLYSTAGEINSTRUCTIONSFORDETAILEDPARTSORIENTATION PLEASEREFERTOTHEINDIV...

Page 5: ...B Assemble theRearStabilizer Assembly 3 totheMainBase Assembly 1 using2 ButtonHeadAllenBolt C Use theAdjustableLevelerson thebottomof theStabilizerAssembliestoadjustthebikeand keep itfromrocking on a...

Page 6: ...correspondingmountingarea of theBaseFrameAssembly Securethemast tothe baseframe using 2 Button HeadAllenBolts 22 2 SpringWashers 23 and 2 Washers 24 B Install 2 C Batteriesinto the back oftheComputer...

Page 7: ...eat nolongertwistsortilts SeatAdjustments Adjust theseat heightby unscrewingandpullingout ontheSeatPostAdjustment Knob 12 Select a desired seat post height and retighten theknobuntil seatpost issecure...

Page 8: ...sof theBaseFrameAssembly 1 Using a standardcrescentwrench not included threadeach shaftinto the pivot boss using a clockwiserotation Fully tighten each shaft until itis flush against the pivot bossof...

Page 9: ...emble theRightPedal 20 to theRightCrankArmonthe MainBase Assembly Threadthepedal onthe crankarm clockwise and securely tightenwith the pedal wrench included Reference Figure 5 B AssembletheLeftPedal 2...

Page 10: ...E STABILIZERS TO ADJUST EQUIPMENT TO UNEVEN SURFACES SEAT POST MOVEMENT 1 MAKE SURE THE ADJUSTMENT KNOB IS LOCKED INTO A SEAT POST HOLE 2 SECURELY TIGHTEN THE SEAT POST IN PLACE BY TURNING THE ADJUSTM...

Page 11: ...ilizerwheelstouch thefloor Donotusethecomputerorpivotarmstomovetheunit Youmaywishtolockthefanin place whichwillkeepthearmsfrommoving byturningthesafetyknob referencedonpage7 untilitmakescontactwiththe...

Page 12: ...tighten handlebar assembly peg nut with 22mm socket wrench Note There will be a little play in these arms after tightening but this is normal XEBEX AIR BIKE Maintenance Information Service Daily Month...

Page 13: ...n movement To adjust the chain use the 15mm wrench to loosen the crank axle nut by rotating the wrench counter clockwise Once the axle nut is loosened use the 10mm wrench to turn the chain tensioner n...

Page 14: ......

Page 15: ...ER ARM 17 1PC FOOT REST 18 2PC LEFT PEDAL 20 1PC RIGHT PEDAL 21 1PC BUTTON HEAD ALLEN BOLT M8 20L 22 6PC SPRING WASHER 23 12PC WASHER 18 8 5 1 5T 24 14PC BOLT M5 10L 25 2PC PAN HEAD SCREW M5 10L 26 2P...

Reviews: