background image


                          1029 INSTALLATION  MANUAL 


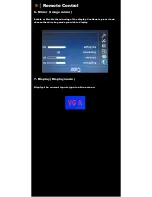
Summary of Contents for 1029

Page 1: ...1029 INSTALLATION MANUAL...

Page 2: ...Table of Contents Features 03 Specifications 04 Quick Start 05 Remote Control 07 Capacitive Touch 10 Hardware Installation 11 1029CNH 1029CNV 1029TNH 1029TNV Models Additional Info 15 Owner s Record 1...

Page 3: ...B x 1 Video Input x 2 DVI Input through included DVI to HDMI adaptor 1029CNH 1029TNH Only Supports HDCP NTSC PAL Multi System 16x9 Aspect Ratio Ultra High Resolution 1024 x 600 Native Solid Capacitors...

Page 4: ...connector 15 Pin D SUB x 1 RCA composite video female connector x 2 HDMI input connector x 1 1029CNH 1029TNH Only Touch Panel Input Output USB connector x 1 Power Source Input Single 12V DC_IN Suppor...

Page 5: ...uter s analog VGA output connector Attach the HDMI connector to your computer s HDMI output connector CNH TNH Only Attach your Video source one e g VCR Video Game Console to the Yellow RCA connector m...

Page 6: ...hscreen driver for your operating system from our website WWW XENARC COM Depending on your application you can choose to install the included U Shape bracket onto the monitor Please make sure that you...

Page 7: ...timer Press this button to select and set the time to turn off the monitor automatically 6 Picture Button Enable or select the picture mode you prefer Press this button and then you can select standa...

Page 8: ...atically turn off the monitor The minimum is 15 minutes and the maximum is 120 minutes 3 Picture Set the modes of the picture Enable to select the picture modes you prefer Press this button and then y...

Page 9: ...rol 6 Mirror Image mirror Enable or Disable the mirroring of the display Continue to press it and choose the mirroring mode you wish to display 7 Display Display mode Display the current input signal...

Page 10: ...type into the field Other common gestures include Touch hold Touch hold an item on the screen by touching it and not lifting your finger until an action occurs Drag Touch hold an item for a moment and...

Page 11: ...he value of settings inside the OSD menu Ambient Light Sensor Ambient light sensor can be enabled or disabled in the OSD by going into the MISC category and selecting the option Auto Sensor When Auto...

Page 12: ...ress left to decrease sharpness and right to increase the level of sharpness Color Temp Set the color temp to the desired setting 6500K 9300K and User Backlight Adjust backlight intensity by pressing...

Page 13: ...ally adjust the brightness of the display according to the surrounding environment Please note While auto sensor is enabled the option of dimmer or backlight inside the OSD can not work until auto sen...

Page 14: ...nimum is 15 minutes and the maximum is 120 minutes Keypad Allows you to disable or enable the buttons on the front of the monitor Power Menu Select Left and Right buttons can be disabled or enabled So...

Page 15: ...ltage will damage the monitor and void the warranty Please use a fused power source if you decide to wire the monitor directly to your vehicle s electrical system It is also crucial that you check the...

Page 16: ...provided below as well as the dealer name address and telephone number Please refer to these records whenever speaking to your dealer regarding this product Model Number Serial Number Dealer Name Str...

Reviews: