background image

Video and

pen data

Pen data

Pen data

Video data

Video data

Video and

pen data

Pen data

Pen data

Video data

Video data

Video and

pen data

Pen data

Pen data

Video data

Video data

4

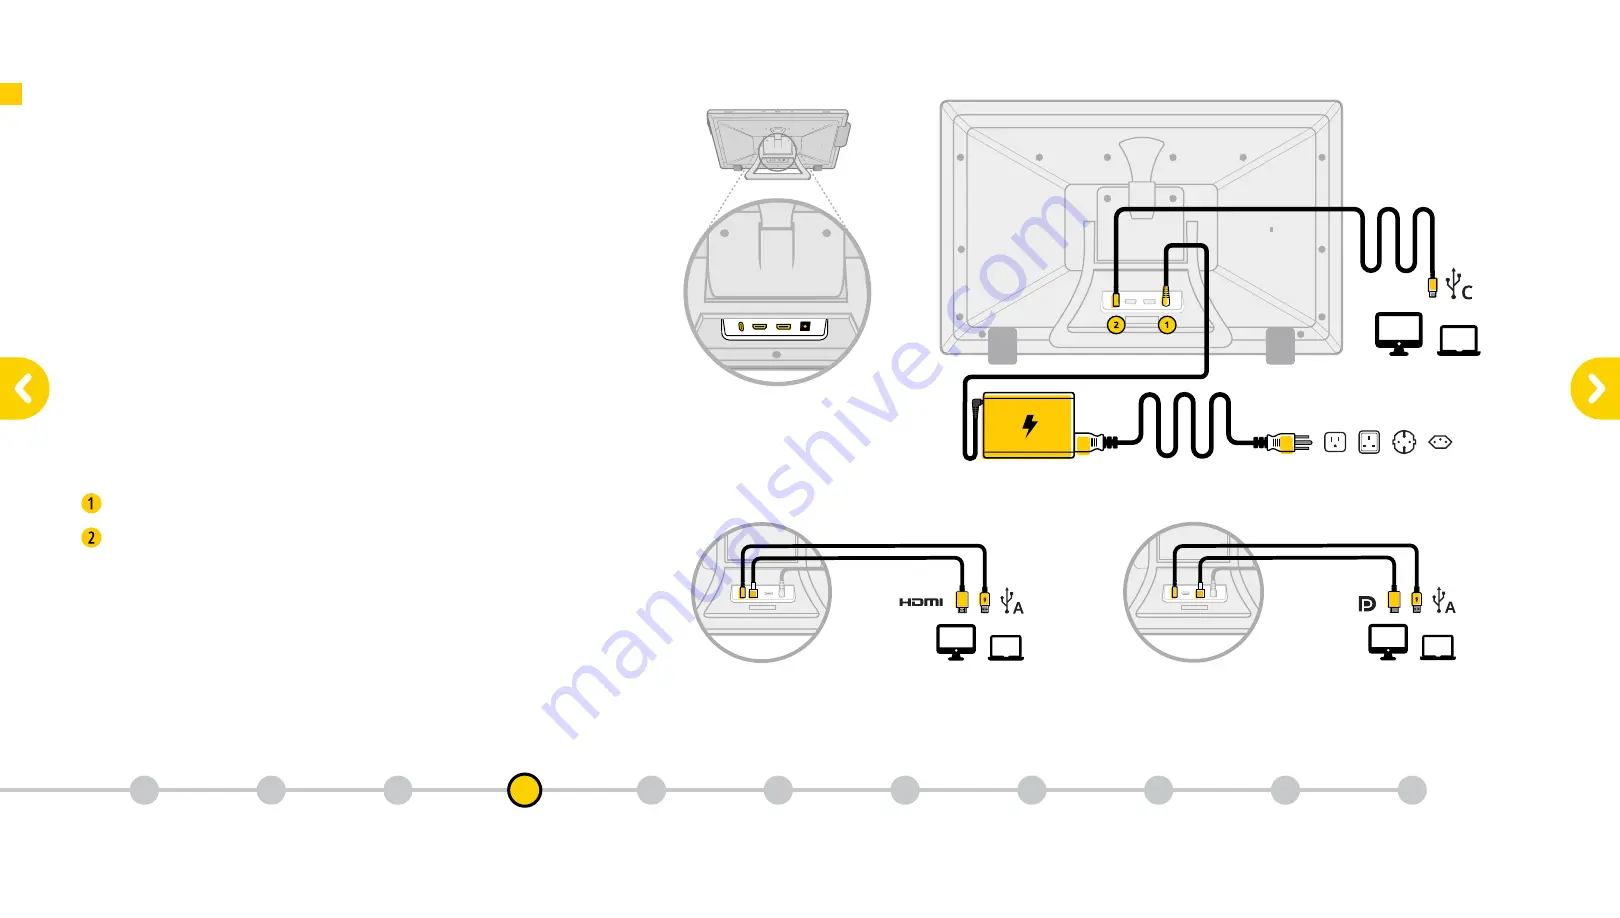
The Pen Display’s video-data-power ports are located on the back of the 

display. To easily view and access these ports, we suggest using the foam 

packing pad the display was shipped with as a cushioned mat. Place the 

foam pad on a flat surface such as a tabletop, then lay the display face 

down on the foam pad. As you plug in the cables, do not route them 

through the tight space between the top of the stand leg and tilting arm. 

This may damage the cables at low tilt angles.
For the pen display to work properly it needs to be connected to power, 

and it also needs both video and pen data to flow between it and your 

computer. The cable combination that works for you will depend upon the 

type of ports your computer has.  

If your computer has a USB-C port, you should be able to use only the 

USB-C to USB-C cable. This is a special connection type that’s capable of 

passing both video and pen data at the same time. This cable combination 

is shown at the top right.

   AC Power Adapter with L-shaped connector 

  2m USB-C to USB-C (L-shaped) cable   

If your computer does not have a USB-C port and instead has an HDMI 

port or DisplayPort, then you’ll want to use one of those cables in 

combination with the USB-A cable. The HDMI or DisplayPort cables 

pass video data and the USB-A cable passes pen data. These cable 

combinations are shown at the bottom right.
Please do not use an HDMI, DisplayPort or USB-C cable together. This may 

cause a duplication of the video data to be sent to your computer, making 

your OS think you have multiple pen displays attached.

Your pen display is working properly when your cursor follows your pen movement.

Video, Data, and Power Ports

USB-C, HDMI, DisplayPort, and 

Power Connector.

Connecting the Pen Display 24

What is in 

the box

1

Getting 

Started

2

Key Features of the 

Pen Display 24

3

Download 

the Driver

5

Key Features of  

the Quick Keys

6

Connecting  

Quick Keys

Wirelessly

7

Charging the 

Quick Keys

8

Key Functionality 

of the  

Pen Display 24

9

Key Functionality 

of the 

Quick Keys

10

Register Your 

New Product

11

Connecting 

the Pen  

Display 24

4

Summary of Contents for Pen Display 24

Page 1: ...Quick Start Guide Xencelabs Pen Display 24 next...

Page 2: ...ter with L Shaped Connector Power Cable s Varies by region 2m USB C to USB C L shaped cable 2m USB C to USB A 3 0 L shaped cable 2m HDMI2 0 to HDMI2 0 L shaped cable 2m DisplayPort to DisplayPort L sh...

Page 3: ...USB C to USB A 3 0 L shaped cable 2m HDMI2 0 to HDMI2 0 L shaped cable 2m DisplayPort to DisplayPort L shaped cable Warranty Sheet and Thank You Card not shown Getting Started Xencelabs Pen Display 24...

Page 4: ...stable Tilt Stand Shown engaged Stand is removable It is drilled for VESA 100 x 100 mounts and uses M4 screws Video Data Power Ports USB C HDMI DisplayPort and Power Connector Because the Pen Display...

Page 5: ...type that s capable of passing both video and pen data at the same time This cable combination is shown at the top right AC Power Adapter with L shaped connector 2m USB C to USB C L shaped cable If yo...

Page 6: ...on properly Restarting also ensures your system will correctly detect your video data cables Download the Driver Install the Driver Restart your System Download the Driver Download the Driver 5 What i...

Page 7: ...roup your workflow activities into sets eg sketching coloring editing Set Button Allows you to switch between up to 5 shortcut sets Connection Indicator Blinking blue light indicates searching for con...

Page 8: ...ed Breathing Blue Wired Connection Blinking Blue Trying to Connect If you have any questions or concerns please feel free to reach out at support xencelabs com 7 The Quick Keys connects wirelessly via...

Page 9: ...arged Power Indicator Solid Amber Low Charge Breathing Green Charging Solid Green Fully Charged Power Indicator Power Indicator Solid Amber Low Charge Breathing Green Charging Solid Green Fully Charge...

Page 10: ...y Pop your pen cursor on to external displays using your Virtual Tablet Key Functionality of the Pen Display 24 Key Functionality of the Pen Display 24 9 What is in the box 1 Getting Started 2 Key Fea...

Page 11: ...pens Key Functionality of the Pen Display 24 Key Functionality of the Pen Display 24 9 What is in the box 1 Getting Started 2 Key Features of the Pen Display 24 3 Connecting the Pen Display 24 4 Downl...

Page 12: ...your pens to match your drawing style You can also customize more pen settings including pen tilt sensitivity Key Functionality of the Pen Display 24 Key Functionality of the Pen Display 24 9 What is...

Page 13: ...have these applications installed they will be auto added to the application bar along with their presets which you can edit to your preferences Add your other favorite applications to the applicatio...

Page 14: ...a cursor on your other screens Press the right control button again to switch between your displays Key Functionality of the Pen Display 24 Key Functionality of the Pen Display 24 9 What is in the bo...

Page 15: ...y of the Pen Display 24 Key Functionality of the Pen Display 24 9 What is in the box 1 Getting Started 2 Key Features of the Pen Display 24 3 Connecting the Pen Display 24 4 Download the Driver 5 Key...

Page 16: ...between the displays you want to control with your pen Key Functionality of the Pen Display 24 Key Functionality of the Pen Display 24 9 What is in the box 1 Getting Started 2 Key Features of the Pen...

Page 17: ...ed color and a fully customizable user mode setting Key Functionality of the Pen Display 24 Key Functionality of the Pen Display 24 9 What is in the box 1 Getting Started 2 Key Features of the Pen Dis...

Page 18: ...n the Settings Panel Key Functionality of the Pen Display 24 Key Functionality of the Pen Display 24 9 What is in the box 1 Getting Started 2 Key Features of the Pen Display 24 3 Connecting the Pen Di...

Page 19: ...le this feature on and off Key Functionality of the Pen Display 24 9 10 Key Functionality of the Pen Display 24 9 What is in the box 1 Getting Started 2 Key Features of the Pen Display 24 3 Connecting...

Page 20: ...ey Functionality of the Quick Keys Xencelabs Pen Display 24 What is in the box 1 Getting Started 2 Key Features of the Pen Display 24 3 Connecting the Pen Display 24 4 Download the Driver 5 Key Featur...

Page 21: ...ality of the Quick Keys Xencelabs Pen Display 24 What is in the box 1 Getting Started 2 Key Features of the Pen Display 24 3 Connecting the Pen Display 24 4 Download the Driver 5 Key Features of the Q...

Page 22: ...er the customize dropdown 10 3 Key Functionality of the Quick Keys Xencelabs Pen Display 24 What is in the box 1 Getting Started 2 Key Features of the Pen Display 24 3 Connecting the Pen Display 24 4...

Page 23: ...d Support FAQs and our Forum at support xencelabs com 11 Locate Your Serial Number Your product serial number can be found on both your box and the back of your pen display below the connection ports...

Page 24: ...Xencelabs Technologies Ltd xencelabs com V E R S I O N 1 0 front cover...

Reviews: