background image


66


Xeno XDR5 real time DVRs manual V1.0 

5.2 Setting Presets, Tours & Learns 

Before you start: 

Please make sure that the presets, tours and learns should be supported by PTZ protocols. 

5.2.1 Customizing Presets  

Purpose: 

Follow the steps to set the Preset location which you want the PTZ camera to point to when an event takes place. 

Steps: 

1. 

Enter the PTZ Control interface.   
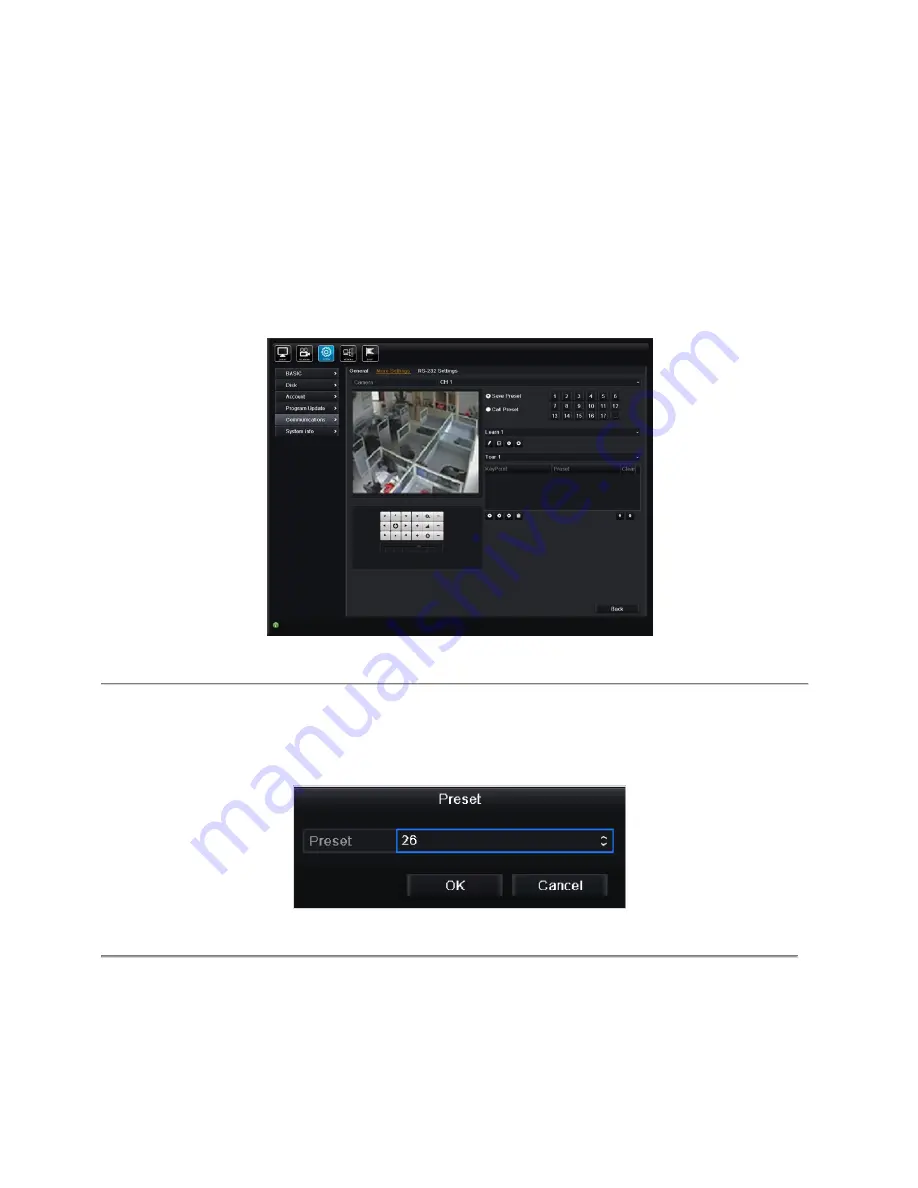
Menu >System> Communications>More Settings 


Figure 4.2 Communications - More Settings


2. 

Use the directional button to wheel the camera to the location where you want to set preset. 

3. 

Click the round icon before 

Save Preset

4. 

Click the preset number to save the preset. 

Repeat the steps2-4 to save more presets. If the number of the presets you want to save is more than 17, you can click 
[…] and choose the available numbers. 


Figure 4.3 More Presets


Summary of Contents for XDR5

Page 1: ...Xeno XDR5 real time DVRs SET UP AND USER MANUAL...

Page 2: ...Xeno XDR5 DVR manual V1 0...

Page 3: ...leshooting this product refer to this document and any other documentation provided If you still have questions please contact Norbain Technical Support and Sales Norbain Ltd 210 Wharfedale Road IQ Wi...

Page 4: ...nsorted municipal waste CE MARK This apparatus is manufactured to comply with the radio interference A Declaration of Conformity in accordance with the following EU standards has been made The manufac...

Page 5: ...d to protect if from overheating These openings must not be blocked or covered 7 POWER SOURCES The equipment should be operated only from the type of power source indicated on the marking label If you...

Page 6: ...other controls may result in damage to the unit E If the equipment has been dropped or the casing is damaged F When the equipment exhibits a distinct change in performance 14 REPLACEMENT PARTS When re...

Page 7: ...l time DVRs manual V1 0 CE COMPLIANCE STATEMENT WARNING This is a Class A product In a domestic environment this product may cause radio interference in which case the user may be required to take ade...

Page 8: ...l times Quick set menu is provided for live view Camera viewing access is controlled via users rights Motion detection tamper proof audio event video exception alert and video loss alert functions Pri...

Page 9: ...t standard mismatch illegal login network disconnected IP confliction abnormal record capture HDD error and HDD full etc Alarm triggers full screen monitoring audio alarm notifying client host sending...

Page 10: ...nt to the remote host Remotely enable disable recording Remotely start stop relay output Captured pictures can be sent to the FTP and the device firmware can be upgraded by FTP server remotely Remote...

Page 11: ...r Input and Relay Output Device 23 Note Remote Keyboard connections are for future use 23 Alarm Connections 24 PTZ RS 485 Connections 25 Keyboard connections For future use not operational 26 Connecti...

Page 12: ...Mask 58 4 3 3 Configuring OSD Settings 59 4 4 Adjusting Live View Settings 62 4 5 Covert Camera Settings 64 C H A P T E R 5 65 PTZ Controls 65 5 1 Configuring PTZ Settings 65 5 2 Setting Presets Tours...

Page 13: ...Search 113 7 1 5 Playing Back by Bookmark 117 7 1 6 Playing Back by System Log 121 7 2 Auxiliary Functions of Playback 123 7 2 1 Playing Back Frame by Frame 123 7 2 2 Smart Searching 123 7 2 3 Digital...

Page 14: ...uring FTP Server 176 10 2 5 Configuring SNMP 178 10 2 6 Configuring PPPoE Settings 179 10 2 7 Configuring Remote Alarm Host 180 10 2 8 Configuring Multicast 181 10 2 9 Configuring RTSP 182 10 2 10 Con...

Page 15: ...nformation 207 11 2 7 Configuring HDD Error Alarms 207 11 3 Managing User Accounts 209 11 3 1 Adding a User 209 11 3 2 Deleting a User 212 11 3 3 Editing a User 212 11 3 4 Changing Admin Password 213...

Page 16: ...16 Xeno XDR5 real time DVRs manual V1 0 12 1 Searching Export Log Files 222 12 2 Configuring RS 232 Serial Port 225 C H A P T E R 13 226 Appendix 226 Glossary 227 FAQ 228...

Page 17: ...17 Xeno XDR5 real time DVRs manual V1 0 C H A P T E R 1 Installation...

Page 18: ...s meet factory specifications 4 Install a manufacturer recommended HDD DVR Installation During the installation of the DVR 1 Use brackets for rack mounting 2 Ensure there is ample room for audio and v...

Page 19: ...DD should be used for this installation Tools Required Screwdriver Steps 1 Remove the cover from the DVR by unfastening the screws on the back and side 2 Install the HDD in the HDD rack using the prov...

Page 20: ...20 Xeno XDR5 real time DVRs manual V1 0 5 Re install the cover of the DVR and fasten screws...

Page 21: ...Input and Relay Output Device Note Remote Keyboard connections are for future use The sensor input and relay output interface of the DVR is shown as below The sensor input is an open closed relay If...

Page 22: ...larm Connections To connect alarm devices to the DVR 1 Disconnect pluggable block from the SENSOR IN RELAY OUT terminal block 2 Unfasten stop screws from the pluggable block insert signal cables into...

Page 23: ...asten stop screws Ensure signal cables are in tight 3 Connect Ta on controller to D on terminal block and Tb on controller to D on terminal block Fasten stop screws 4 Connect pluggable block back into...

Page 24: ...ure above There are 4 jumpers JP4 JP5 JP6 and JP7 on the motherboard each corresponding with one alarm output By default jumpers are connected To connect an AC load jumpers should be removed Note An e...

Page 25: ...luggable block from the RS 485 terminal block 5 Unfasten stop screws from the pluggable block insert signal cables into slots and fasten stop screws Ensure signal cables are in tight 6 Connect pluggab...

Page 26: ...ables are in tight 7 Connect Ta on controller to D on terminal block and Tb on controller to D on terminal block Fasten stop screws 8 Connect pluggable block back into terminal block Note Make sure bo...

Page 27: ...therboard each corresponding with one alarm output By default jumpers are connected To connect an AC load jumpers should be removed Note An external relay is needed to prevent electric shock when conn...

Page 28: ...R 7 Disconnect pluggable block from the RS 485 terminal block 8 Unfasten stop screws from the pluggable block insert signal cables into slots and fasten stop screws Ensure signal cables are in tight 9...

Page 29: ...l block 10 Unfasten stop screws from the KB D D pluggable block insert signal cables into slots and fasten stop screws Ensure signal cables are in tight 11 Connect Ta on controller to D on terminal bl...

Page 30: ...ixed bit rate Bit Rate Storage Used 96K 42M 128K 56M 160K 70M 192K 84M 224K 98M 256K 112M 320K 140M 384K 168M 448K 196M 512K 225M 640K 281M 768K 337M 896K 393M 1024K 450M 1280K 562M 1536K 675M 1792K 7...

Page 31: ...31 Xeno XDR5 real time DVRs manual V1 0 1 5 Menu Structure The menu structure of the DVR is shown as below Main Menu Search Menu...

Page 32: ...32 Xeno XDR5 real time DVRs manual V1 0 C H A P T E R 2 Introduction...

Page 33: ...and characters in Edit mode Switching between different channels in Playback mode 5 MENU ESC Pressing the MENU ESC button will go to the Main menu after successful login Back to the previous menu Pre...

Page 34: ...tton PLAY FWD FOCUS In play mode it is used to play the recent video In PTZ Control mode it is used to adjust the focus in conjunction with the PLAY FWD FOCUS button REC IRIS In live mode it is used t...

Page 35: ...en to HDD HEALTH Health indicator is normally blue indicating that the DVR is functioning properly NET NET indictor blinks blue when network connection is functioning properly COMMS Comms indicator tu...

Page 36: ...ovider The operation of the mouse Table 1 1 Description of the Mouse Control Name Action Description Left Click Single Click Live view Select channel and show the quick set menu Menu Select and enter...

Page 37: ...Description Figure 1 2 Soft Keyboard Description of the buttons on the soft keyboard Table 1 2 Description of the Soft Keyboard Icons Icons Description Icons Description English Capital English Number...

Page 38: ...ideo display playback recording and PTZ controls If HDMI VGA is not connected the interface is used as the main video output with local video display and menu operations 5 AUDIO OUT BNC connector for...

Page 39: ...ROUND Ground needs to be connected when DVR starts up 17 AC 100V 240V AC 100V 240V power supply 18 POWER Switch for turning on off the device 2 4 2 Rear panel description for XDR5D Figure 1 3 2 Rear P...

Page 40: ...input 9 HDMI HDMI video output connector 10 USB Universal Serial Bus USB ports for additional devices such as USB mouse and USB Hard Disk Drive HDD 11 NET Interface Connector for Network 12 RS 485 In...

Page 41: ...ng and PTZ controls If HDMI VGA is not connected the interface is used as the main video output with local video display and menu operations 5 AUDIO OUT BNC connector for audio output This connector i...

Page 42: ...anual V1 0 ALARM IN Connector for alarm input ALARM OUT Connector for alarm output 12 GROUND Ground needs to be connected when DVR starts up 13 AC 100V 240V AC 100V 240V power supply 14 POWER Switch f...

Page 43: ...et It is HIGHLY recommended that an Uninterruptible Power Supply UPS be used in conjunction with the device The Power indicator LED on the front panel should be red indicating supply is on 2 Press the...

Page 44: ...seconds 2 Enter the administrator s username and password in the dialog box for authentication 3 Click the Yes button Note Do not press the POWER button again when the system is shutting down Rebooti...

Page 45: ...45 Xeno XDR5 real time DVRs manual V1 0 C H A P T E R 3 Getting Started...

Page 46: ...tings of the DVR If you don t want to use the Setup Wizard at that moment click the Cancel button You can also choose to use the Setup Wizard next time by leaving the Start wizard when DVR starts chec...

Page 47: ...window as shown in Figure 2 3 Figure 2 3 Date and Time Settings 6 After the time settings click Next button which takes you back to the Network Setup Wizard window as shown in Figure 2 4 Figure 2 4 N...

Page 48: ...HDD Management 8 To initialise the HDD click the Init button Initialisation removes all the data saved in the HDD 9 Click Next button to enter the Record Settings window Figure 2 6 Record Settings 10...

Page 49: ...49 Xeno XDR5 real time DVRs manual V1 0 Figure 2 7 Copy Record Settings 11 Click OK to complete the startup Setup Wizard...

Page 50: ...50 Xeno XDR5 real time DVRs manual V1 0 C H A P T E R 4 Live View...

Page 51: ...u re on brings you to the Live View mode Live View Icons In the live view mode there are icons at the right top of the screen for each channel showing the status of the record and alarm in the channel...

Page 52: ...already logged in Alarm Cancel Panic Cancel the latest active alarm start panic recording if there isn t any alarm active Note It is recommended that either the HDMI or VGA is used as the main monito...

Page 53: ...he next screen Start Stop Sequence Enable disable the auto sequence of the screens Aux Switch the camera or enable disable the auto sequence of Auxiliary monitor Spot Switch the camera or enable disab...

Page 54: ...switch to the next set of displays Play Enter into Playback mode Log off Logout the current user who already logged in Note In the live view mode of the main output monitor the menu operation is not...

Page 55: ...xplanation for each mode Indoor the image is relatively smoother Dim Light the image is smoother than the other two modes Outdoor the image is relatively clearer and sharper The degree of contrast and...

Page 56: ...56 Xeno XDR5 real time DVRs manual V1 0 Figure 3 5 Image Settings Customize...

Page 57: ...arameters Steps 1 Enter the Image Settings interface Menu Display Camera Settings Image Settings Figure 3 6 Image Settings Interface 2 Select the camera to set image parameters 3 Select the mode from...

Page 58: ...3 3 Configuring OSD Settings Click the Apply button to save the settings 4 3 2 Configuring Privacy Mask Purpose You are allowed to configure the four sided privacy mask zones that cannot be viewed by...

Page 59: ...5 The configured privacy mask zones on the window can be cleared by clicking the corresponding Clear Zone1 4 icons on the right side of the window or click Clear All to clear all zones Figure 3 9 Set...

Page 60: ...amera Name in the text field 4 Configure the Display Name Display Date and Display Week by clicking the checkbox 5 Select the Date Format Time Format and Display Mode Figure 3 10 OSD Configuration Int...

Page 61: ...er Cameras 2 Select the camera s to be configured with the same OSD settings You can also click the checkbox of Analog to select all cameras 3 Click the OK to finish the Copy settings and back to the...

Page 62: ...esignates the output to configure the settings for Outputs include HDMI depends on the model VGA Main CVBS and Spot Output Display on Power Up Designates the display mode to be used for Live View Non...

Page 63: ...View Screen Views To set the Screen Views 1 Select Screen Views 2 Click the up and down button at each screen to select the channel you would like to display Setting an X means the channel will not b...

Page 64: ...overt camera is global setting that user who had the menu configure permission can change the settings User who do not have permission cannot see the convert camera When log out the convert camera wil...

Page 65: ...gh RS 485 interface Steps 1 Enter the PTZ Settings interface Menu System Communications Figure 4 1 Communications General 2 Choose the camera for PTZ setting in the Camera dropdown list 3 Enter the pa...

Page 66: ...en an event takes place Steps 1 Enter the PTZ Control interface Menu System Communications More Settings Figure 4 2 Communications More Settings 2 Use the directional button to wheel the camera to the...

Page 67: ...he PTZ setting interface Steps 1 Enter the PTZ Control interface Menu System Communications More Settings 2 Check the round icon before Call Preset Figure 4 4 Communications Call Preset 3 Choose the p...

Page 68: ...lling patrol in the PTZ setting interface Steps 1 In the PTZ setting interface Menu System Communications More Settings 2 Select the tour number and then click to call the tour 3 Click to stop it Call...

Page 69: ...interface Steps 1 Enter the PTZ Control interface 2 Click then the PTZ moves according to the pattern Click to stop it Figure 4 6 PTZ Calling Learn Call learn in live view mode Steps 1 In the live vie...

Page 70: ...70 Xeno XDR5 real time DVRs manual V1 0 Figure 4 7 PTZ Toolbar Learn...

Page 71: ...the PTZ toolbar Figure 4 8 PTZ Toolbar Table 4 1 Description of the PTZ toolbar icons Icon Description Icon Description Icon Description Direction button and the auto cycle button Zoom Focus Iris Zoom...

Page 72: ...72 Xeno XDR5 real time DVRs manual V1 0 C H A P T E R 6 Record and Capture Settings...

Page 73: ...tall a HDD and initialize it Menu System Disk Advanced Figure 5 1 Disk Advance 2 Check the storage mode of the HDD 1 Click General to check the storage mode of the Disk 2 If the Disk mode is Quota ple...

Page 74: ...elect Video to configure You can configure the stream type the resolution the video quality on demand 2 Click More to configure the pre record post record time expired time redundant record capture an...

Page 75: ...me to 0 and then the file will not be deleted Redundant Record Capture Enabling redundant record or capture means you save the record and captured picture in the redundant HDD See Chapter 5 8 Configur...

Page 76: ...2 Configure the parameters 3 Click Apply to save the settings 4 If the parameters can also be used to other channels click Copy to copy the settings to other channels Note The interval is the time per...

Page 77: ...Enter the Record Schedule interface Menu Recording Schedule 2 Configure Record Schedule 1 Select Video JPEG Capture Schedule Figure 5 7 Video Schedule 2 Choose the camera you want to configure 3 Selec...

Page 78: ...the above steps5 7 to schedule video capture for other days in the week If the schedule can also be set to other days click Copy Figure 5 9 Copy Schedule to Other Days 8 Click OK to save settings and...

Page 79: ...79 Xeno XDR5 real time DVRs manual V1 0 Figure 5 10 Copy Schedule to Other Channels...

Page 80: ...or capture schedule on holiday for that year You may want to have different plans for recording and capture on holiday Steps 1 Enter the Record setting interface Menu Recording Schedule Holiday Settin...

Page 81: ...he checkbox after Enable Holiday 3 Select Mode from the dropdown list There are three different modes for the date format to configure holiday schedule 4 Set the start and end date 5 Click Apply to sa...

Page 82: ...channels to start recording or trigger full screen monitoring audio warning notify the surveillance center and so on Steps 1 Enter the Motion Detection interface Menu Event Motion Settings Figure 5 13...

Page 83: ...information will pop up Figure 5 15 Motion Detection Handling 5 Select the channels which you want the motion detection event to trigger recording 6 Click Apply to save the settings 7 Click OK to back...

Page 84: ...heckbox after the Enable Schedule item 2 Click Edit Figure 5 17 Edit Schedule Motion Detection 3 In the message box you can choose the day to which you want to set schedule 4 Set the Type as Motion 5...

Page 85: ...n t be overlapped each other Repeat the above steps3 5 to schedule motion detection triggered recording capture for all the week If the schedule can also be set to other days click Copy Figure 5 19 Co...

Page 86: ...86 Xeno XDR5 real time DVRs manual V1 0 Figure 5 20 Copy Schedule to Other Channels...

Page 87: ...ing Sensor Triggered Record and Capture Purpose Follow the procedure to configure sensor triggered recording or capture Steps 1 Enter the Sensor setting interface Menu Event Sensor Settings Sensor Sta...

Page 88: ...5 23 Sensor Handling 5 Choose the sensor triggered recording channel 6 Check the radio box to select the primary channel for recording and PTZ linkage the checkbox to select secondary channels for PTZ...

Page 89: ...5 In the message box you can choose the day to which you want to set schedule 6 To schedule an all day recording check the checkbox after the All Day item 7 To arrange other schedule leave the All Day...

Page 90: ...igger full screen monitoring audio warning notify the surveillance centre and so on Steps 1 Enter the Audio Event interface Menu Event Audio Figure 5 26 Audio Events 2 Configure Audio Events 1 Choose...

Page 91: ...ant the audio event to trigger recording 6 Click Apply to save the settings 7 Click OK to back to the upper level menu 8 Exit the Audio Event menu 3 Enter Schedule settings interface Menu Recording Sc...

Page 92: ...eck the checkbox after the All Day item Figure 5 30 Edit Schedule All Day 13 To arrange other schedule leave the All Day checkbox blank and set the Start End time Note Up to 8 periods can be configure...

Page 93: ...Other Days 14 Click OK to back to upper level menu You can repeat steps to set schedule for other channels if the settings can also be used to other channels click Copy and then choose the channel to...

Page 94: ...and Chapter 5 5 In this chapter the configuration for Motion Alarm motion or alarm and Motion Alarm triggered recording and capture will be described only Steps 1 Enter the Record setting interface M...

Page 95: ...configured for each day And the time periods can t be overlapped each other Repeat the above steps to schedule for all the week If the schedule can also be applied to other days click Copy 7 Click Ap...

Page 96: ...ving the record files and captured pictures not only in the R W HDD but also in the redundant HDD will effectively enhance the data safety and reliability Steps 1 Enter HDD Information interface Menu...

Page 97: ...HDD general settings to Group before you set the HDD property to Redundant For detailed information please refer to Chapter 10 2 4 Managing HDD Group There should be at least another HDD which is in...

Page 98: ...Rs manual V1 0 Figure 5 38 Video Encoding Parameters More 4 Set the Redundant Recording of JPEG Capture to Yes 5 Click OK to save settings and back to the upper level menu Repeat the above steps for c...

Page 99: ...r editing interface 4 Configuring HDD group 1 Choose a group number for the HDD group 2 Click Apply and then in the pop up message box click Yes to save your settings 3 Click OK to back to the upper l...

Page 100: ...to protect the record files from being overwritten Protect file by locking the record files Steps 1 Enter search interface Search Time and Date Figure 5 40 Search Time and Date 2 Select the channels y...

Page 101: ...ck the icon which will turn to indicating that the file is locked Note The record files which the recording is not completed can t be locked 2 Click to change it to to unlock the file and the file is...

Page 102: ...to Read only 4 Click OK to save settings and back to the upper level menu Note You can t save any files in a Read only HDD If you want to save files in the HDD change the property to R W Note If ther...

Page 103: ...103 Xeno XDR5 real time DVRs manual V1 0 C H A P T E R 7 Playback...

Page 104: ...nel in live view mode using the mouse and click the button in the quick setting toolbar Note Only record files recorded during the last few minutes on this channel will be played back the time period...

Page 105: ...buttons will switch playback to the corresponding channels during playback process 2 Playback management The toolbar in the bottom part of Playback interface can be used to control playing progress a...

Page 106: ...located Figure 6 5 Toolbar of All day Playback Table 6 1 Detailed Explanation of All day playback Toolbar Button Operation Button Operation Button Operation Button Operation Audio on Mute Start Stop c...

Page 107: ...ar Quick Archive Playback all Note 1 Playback progress bar use the mouse to click any point of the progress bar or drag the progress bar to locate special frames 2 About video type bar represents norm...

Page 108: ...ltaneous playback and channel switch are supported Steps 1 Enter playback interface Search Search Time and Date 2 Set search conditions and click the Playback button to enter Playback interface Figure...

Page 109: ...d default bookmark Add customized bookmark Bookmark managemen t Speed down Pause reverse play Reverse play Single frame reverse play Pause play Play Single frame play Stop Speed up Video search Exit H...

Page 110: ...mal Motion Alarm Motion Alarm Motion Alarm Manual and All Steps 1 Enter Record File Search interface Search Search Time and Date Set search condition and press Search button to enter the Search Result...

Page 111: ...imultaneous playback are the same channels for chosen to search record files in step 1 For 4 ch 8 ch and 16 ch devices support 4 ch 8 ch and 16 ch simultaneous playback respectively Figure 6 12 Select...

Page 112: ...moving the mouse to the right of the playback interface Figure 6 14 4 ch Synchronous Playback Interface with Video List Figure 6 15 Toolbar of Normal Playback Table 6 3 Detailed Explanation of Normal...

Page 113: ...to click any point of the progress bar or drag the progress bar to locate special frames 2 About video type bar represents normal recording manual or schedule represents event recording motion alarm...

Page 114: ...ch button to enter the Search Result interface Figure 6 17 Video Search by Motion 4 Click button to enter the Playback interface If there is only one channel is triggered by an sensor input pressing b...

Page 115: ...by Sensor Input 5 Click Details button to view detailed information of the record file e g start time end time file size etc Figure 6 19 Event Details Interface 6 Playback interface The toolbar in th...

Page 116: ...ts will be displayed by moving the mouse to the right of the playback interface Figure 6 21 Playback Interface with Sensor Input List Figure 6 22 Toolbar of Playback by Event Table 6 4 Detailed Explan...

Page 117: ...ss bar use the mouse to click any point of the progress bar or drag the progress bar to locate special frames 2 About video type bar represents normal recording manual or schedule represents event rec...

Page 118: ...ingle video file 2 Bookmark management Press button to check edit and delete bookmark s Figure 6 24 Bookmark Management Interface Steps 1 Enter Playback interface Search Search Bookmark Choose channel...

Page 119: ...e of the recorded file you want to play back it can be edited or deleted Pre play and post play time can be set according to actual needs Note Pre play time and post play time is added to the time poi...

Page 120: ...mouse to the right of the playback interface Figure 6 28 Interface of Playback by Bookmark with Video List Figure 6 29 Toolbar of Playback by Tag Table 6 5 Detailed Explanation of Playback by bookmar...

Page 121: ...progress bar use the mouse to click any point of the progress bar or drag the progress bar to locate special frames 2 About video type bar represents normal recording manual or schedule represents eve...

Page 122: ...rface Note If there is no record file at the time point of the log the message box no related record file will pop up Figure 6 31 Result of System Log Search 3 Playback interface The toolbar in the bo...

Page 123: ...ar Using the Front Panel Press the button to set the speed to Single frame One click on button represents playback or adverse playback of one frame 7 2 2 Smart Searching Purpose In order to locate mot...

Page 124: ...awing area s press button to execute smart search in this area Note Multi area and full screen searching modes are supported Figure 6 35 Draw Area of Smart Search Results of intelligent analysis Video...

Page 125: ...e Start Stop clipping Jump forward Jump reverse Add default tag Add customized tag Tag managemen t Slow down Pause reverse play Reverse play Single frame reverse play Pause play Play Single frame play...

Page 126: ...under playback and choose Digital Zoom to enter Digital Zoom interface 2 Move the red rectangle and the image within it will be enlarged for up to 16 times Figure 6 38 Draw Area for Digital Zoom Figur...

Page 127: ...me DVRs manual V1 0 Enter Digital Zoom interface Smart search for motion against a specified area Applicable for analog channels only Show hide control interface Open Close the audio of record Return...

Page 128: ...nterface Search Search JPEG Images 2 Choose JPEG Images tab Set channel picture type and time and press Search button to enter Search Result interface Note Picture types include Normal Motion Alarm Mo...

Page 129: ...h 4 Picture Playback interface The toolbar in the bottom part of Playback interface can be used to control playing process Figure 6 42 Picture Playback Interface The hidden list of captured pictures w...

Page 130: ...nterface with Picture List Figure 6 44 Picture Playback Toolbar Table 6 8 Detailed Explanation of Picture playback Toolbar Butto n Function Butto n Function Button Function Butto n Function Play rever...

Page 131: ...131 Xeno XDR5 real time DVRs manual V1 0 C H A P T E R 8 Archive...

Page 132: ...the message box Max 24 hours are allowed for quick export will pop up 2 The recommended number of channels for synchronous export less than or equal than 4 Otherwise the message box Note If you archiv...

Page 133: ...Export Finished 8 1 2 Archiving by Normal Video Search Purpose The record files can be backup to various devices such as USB devices USB flash drives USB HDDs USB writer Archive using USB flash drives...

Page 134: ...Check the checkbox before the record files you want to archive Note The size of the currently selected files is displayed in the lower left corner of the window Figure 7 5 Result of Normal Video Searc...

Page 135: ...h using USB Flash Drive Stay in the Exporting interface until all record files are exported with pop up message box Export finished Figure 7 7 Export Finished Archive using USB writer and SATA writer...

Page 136: ...e checkbox before the record files you want to archive Note The size of the currently selected files is displayed in the lower left corner of the window Figure 7 9 Result of Normal Video Search for Ba...

Page 137: ...gure 7 11 Export Finished 8 1 3 Archiving by Event Search Purpose Archive event related record files using USB devices USB flash drives USB HDDs USB writer Quick Export and Normal Archive are supporte...

Page 138: ...ed information of all channels triggered by the selected sensor input Note Event types contain Sensor Input and Motion 3 Pressing Quick Export button will export record files of all channels triggered...

Page 139: ...he inserted USB device is not recognized Click the Refresh button Reconnect device Check for compatibility from vendor You can also format USB flash drive or USB HDDs via the device Figure 7 19 Export...

Page 140: ...ack interface Please refer to Chapter 6 2 During playback use buttons and in the playback toolbar to start or stop clipping record file s 3 Quit Playback interface after finishing clipping and you wil...

Page 141: ...B device is not recognized Click the Refresh button Reconnect device Check for compatibility from vendor You can also format USB flash drive or USB HDDs via the device Figure 7 23 Export Video Clips U...

Page 142: ...es Select channel s image type start time and end time and click Search button to enter the Search Result interface Figure 7 25 Picture Search for Backup 2 Select pictures you want to back up Check th...

Page 143: ...0 Figure 7 26 Result of Picture Search 3 Export Press Export button and start backup Figure 7 27 Export Pictures Using USB Flash Drive Stay in the Exporting interface until all record files are export...

Page 144: ...144 Xeno XDR5 real time DVRs manual V1 0 Figure 7 28 Export Finished...

Page 145: ...record files Search Archive Time and Date Set search condition and press Search button to enter Search Result interface Note At least one channel shall be selected Figure 7 29 Normal Video Search for...

Page 146: ...Select a record file or folder in the backup device and press button if you want to delete it Press Format button to format the backup device Note If the inserted USB device is not recognized Click t...

Page 147: ...arch for Backup 2 Select record files you want to back up Press Export button to enter Export interface Note At least one record file shall be selected Figure 7 34 Result of Normal Video Search for Ba...

Page 148: ...XDR5 real time DVRs manual V1 0 Note If the inserted USB writer or SATA writer is not recognized Click the Refresh button Reconnect device Check for compatibility from vendor Figure 7 35 USB Writer Ma...

Page 149: ...149 Xeno XDR5 real time DVRs manual V1 0 C H A P T E R 9 Event Settings...

Page 150: ...n detection Menu Event Motion Settings Figure 8 1 Motion Detection Setup Interface 2 Set up detection area and sensitivity Tick Enable Motion Detection use the mouse to draw detection area s and drag...

Page 151: ...up to eight time periods can be set within each day Note Time periods shall not be repeated or overlapped Figure 8 4 Set Arming Schedule of Motion Detection 5 Click Handling tab to set up alarm respo...

Page 152: ...152 Xeno XDR5 real time DVRs manual V1 0 settings to it Note You are not allowed to copy the Trigger Channel action Figure 8 5 Copy Settings of Motion Detection...

Page 153: ...Steps 1 Enter Sensor Settings and select a sensor input Menu Event Sensor Settings Select Sensor Input tab to enter Sensor Input Settings interface Figure 8 6 Sensor Input Interface 2 Set up the handl...

Page 154: ...and Max eight time periods can be set within each day Note Time periods shall not be repeated or overlapped 5 Select Handling tab to set up alarm response actions of the alarm input please refer to Ch...

Page 155: ...DVRs manual V1 0 Figure 8 9 Set PTZ Linking of Sensor Input 7 If you want to set handling method of another sensor input repeat the above steps or just copy the above settings to it Figure 8 10 Copy S...

Page 156: ...ction s Steps 1 Enter Video Loss and select a channel you want to detect Menu Event Video Loss Figure 8 11 Video Loss Setup Interface 2 Set up handling method of video loss Check the checkbox of Enabl...

Page 157: ...chedule of Video Loss 4 Select Handling tab to set up alarm response action of video loss please refer to Chapter 8 7 Repeat the above steps to set up arming schedule of other days of a week You can a...

Page 158: ...annel you want to detect video tampering Menu Event Camera Tamper Figure 8 15 Tamper proof Setup Interface 2 Set up the camera tampering handling method of the channel Check the checkbox of Enable Tam...

Page 159: ...not be repeated or overlapped Figure 8 17 Set Arming Schedule of Video Tampering 4 Select Handling tab to set up alarm response actions of video tampering alarm please refer to Chapter 8 7 Repeat the...

Page 160: ...160 Xeno XDR5 real time DVRs manual V1 0 Figure 8 18 Copy Settings of Video Tampering...

Page 161: ...detect audio Menu Event Audio Figure 8 19 Audio Event Setup Interface 2 Set up the audio event handling method of the channel Check the checkbox of Enable Audio Event Drag the sensitivity bar Volume...

Page 162: ...ot be repeated or overlapped Figure 8 21 Set Arming Schedule of Audio Event 5 Select Handling tab to set up alarm response actions of audio event please refer to Chapter 8 7 Repeat the above steps to...

Page 163: ...163 Xeno XDR5 real time DVRs manual V1 0 Figure 8 22 Copy Settings of Audio Event...

Page 164: ...ct user ID or password Abnormal Video Signal Unstable video signal Input Output Video Standard Mismatch I O video standards do not match Abnormal Recording of Video JPEG Capture No space for saving re...

Page 165: ...ll Time Auto switch will terminate once the alarm stops and you will be taken back to the Live View interface Note You must select during Trigger Channel settings the channel s you want to make full s...

Page 166: ...ime Press Schedule button to set the arming schedule of relay output Note If Manually Clear is selected in the dropdown list of Dwell Time you can clear it only by going to Menu Event Sensor Settings...

Page 167: ...above steps to set up arming schedule of other days of a week You can also use Copy button to copy an arming schedule to other days Click the OK button to complete the settings of the relay output No...

Page 168: ...leared only by pressing Clear button in the following interface Steps Select the relay output you want to trigger or clear and make related operations Menu Event Sensor Settings Manual Relay Output Pr...

Page 169: ...169 Xeno XDR5 real time DVRs manual V1 0 C H A P T E R 10 Network Settings...

Page 170: ...k Settings Interface 2 Select the IP Settings tab 3 In the IP Settings interface you can configure the following settings NIC Type IPv4 Address IPv4 Gateway MTU and DNS Server If the DHCP server is av...

Page 171: ...ion with your ISP is required before configuring the system to use DDNS Steps 1 Enter the Network Settings interface Menu Network Network Settings 2 Select the DDNS tab to enter the DDNS Settings inte...

Page 172: ...ess for DynDNS i e members dyndns org 2 In the DVR Domain Name text field enter the domain obtained from the DynDNS website 3 Enter the User Name and Password registered in the DynDNS website Figure 9...

Page 173: ...e corresponding fields Refer to the DynDNS settings 1 Enter Server Address for NO IP 2 In the DVR Domain Name text field enter the domain obtained from the NO IP website www no ip com 3 Enter the User...

Page 174: ...m 1 to 10080min and the default value is 60min If the DVR is connected to a public network you should use a NTP server that has a time synchronization function such as the server at the National Time...

Page 175: ...ngs Interface 3 Click the Apply button to save the settings 4 Select the Email tab to enter the Email Settings interface Figure 9 9 Email Settings Interface 5 Configure the following Email settings En...

Page 176: ...The interval is the time of two adjacent alarm images You can also set SMTP port and enable SSL here Interval The interval refers to the time between two actions of sending attached pictures E mail T...

Page 177: ...ield you can select the Root Directory Parent directory and secondary directory When the Parent Directory is selected you have the option to use the Device Name Device No or Device IP for the name of...

Page 178: ...nd parameters related information Steps 1 Enter the Network Settings interface Menu Network Network Settings 2 Select the SNMP tab to enter the SNMP Settings interface Figure 9 13 SNMP Settings Interf...

Page 179: ...the surveillance center 10 2 6 Configuring PPPoE Settings Purpose Your DVR also allows access by Point to Point Protocol over Ethernet PPPoE Steps 1 Enter the Network Settings interface Menu Network N...

Page 180: ...o Network interface to view the status of PPPoE connection Please refer to Chapter 10 2 6 Viewing System Information for PPPoE status 10 2 7 Configuring Remote Alarm Host Purpose With a remote alarm h...

Page 181: ...e Software e g X_CMS is installed and the Alarm Host Port must be the same as the alarm monitoring port configured in the software default port is 0 Figure 9 18 Configure Alarm Host 4 Click the Apply...

Page 182: ...multicast address must be the same as the DVR s multicast IP Figure 9 19 Configure Multicast 4 Click the Apply button to save and exit the interface 10 2 9 Configuring RTSP Purpose The RTSP Real Time...

Page 183: ...the Apply button to save and exit the menu 10 2 10 Configuring Server and HTTP Ports Purpose You can change the server and HTTP ports in the Network Settings menu The default server port is 8000 and...

Page 184: ...elds The default Server Port is 8000 and the HTTP Port is 80 and you can change them according to different requirements 5 Click the Apply button to save and exit the interface Note The Server Port sh...

Page 185: ...information of DVR such as linking status MTU sending receiving rate etc Steps 1 Enter the Network Traffic interface Menu Network Network Data Select LAN Usage tab page Figure 9 22 Network Traffic In...

Page 186: ...nter the Network Detection menu Figure 9 22 Network Detection Interface 3 Enter the destination address in the text field of Destination Address 4 Click the Test button to start testing network delay...

Page 187: ...to detect the backup device please check whether it is compatible with the device You can format the backup device if the format is incorrect Figure 9 25 Export Network Packet 4 Click the Export butto...

Page 188: ...tatus If the network is normal the following message box pops out Figure 9 28 Network Status Checking Result If the message box pops out with other information instead of this one you can click Networ...

Page 189: ...real time information of the device Steps 1 Enter the Network Statistics interface Menu Network Network Settings Network Stat Figure 9 30 Network Stat Interface 2 View the bandwidth of IP Camera bandw...

Page 190: ...olution stream Steps 1 Enter the Network Settings interface Menu Network Single Stream Encode Figure 9 31 Single Stream Encoding 2 Check the checkbox after Enable Single Stream Encode 3 Configure the...

Page 191: ...191 Xeno XDR5 real time DVRs manual V1 0 C H A P T E R 11 System Configuration...

Page 192: ...English CVBS Output Standard Select the CVBS output standard to NTSC or PAL which must be the same with the video input standard HDMI VGA Resolution Select the HDMI VGA output resolution which must be...

Page 193: ...ity E g when the timeout time is set to 5 Minutes then the system will exit from the current operation menu to live view screen after 5 minutes of menu inactivity Menu Monitor Select the menu monitor...

Page 194: ...e configured with the same parameters Steps 1 Enter the Import Export Configuration File interface Menu System Basic Import Export Figure 10 3 Import Export Config File 2 Click the Export button to ex...

Page 195: ...to Default Settings 2 Click the OK button to restore the default settings Note Except the network parameters including IP address subnet mask gateway MTU NIC working mode default route and server port...

Page 196: ...tting down Rebooting Device Steps 1 Enter the Shutdown interface Menu System Basic Shutdown Figure 10 5 Shutdown Menu 2 Click the Logout button to lock the device or Click the Shutdown button to shut...

Page 197: ...st be initialized before it can be used with your DVR Steps 1 Enter the HDD Information interface Menu System Disk Select Advanced tab to view the mounted HDDs Figure 10 6 Disk Advanced Information 2...

Page 198: ...e HDD will change from Uninitialized to Normal Figure 10 9 HDD Status Changes to Normal Note Initializing the HDD will erase all data on it 11 2 2 Managing Network HDDs Purpose You can add the allocat...

Page 199: ...Figure 10 11 Figure 10 11 HDD Information Interface 3 Add the allocated NetHDD 4 Select the type to NAS or IP SAN 5 Configure the NAS or IP SAN settings Add NAS disk 1 Enter the NetHDD IP address in t...

Page 200: ...SAN disk from the list shown below 4 Click the OK button to add the selected IP SAN disk Note Up to 1 IP SAN disk can be added Figure 10 13 Add IP SAN Disk 6 After having successfully added the NAS or...

Page 201: ...rface Menu System Basic General 2 Set the Mode to Group as shown in Figure 10 17 Figure 10 16 Storage Mode Interface 3 Click the Apply button and the following Attention box will pop up Figure 10 17 A...

Page 202: ...Before setting the HDD property please set the storage mode to Group refer to step1 4 of Chapter 10 2 4 Managing HDD Groups Setting HDD Groups A HDD can be set to read only to prevent important record...

Page 203: ...st Note At least 2 hard disks must be installed on your DVR when you want to set a HDD to Redundancy and there is one HDD with R W property 11 2 4 Configuring Quota Mode Purpose Each camera can be con...

Page 204: ...uota 4 Enter the storage capacity in the text fields of Max Record Capacity GB and Max Picture Capacity GB as shown in Figure 10 22 Figure 10 22 Configure Record Picture Quota 5 You can copy the quota...

Page 205: ...rage Mode interface 8 Click the Apply button to apply the settings Note If the quota capacity is set to 0 then all cameras will use the total capacity of HDD for record and picture capture 11 2 5 Chec...

Page 206: ...Abnormal please initialize the HDD before use And if the HDD initialization is failed please replace it with a new one Checking HDD Status in HDD Information Interface Steps 1 Enter the System Informa...

Page 207: ...formation list as shown in Figure 10 26 Figure 10 26 S M A R T Settings Interface 11 2 7 Configuring HDD Error Alarms Purpose You can configure the HDD error alarms when the HDD status is Uninitialize...

Page 208: ...me DVRs manual V1 0 Figure 10 27 Configure HDD Error Alarm 4 When the Trigger Relay Output is selected you can also select the relay output to be triggered from the list below 5 Click the Apply button...

Page 209: ...r user name is admin and the password is 00000000 The Administrator has the permission to add and delete user and configure user parameters 11 3 1 Adding a User Steps 1 Enter the User Management inter...

Page 210: ...mote Configuration and only has the local remote playback in the Camera Configuration User s MAC Address The MAC address of the remote PC which logs onto the DVR If it is configured and enabled it onl...

Page 211: ...t are saved on the DVR Remote Parameters Settings Remotely configuring parameters restoring factory default parameters and importing exporting configuration files Remote Serial Port Control Configurin...

Page 212: ...ent of the selected camera s Local Video Export Locally exporting recorded files of the selected camera s 7 Click the OK button to save the settings and exit interface Note Only the admin user account...

Page 213: ...own in Figure 10 34 Figure 10 34 Edit User Interface 4 Edit the user information including user name password level and MAC address 5 Click the OK button to save the settings and exit the menu 6 11 3...

Page 214: ...t interface Menu System Account 2 Click the Change Password tab to enter the Change Password menu as shown in Figure 10 35 Figure 10 35 Change Password 3 Enter the old password new password and confir...

Page 215: ...pgrade menu as shown in Figure 10 36 Figure 10 36 Local Upgrade Interface 4 Select the update file from the backup device 5 Click the Upgrade button to start upgrading 6 After the upgrading is complet...

Page 216: ...DVRs manual V1 0 Figure 10 37 FTP Upgrade Interface 3 Enter the FTP Server Address in the text field 4 Click the Upgrade button to start upgrading 5 After the upgrading is complete reboot the DVR to a...

Page 217: ...ce name model serial No firmware version and encode version as shown in Figure 10 40 The information on the figure is for reference only the information for actual product may be different Figure 10 4...

Page 218: ...ation Steps 1 Enter the System Information interface Menu System System Info 2 Click the Record Info tab to enter the Record Information menu to view the recording status encoding parameters of each c...

Page 219: ...to view the alarm information as shown in Figure 10 43 Figure 10 43 Alarm Information Interface 11 5 5 Viewing Network Information Steps 1 Enter the System Information interface Menu System System Inf...

Page 220: ...HDD Information Steps 1 Enter the System Information interface Menu System System Info 2 Click the HDD Info tab to enter the HDD Information menu to view the HDD status free space property etc as show...

Page 221: ...221 Xeno XDR5 real time DVRs manual V1 0 C H A P T E R 12 Others...

Page 222: ...ted at any time Steps 1 Enter the Log Search interface Search Log Log Search Figure 11 1 Log Search Interface 2 Set the log search conditions to refine your search including the Start Time End Time Ma...

Page 223: ...f each log or double click it to view its detailed information as shown in Figure 11 3 And you can also click the button to view the related video files if available Figure 11 3 Log Details 6 If you w...

Page 224: ...log files to the selected backup device You can click the New Folder button to create new folder in the backup device or click the Format button to format the backup device before log export Note Ple...

Page 225: ...e the same as the DVR s when connecting with the PC serial port Transparent Channel Connect a serial device directly to the DVR The serial device will be controlled remotely by the PC through the netw...

Page 226: ...226 Xeno XDR5 real time DVRs manual V1 0 C H A P T E R 13 Appendix...

Page 227: ...et and in plain Metro Ethernet networks DDNS Dynamic DNS is a method protocol or network service that provides the capability for a networked device such as a router or computer system using the Inter...

Page 228: ...ent lamps in use nearby Why does the PTZ seem unresponsive If the PTZ seem unresponsive please check a The RS 485 cable is properly connected b The dome decoder type is correct c The dome decoder spee...

Page 229: ...229 Xeno XDR5 real time DVRs manual V1 0...

Page 230: ...230 Xeno XDR5 real time DVRs manual V1 0...

Page 231: ...231 Xeno XDR5 real time DVRs manual V1 0 Norbain SD Ltd 210 Wharfedale Road IQ Winnersh Wokingham RG41 5TP 44 0 118 912 5000...

Reviews: