background image

14

XENYX 1622FX/1832FX/2222FX/2442FX

which  meets  the  required  safety  standards.  Blown  fuses  must

only  be  replaced  by  fuses  of  the  same  type  and  rating.  The

mains connection is made via a cable with IEC mains connector.

An appropriate mains cable is supplied with the equipment.

POWER switch

Use  the 

POWER

  switch  to  turn  on  the  mixing  console.  The

POWER switch should always be in the “Off” position when you

are about to connect your unit to the mains.

To disconnect the unit from the mains, pull out the main cord

plug. When installing the product, ensure that the plug is easily

accessible. If mounting in a rack, ensure that the mains can be

easily disconnected by a plug pull or by an all-pole disconnect

switch on or near the rack.

+

Attention:  The  POWER  switch  does  not  fully

disconnect  the  unit  from  the  mains.  Unplug  the

power  cord  completely  when  the  unit  is  not  used

for  prolonged  periods  of  time.

PHANTOM  switch

The 

PHANTOM

  switch  activates  the  phantom  power

(necessary  to  operate  condenser  microphones)  on  the  XLR

sockets of the mono channels. The red 

+48 V

 LED illuminates

when  phantom  power  is  on.  As  a  rule,  dynamic  microphones

can  still  be  used  with  phantom  power,  provided  that  they  are

wired in a balanced configuration. In case of doubt, contact the

microphone  manufacturer!

+

Connect  microphones  before  you  switch  on  the

phantom  power  supply.  Please  do  not  connect

microphones  to  the  mixer  (or  the  stagebox/

wallbox)  while  the  phantom  power  supply  is

switched  on.  In  addition,  the  monitor/PA  loud-

speakers  should  be  muted  before  you  activate  the

phantom  power  supply.  After  switching  on,  wait

approx.  one  minute  to  allow  for  system

stabilization.

+

Caution!  Please  also  note  the  information  given  in

chapter  6.2.1  “Audio  connections”.

SERIAL NUMBER

Please  note  the  important  information  on  the  serial  number

given in chapter 1.3.3.

6. INSTALLATION

6.1 Rack mounting

The packaging of your mixing console contains two 19" rack

mounts for installation on the side panels of the console.

Before you can attach the rack mounts to the mixing console,

you need to remove the screws holding the left and right side

panels. Then, use these screws to fasten the two rack mounts,

each specifically to one side. With the rack mounts installed, you

can mount the mixing console in a commercially available 19"

rack. Be sure to allow for proper air flow around the unit, and do

not place the mixing console close to radiators or power amps,

so as to avoid overheating.

+

Only  use  the  screws  holding  the  mixing  console

side  panels  to  fasten  the  19"  rack  mounts.

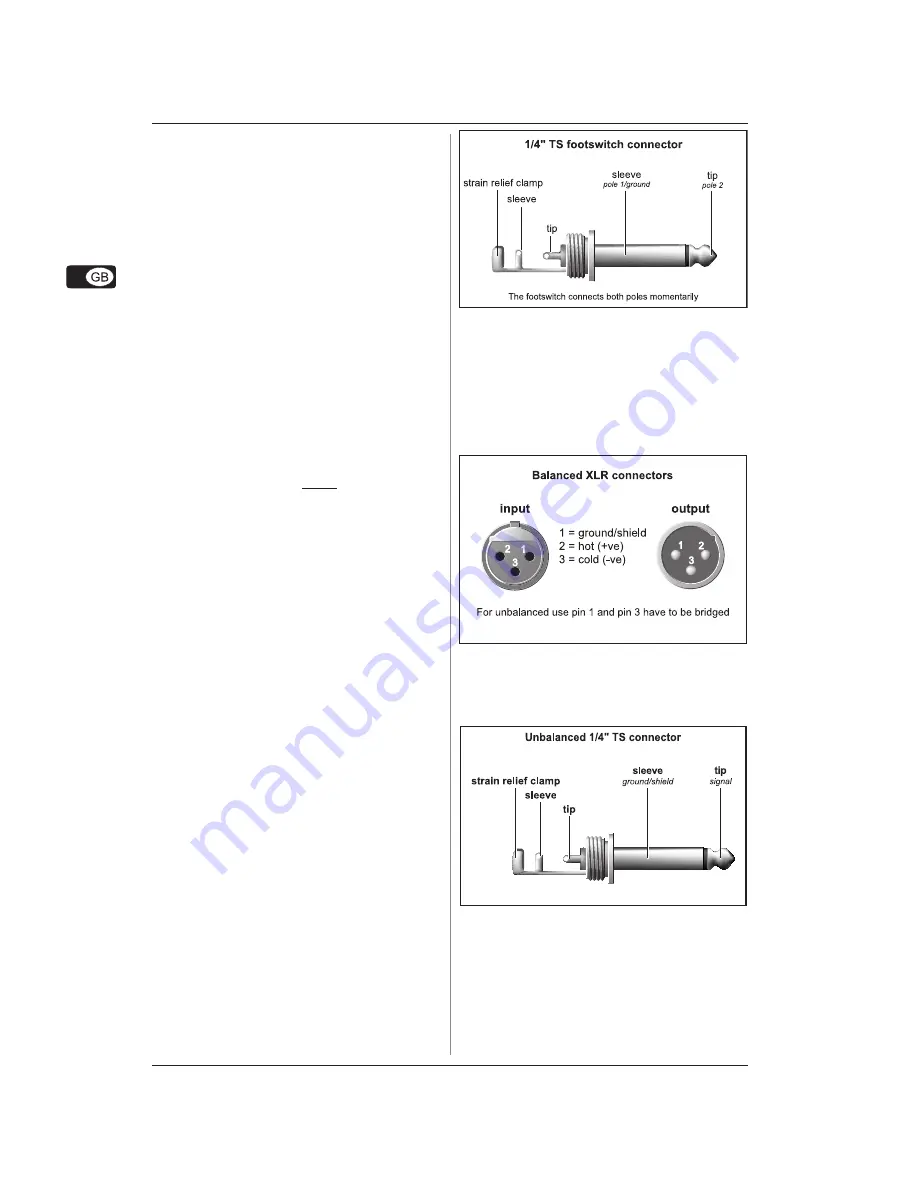
6.2 Cable connections

You  will  need  a  large  number  of  cables  for  the  various

connections  of  the  console.  The  illustrations  below  show  the

wiring of these cables. Be sure to use only high-grade cables.

Fig.  6.1:  Foot  switch  connector

6.2.1 Audio connections

Please use commercial RCA cables to wire the 2-track inputs

and outputs.

You can, of course, also connect unbalanced devices to the

balanced  input/outputs.  Use  either  mono  plugs,  or  use  stereo

plugs to link the ring and shaft (or pins 1 & 3 in the case of XLR

connectors).

Fig.  6.2:  XLR  connections

+

Caution!  You  must  never  use  unbalanced  XLR

connectors (PIN 1 and 3 connected) at the MIC input

jacks if you want to use the phantom power supply.

Fig. 6.3: 1/4" mono plug

6. INSTALLATION

Summary of Contents for 1622FX

Page 1: ...Version 1 0 January 2006 User s Manual XENYX 1622FX 1832FX 2222FX 2442FX...

Page 2: ...ty purpose of the polarized or grounding type plug A polarized plug has two blades with one wider than the other A grounding type plug has two blades and a third grounding prong The wide blade or the...

Page 3: ...s to the quality and ease of use of your new XENYX mixing console you ll soon come to appreciate that I both personally and in my capacity as musician and sound engineer put you the end user first and...

Page 4: ...d using the aux sends monitor mix Similarly for example signals for recording equipment power ampli fiers headphones and 2 track outputs can also be taken 1 INTRODUCTION Congratulations In purchasing...

Page 5: ...that all units must be properly grounded For your own safety you should never remove any ground connectors from electrical devices or power cables or render them in operative Please ensure that only q...

Page 6: ...the console TRIM Use the TRIM control to adjust the input gain This control should always be turned fully counter clockwise whenever you connect or disconnect a signal source to one of the inputs The...

Page 7: ...mix 2 2 Stereo channels 2 2 1 Channel inputs Fig 2 5 The various stereo channel inputs Each stereo channel has two balanced line level inputs on jacks for left and right channels Channels 9 10 and 11...

Page 8: ...TURN 1 2 TO AUX SEND STEREO AUX RETURN FX The STEREO AUX RETURN FX jacks accept the effects mix 2 2 4 Routing switch solo and channel fader Fig 2 6 Balance control and mute switch BAL The BAL ANCE con...

Page 9: ...ould be set at 100 effect Fig 2 12 Stereo aux return and stereo aux return to aux send controls STEREO AUX RETURN 1 2 TO AUX SEND The two right hand STEREO AUX RETURN controls have a special function...

Page 10: ...bled disabled with the XPQ TO MAIN switch This is a built in effect that widens the stereo width thus making the sound more lively and trans parent Use the SURROUND control to determine the intensity...

Page 11: ...signals e g kick drum Due to their inertia VU meters tend to display too low a signal level at frequencies above 1 kHz You should only drive instruments such as a Hi Hat as far as 10 dB Snare drums s...

Page 12: ...ject sound in the direction of microphones Therefore you can also use the FBQ Feedback Detection for monitors by placing the equalizer in the monitor bus see MAIN MIX MONITOR 4 DIGITAL EFFECTS PROCESS...

Page 13: ...ecord several tracks simultaneously With an 8 track recorder use Y cables and wire the inputs of your machine so that you have 2 x 4 tracks available e g channel 1 to track 1 and 2 etc In the first pa...

Page 14: ...re you activate the phantom power supply After switching on wait approx one minute to allow for system stabilization Caution Please also note the information given in chapter 6 2 1 Audio connections S...

Page 15: ...15 XENYX 1622FX 1832FX 2222FX 2442FX Fig 6 4 1 4 stereo plug Fig 6 5 Insert send return stereo plug Fig 6 6 Stereo plug for headphones connection 6 INSTALLATION...

Page 16: ...1622FX only 1 4 TS connector unbalanced Impedance approx 240 W symm 120 W unbalanced Max output level 28 dBu 22 dBu 1622FX Control room outputs Type 1 4 TS connector unbalanced Impedance approx 120 W...

Page 17: ...ER see enclosed list during normal business hours BEFORE returning the product All inquiries must be accompanied by a description of the problem BEHRINGER will then issue a return authorization number...

Reviews: