background image

Technical information

DocuTech 61xx Operator Guide

7-13

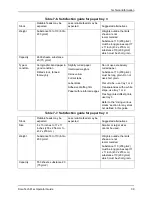
Do not use the following stocks:

Multipart forms

Stocks outside of the recommended size and weight ranges

Preprinted stock

Preprinted forms must be made up of ink that has 
the following characteristics:

Can withstand temperatures up to 400°F 
(204°C)

Can withstand pressure of 140 psi at the 
above temperature

Can withstand the above conditions for 25 
milliseconds

High speed 
transparencies with white 
stripe

Load the stock with the stripe to the right in trays 
1 and 2.

Label stock

Load the stock face up into trays 1 and 2; face 
down into trays 3, 4, and 5.

Do not select 2-sided prints.

Letterhead (preprinted)

Load the paper into trays 3, 4, and 5; side 1 with 
the printed side down, top edge to the front of the 
tray.

Load the paper into trays 1 and 2; side 1 up with 
the top edge to the front of the tray.

Do not use freshly preprinted paper in trays 1 and 
2.

Textured paper

Heavily textured paper may produce prints with a 
ragged character appearance or deletions. To 
test, run a proof print.

Window stock

Run if the window is 2.2 to 4 inches (57 to 102 
mm) from the top edge of the paper and at least 1 
inch (25.4 mm) from each side of the paper.

Run only as the first page or a front cover to 
avoid finisher bin jams.

Load the window stock face-up into a tray (tray 1 
or 2 is recommended) with the top edge toward 
the front of the tray.

If running plastic-covered window stock, there 
may be some distortion. To test, run a proof copy.

Xerox Carbonless

Xerox Carbonless Paper is recommended.

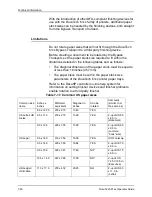
Table 7-10. Satisfaction guide for various stocks

Stock type

Instructions for use

Summary of Contents for 6100BD - Phaser Color Laser Printer

Page 1: ...Xerox Document Services Platform Series DocuTech 61xx Operator Guide 701P38838 DocuSP version 3 6 August 2002 ...

Page 2: ...d so on Printed in the U S A U K and France XEROX XEROX Europe and XEROX Canada Limited The Document Company the stylized X and all names and identifying numbers used in connection with Xerox products mentioned in this publication are trademarks of XEROX CORPORATION All non Xerox brands and product names are trademarks or registered trademarks of their respective companies Other company trademarks...

Page 3: ...ment Directive 1 5 Electricity at Work Regulation UK 1 7 The Regulation 1 7 Check your understanding 1 7 Your responsibility 1 9 Additional queries 1 10 2 Certifications 2 1 FCC USA 2 1 Radio frequency 2 1 Extra Low Voltage safety approval 2 1 Industry Canada requirements 2 2 European Union 2 3 3 Introduction 3 1 About this guide 3 1 Powering down the System 3 1 Contents 3 2 Conventions 3 2 4 Syst...

Page 4: ...er duplex tray 4 7 The decurler lever 4 7 The ground fault protector 4 7 The interposer 4 8 Upper entrance transport 4 9 Upper vertical transport 4 9 Upper turn transport 4 9 Tray 4 4 9 Upper exit transport 4 9 Tray 5 4 9 Lower entrance transport 4 10 Lower turn transport 4 10 Lower exit transport 4 10 Lower vertical transport 4 10 Loop transports 4 10 The finisher 4 10 The bindexer 4 11 The stitc...

Page 5: ...nk cartridge 5 13 Replacing the dry ink waste container 5 17 Adding fuser agent 5 20 Replacing the stitcher spool A 5 24 Storing the binder tape reels 5 31 Replacing the binder tape reel 5 33 Adjusting the binder tape registration 5 38 Adjusting the heavy paper levers 5 41 Adjusting for paper curl 5 42 Measuring the paper curl 5 42 Adjusting the decurler lever 5 46 6 Problem solving 6 1 How proble...

Page 6: ... sensors 6 22 Clearing the Q1213 sensor 6 23 Clearing the Q1221 Q1218 and Q1227 sensors 6 24 Clearing the camming motor 6 25 Calling for assistance 6 27 Recording the problem 6 27 7 Technical information 7 1 DocuTech 61xx hardware requirements 7 1 Power consumption 7 1 Heat output 7 2 DocuTech 61xx printer specifications 7 2 Printer rates 7 2 Paper tray capacities 7 3 Additional paper capacities 7...

Page 7: ...H 61XX OPERATOR GUIDE v Limitations 7 20 8 Supplies 8 1 Supplies to keep in stock 8 1 Supplies ordered from the Supply Order Representative 8 1 Supplies ordered from the Parts Marketing Representative 8 1 Ordering supplies 8 2 ...

Page 8: ...TABLE OF CONTENTS vi DOCUTECH 61XX OPERATOR GUIDE ...

Page 9: ...TABLE OF CONTENTS DOCUTECH 61XX OPERATOR GUIDE vii ...

Page 10: ...TABLE OF CONTENTS viii DOCUTECH 61XX OPERATOR GUIDE ...

Page 11: ...cation and Welfare as Class 1 laser products This is a class of laser products that does not emit hazardous radiation This is possible only because the laser beam is totally enclosed during all modes of customer operation When performing operator functions laser warning labels may be visible These labels are to alert and remind the service representative and are placed on or near panels or shields...

Page 12: ...d safe operation of your equipment The system is heavy Ensure that the floor is level and strong enough to support the weight of the system Do not place the system near a heat source To move the system call a Service Representative Do not use an extension cord Always connect the system power cable to a properly grounded power source receptacle If in doubt have the receptacle checked by a qualified...

Page 13: ... system The system is exposed to water Any part of the system is damaged Always use materials and supplies specifically designed for your Xerox equipment Use of unsuitable materials may result in poor performance and can possibly create a hazardous situation Never attempt any maintenance function that is not specifically described in this Operator Guide Never remove any covers or guards that are f...

Page 14: ...t January 1 1996 Council Directive 89 336 EC approximation of the laws of the member Stated related to electromagnetic compatibility March 9 1999 Council Directive 1995 5 EC on radio equipment and telecommunications terminal equipment and the mutual recognition of their conformity A full declaration defining the relevant directives and referenced standards can be obtained from your Xerox Ltd repre...

Page 15: ... impact this certi9fication Please contact your local Xerox Europe representative for a list of approved accessories Shielded cables must be used with this equipment to maintain compliance with the EMC Directive 89 336 EEC This equipment is not primarily intended for use in a domestic environment WARNING In order to allow this equipment to operate in proximity to industrial scientific and medical ...

Page 16: ...hed telephone networks in the European Economic Area The product may be configured to be compatible with other country networks Please contact your Xerox representative if it needs to be reconnected to another country s network There are no user adjustable settings in the product NOTE Although this product can use either loop disconnect pulse or DTMF tone signalling it is recommended that it is se...

Page 17: ...ond insulation resistance and electrical strength tests Xerox Europe manufacturing plants have been awarded ISO 9000 quality certification and are subject to regular audits by the British Standards Institution or equivalent national standards body Xerox equipment which has been properly and regularly serviced and maintained should not have to undergo additional specific safety tests pursuant to th...

Page 18: ...sured that all Xerox equipment which Xerox Europe and its authorized distributors supply to customers conforms with all the relevant safety legislation and standards Question Is Xerox equipment safe Answer All Xerox equipment supplied by Xerox Europe and their authorized distributors conforms to all relevant safety legislation and standards Question Is the Xerox equipment in my premises safe Answe...

Page 19: ...E MISLEADING RESULTS AND MAY CAUSE DEATH PERSONAL INJURY AND OR DAMAGE TO PROPERTY Question I would like to carry out my own safety tests on the Xerox temperament in my premises Answer You may of course request such tests as you deem necessary to satisfy yourself that your Xerox equipment is safe Your Xerox Europe Customer Support will be pleased to advise you on such testing Question I require re...

Page 20: ...1 10 DocuTech 61xx Operator Guide Additional queries Please contact the Xerox Europe Technical Centre or your authorized Xerox representative if you have any queries regarding the information provided in this document ...

Page 21: ...t his own expense Changes or modifications to this equipment not expressly approved by Xerox Corporation may void the authority granted by the FCC to operate this equipment If requested provide these numbers to the telephone company Extra Low Voltage safety approval The Xerox DocuTech Models 6100 6115 6135 6155 and 6180 are in compliance with various governmental agencies and national safety regul...

Page 22: ... in some situations Repairs to certified equipment should be made by an authorized Canadian maintenance facility designated by the supplier Any repairs or alterations made by the user to this equipment or equipment malfunctions may give the telecommunications company cause to request the user to disconnect the equipment Users should ensure for their own protection that the electrical ground connec...

Page 23: ...ications to this equipment not specifically approved by Xerox Europe may void the user s authority to operate this equipment Shielded cables must be used with this equipment to maintain compliance with the EMC Directive 89 336 EEC WARNING In order to allow this equipment to operate in proximity to Industrial Scientific and Medical ISM equipment the external radiation from ISM equipment may have to...

Page 24: ...Certifications 2 4 DocuTech 61xx Operator Guide ...

Page 25: ...s some programming or systems administration tasks as well as operating the DocuTech 61xx system use the on line help system and the other documents in the Xerox Document Services Platform Series to supplement the information in the DocuTech 61xx Operator Guide Users should have an understanding of the operations of the DocuSP controller and be familiar with Solaris and basic UNIX commands Before ...

Page 26: ...r supplies for the DocuTech 61xx system Conventions This guide uses the following conventions All caps and angle brackets Within procedures the names of keys are shown in all caps within angle brackets for example press RETURN Angle brackets Variable information or the position of a specified argument in the command syntax appears in angle brackets for example List Fonts Pattern Bold Within proced...

Page 27: ... bars for example pdl ps hppcl ascii tiff NOTE Notes contain important supplemental information pertaining to the task that you should read CAUTION CAUTION Cautions alert you to an action that could damage hardware software or your data WARNING WARNING Warnings alert you to conditions that may affect the safety of people ...

Page 28: ...Introduction 3 4 DocuTech 61xx Operator Guide ...

Page 29: ...roller and a 6100 6115 6135 6155 or 6180 printer They accept electronic print input created by client software in ASCII TIFF HP PCL PostScript or PDF format This print input is passed on to the system through a network connection The DocuSP software performs the necessary data conversion creating an electronic file which is stored temporarily in a print queue on the DocuSP controller This electron...

Page 30: ... prints per minute Prints per minute vary depending on paper size for all printers Refer to the Technical information chapter of this guide for more detailed information The System System Hardware The basic hardware components of the DocuTech 61xx systems are the DocuSP controller and the printer The DocuSP controller is a Sun platform The printer consists of a processor and a finisher with an opt...

Page 31: ...de 4 3 Figure 4 1 DocuTech 6100 6115 6135 system hardware 1 Sun platform with DocuSP software 2 DocuTech 6100 6115 6135 printer 3 Processor 4 Finisher For the DocuTech 6155 and 6180 the printer consists of a processor an interposer and a finisher ...

Page 32: ...een you and the system You communicate through the DocuSP software by selecting and managing the jobs displayed on the screen and sending them to the printer for production The system also communicates messages and instructions to you on the Print Services interface screen The four components of the DocuSP controller are the processor the monitor the keyboard and the mouse NOTE For more informatio...

Page 33: ...terposer and the finisher These modules work together to produce collated or uncollated unfinished stitched or bound prints as required The processor The processor is the part of the system that produces the prints of your documents Figure 4 3 Processor components 1 Paper trays 2 Electrical module 3 Dry ink cartridge 4 Photoreceptor located behind a panel 5 Laser located behind a panel 6 Fuser age...

Page 34: ...o remove all power from the printer all three circuit breakers must be in the down position For the printer to operate properly all three circuit breakers must be in the up position The dry ink cartridge Dry ink is the material that forms the black image on prints Dry ink is contained in the dry ink cartridge When directed by a message on the controller you must replace the dry ink cartridge For d...

Page 35: ...the side one image is put on the paper first The paper with the side one image is then moved to the duplex inverter where the paper is turned over The paper then moves through the paper path again to have the side two image applied The decurler lever Too much curl in paper can cause paper handling problems Adjusting the decurler lever should correct most of the curl problems For the decurler lever...

Page 36: ... state and the power is on When the device has tripped a red indicator light is on and the white handled circuit breakers are in the off position The interposer The interposer is designed to improve productivity through the use of two additional paper trays Figure 4 4 Interposer components The following lists the components of the interposer 1 Upper entrance transport 2 Upper vertical transport 3 ...

Page 37: ...upper turn transport inserts the sheet from tray 4 into the upper transport Tray 4 Tray 4 holds up to 550 sheets of substance 20 75 g m2 paper The paper from this tray can be fed only into the upper transport paper path to the finisher bypassing the fuser Upper exit transport The upper exit transport delivers the prints from the processor or the sheets from trays 4 or 5 to the finisher Tray 5 Tray...

Page 38: ...tray 3 in the finisher to the processor Lower vertical transport The lower vertical transport takes the sheet from tray 5 If the job is programmed to bypass the processor it will divert the sheets to the loop transports If the job is programmed to feed the paper from tray 5 to the processor it will deliver the sheets to the lower turn transport Loop transports The loop transports deliver sheets fr...

Page 39: ...e finisher components 1 Bindexer 2 Stitcher 3 Stacker 4 Binder 5 Binder tape reel 6 Stitcher wire spools 7 Top tray The bindexer The bindexer is a three bin sorter that collates the pages of each print set As the pages of the print set are fed to the bindexer the bindexer moves up and down to collate them ...

Page 40: ...cts the drawer and closes the door The stacker also can be unloaded during the printing cycle to check the quality of the print sets by changing the printer options NOTE For more information refer to the on line help system The binder When a job requires bound output a length of pre glued paper tape is placed on a heated surface called the binder platen The system aligns the pages of each print se...

Page 41: ... back to the photoreceptor Areas A to H This is the interposer area Paper travels through this area if paper is fed from trays 1 4 or 5 and also to pass paper from area 10 through F and H to the finisher Areas 11 and 12 If the prints are to be fed to the top tray the system delivers the prints through the top tray slot Areas 13 to 16 The prints enter the bindexer and are collated if desired Areas ...

Page 42: ...System components 4 14 DocuTech 61xx Operator Guide ...

Page 43: ...ontinue printing while you are loading the other tray Adding paper to tray 1 or 2 The following steps must be performed to add paper to tray 1 or 2 1 Press the Tray unlock button on the front of the tray Wait for the red Please wait light to go off 2 When the green Ready to open light comes on pull the tray out until it stops Steps 3 through 5 of loading paper into tray 1 or 2 are illustrated in f...

Page 44: ...d the paper above the red line A jam could occur if too much paper is loaded in the tray 6 Load the required paper into the paper tray Load paper with the curl side facing down Load Xerox paper with the package wrapper seam side facing up NOTE When loading drilled paper be sure to fan the edge where the holes are located 7 Position the stack against the front right corner of the tray as shown in f...

Page 45: ...gest volume of paper required for your jobs These trays can also be used to supply oversized paper for special jobs Paper in tray 4 is only used for post process insertion These trays lower one ream at a time as paper is added More than one ream can be loaded by pressing the Tray unlock button again after the tray is fully opened The following steps must be performed to add paper to tray 3 4 or 5 ...

Page 46: ... tray For information on loading different types of stock refer to the Technical information chapter in this guide Remove any damaged sheets from the top of the stack 4 Load the required paper into the paper tray Load paper with the curl side facing down Load Xerox paper with the package wrapper seam side facing up NOTE When loading drilled paper be sure to fan the edge where the holes are located...

Page 47: ...n the DocuSP Print Services window on the DocuSP controller You should respond to the fault or message as soon as possible to avoid a printer shut down Refer to the System Guide for information on clearing faults The system provides dry ink to the printer from a cartridge located in the printer When the screen displays a low dry ink message a full dry ink cartridge should be installed Waste dry in...

Page 48: ... 218 C To avoid injury use special care when you remove or replace the binder tape For information on cleaning the processor sensors the reflecting surfaces and the finisher sensors refer to the appropriate sections in this booklet Precautions you should take For your own safety and to protect the system it is important to take the following precautions whenever you perform cleaning and replacemen...

Page 49: ...imately 425 F 218 C and may cause a serious burn to the operator If the binder has been in a Ready condition allow the binder to cool for at least one hour before attempting to clean the binder Cleaning the binder Keep the binder clean to prevent binder tape jams Clean the binder once a week or as needed and also when changing the binder tape It is highly recommended that the binder be cleaned bef...

Page 50: ...oid damage to the system do not use any liquids or any abrasive material to clean the binder Use the plastic binder platen cleaner on the tape reel or use a clean lint free cloth 2 Grasp the green handle on the binder drawer Pull the drawer out until it stops Figure 5 5 Opening the binder drawer 3 Perform the following steps a Locate and remove the plastic binder platen cleaner from the binder tap...

Page 51: ...cleaner back and forth until the end tab breaks d Continue to move the cleaner in the same manner until the 2 sided tabs break NOTE Ensure that the following cleaning procedures are performed in the order listed Cleaning the binder tape guides The following steps must be performed to clean the binder tape guides 1 Use the binder platen cleaner to clean the surfaces and grooves of the tape guides 2...

Page 52: ... The following steps must be performed to clean the binder platen 1 Use the binder platen cleaner to clean the top and side surfaces of the binder platen until all the glue is removed 2 Ensure that the glue is removed from the grooves on the binder platen surface which align with the top and bottom edges of the book ...

Page 53: ...nance DocuTech 61xx Operator Guide 5 11 Figure 5 8 Cleaning the binder platen Cleaning the flappers Using the binder platen cleaner clean the top and side surfaces of the binder flappers until all the glue is removed ...

Page 54: ...outine maintenance 5 12 DocuTech 61xx Operator Guide Figure 5 9 Cleaning the flappers Cleaning the calipers Using the binder platen cleaner clean the binder caliper surfaces until all the glue is removed ...

Page 55: ... platen cleaner in a safe place Maintaining the printer A screen message is displayed when it is necessary to replace system supplies To ensure that the system runs efficiently replace the supplies as soon as possible Replacing the dry ink cartridge When directed by a screen message replace the dry ink cartridge If the cartridge is not replaced the printer will eventually stop and it will not oper...

Page 56: ... get on your clothes brushing with a dry paper towel or a stiff bristled brush may remove the ink If not launder your clothes with detergent and cold water Tell a commercial dry cleaner that the spot is dry ink or toner so that they will not use a solvent that will set the dry ink stain 1 Open the processor doors and locate the dry ink cartridge at the left side of the processor 2 Place a drop clo...

Page 57: ... empty cartridge 4 Install a new dry ink cartridge as shown in figures 5 12 and 5 13 a Turn a new cartridge of dry ink upside down and shake the cartridge thoroughly to loosen the contents b Insert the full cartridge until it stops c Move the green handle to the latched position ...

Page 58: ...the cartridge d Slide the full cartridge all the way into the system e Hold the cartridge in place with one hand and remove the paper seal by pulling it toward you with the other hand Discard the seal along with the drop cloth Figure 5 13 Removing the paper seal 5 Close the processor doors ...

Page 59: ... heat or solvent will set the dry ink and make it difficult to remove If any dry ink should get on your skin wash with mild soap and cold water If any dry ink should get on your clothes brushing with a dry paper towel or a stiff bristled brush may remove the ink If not launder your clothes with detergent and cold water Tell a commercial dry cleaner that the spot is dry ink or toner so that they wi...

Page 60: ... 5 14 Removing the full waste container b Remove the cap from the top of the full dry ink waste container c Place the removed cap over the opening on the end of the full dry ink waste container as shown in figure 5 15 d Do not remove the cap on the new container ...

Page 61: ...5 19 Figure 5 15 Placing the cap on the waste container e Slide a new empty dry ink waste container all the way into the system until the container stops as shown in figure 5 16 Figure 5 16 Inserting the new empty container 4 Close the processor doors ...

Page 62: ...added WARNING The fuser area can reach temperatures of approximately 425 F 218 C Exercise care to prevent burns when working in this area CAUTION Fuser lubricant for other printers may not be compatible Order and use fuser agent only for the printer 1 Open the processor doors 2 Place a drop cloth on the floor under the fuser area 3 Open the fuser drawer a Locate the fuser drawer b Grasp the green ...

Page 63: ...agent contains silicone which can cause irritation upon contact with the eye Make sure that you wash your hands with soap and water after you finish this procedure 4 Fill the fuser agent reservoir a Pull the fuser agent reservoir out until it stops b Remove the reservoir cap by turning it counterclockwise ...

Page 64: ... agent spills cause the floor to be slippery If any fuser agent is spilled onto the floor it must be removed immediately c Open a new box of fuser agent and remove the bottle Remove the cap from the bottle of fuser agent d Carefully pour the fuser agent into the reservoir until the level reaches the MAX line ...

Page 65: ... the reservoir cap by turning it clockwise CAUTION Do not push the fuser agent bottle into the reservoir with excessive force There is an anti splash seal in the reservoir that could be damaged f Push the fuser agent reservoir in until it stops 5 Push the fuser drawer in until it latches into place ...

Page 66: ... on top and stitcher spool B is the spool on the bottom If spool B needs new wire call the customer support center Refer to the section Calling for assistance in this guide There is a label behind the stitcher panel that gives instructions for replacing the stitcher spool A Refer to this label if needed The following steps must be performed to replace the stitcher spool A 1 Open the finisher doors...

Page 67: ...tcher head 4 Remove the stitcher wire plug a The stitcher wire plug is located above the binder area as shown in figure 5 22 b Press and hold down the release clip c Pull the plug out of the stitcher head Figure 5 22 Removing the stitcher wire plug 5 Perform one of the following steps ...

Page 68: ...y out of the tubing as shown in figure 5 23 NOTE The wire cutter tool needed to perform this procedure is located next to stitcher spool B Figure 5 23 Removing the wire from the tubing If there is wire on the spool hold it on the spool and carefully rewind the remaining wire out of the tubing and onto the stitcher spool as shown in figure 5 24 ...

Page 69: ...igure 5 24 Rewinding the remaining wire 6 Insert the plug into the measuring bracket as shown in figure 5 25 Figure 5 25 The measuring bracket 7 Release and remove stitcher spool A a Locate the green pin release handle under spool B as shown in figure 5 26 ...

Page 70: ...and hold the handle forward and remove the pin c Release the handle and remove stitcher spool A 8 Install the new stitcher spool a Slide the new stitcher spool into position with the paper wrapper still in place b Replace the stitcher spool pin Push it down until it locks into place as shown in figure 5 27 ...

Page 71: ...Hold the wire on the spool to prevent eye injury and to keep the wire from unwinding a Locate the end of the wire on the new spool b Using the wire cutters carefully clip any bent or twisted wire from the lead end of the wire c Hold onto the end of the wire and carefully remove the paper wrapper as shown in figure 5 28 ...

Page 72: ...the paper wrapper NOTE Hold the wire between the thumb and forefinger of both hands 10 Feed the wire slowly into the tubing until the wire extends from the stitcher plug as shown in figure 5 29 Figure 5 29 Feeding the wire 11 Remove the stitcher plug from the measuring bracket ...

Page 73: ...ket 18 Insert the plug into the stitcher head until the plug snaps into place 19 Place the wire cutters in the storage bracket NOTE Ensure that the wire cutters are not touching the stitcher spools This can prevent the stitcher wire from feeding properly 20 Lower the stitcher panel NOTE Ensure that the stitcher panel has been lowered The stacker will not deliver prints if the stitcher panel is lef...

Page 74: ...F 32 C 2 Keep stored rolls in their original unopened containers 3 Use rolls with older dates first Save the original foil containers for reuse in storing partially used rolls 4 Place partially used rolls of binder tape in their original resealable foil containers Ensure that the edge is sealed tightly Figure 5 31 Storing the binder tape 5 Store the partially used rolls of binder tape in a dry pla...

Page 75: ...f necessary refer to the label on the binder for instructions on how to replace the binder tape The following steps must be performed to replace the binder tape wheel WARNING All areas of the binder drawer including the binder tape are hot approximately 425 F 218 C and may cause serious burns If the binder has been in a Ready condition allow the binder drawer to cool at least one hour before conti...

Page 76: ...ng the tape b Rewind the tape onto the tape reel 4 Slide the tape reel off the tape reel drive a Move the reel retainer in the center of the reel to the horizontal unlocked position Figure 5 34 Unlocking the reel b Remove the tape reel NOTE Ensure that the larger center hole in the reel faces the drive 5 Slide the new tape reel onto the tape reel drive ...

Page 77: ... position NOTE The tape will not feed properly if the retainer is not locked b Move the reel retainer to the locked position Figure 5 35 Locking the reel NOTE Ensure that the tape passes through the binder tape sensor 6 Follow the instructions on the binder tape loading label and thread the tape through the tape feeder ...

Page 78: ...ing the tape through the tape feeder 7 Thread the tape around the drive roll to the edge of the pressure roll Figure 5 37 Threading the tape to the pressure roll 8 Turn the green knob clockwise until the tape extends at least 2 inches 51mm beyond the tape guides Tape Sensor ...

Page 79: ...61xx Operator Guide 5 37 Figure 5 38 Feeding the tape manually 9 Cut the tape a Lift up on the green tape cutter handle as shown in figure 5 39 b Remove the cut piece of tape Figure 5 39 Cutting the tape 10 Close the binder drawer ...

Page 80: ...dure before adjusting the tape length To adjust the length refer to the on line help Perform the following steps to adjust the binder tape registration 1 Ensure that the tape guides are clean and free of glue residue Refer to the procedure Cleaning the binder in this section 2 Determine the adjustment amount for the top edge of the book 3 Open the finisher doors 4 Measure the distance between the ...

Page 81: ...inder tape Each increment equals a change of 0 1mm up or down on the edge of the book One full rotation of the knob is equal to 0 04 inch 1mm 6 Pull the knob toward you to rotate it for the adjustment 7 Adjust the tape position by performing one of the following steps Pull the knob and rotate it clockwise to move the tape toward the top edge of the book as shown in figure 5 41 ...

Page 82: ...he tape position up Pull the knob and rotate it counterclockwise to move the tape toward the bottom edge of the book Figure 5 42 Adjusting the tape position down 8 Close the finisher doors 9 Run a test binder job to check your adjustment 10 Perform the procedure again as needed ...

Page 83: ...m the following steps to adjust the heavy paper levers 1 Open the right door of the processor 2 Open the left door of the processor 3 Locate the black heavy paper levers behind area 4 and area 2 4 Raise the heavy paper levers a Pull the silver latch release toward you b Raise the left and right black levers to the vertical position as shown in figure 5 43 Figure 5 43 Raising the levers 5 Run the p...

Page 84: ...e curl Storing or using the paper under humid conditions may increase the curl When too much curl causes paper handling problems adjust the decurler in the processor The decurler flattens the paper after fusing Measuring the paper curl 1 Program and print five 1 sided 8 5 x 11 inch 216 x 279 mm sheets to the top tray NOTE Keep the image toward you as shown in figure 5 45 2 Measure the amount of cu...

Page 85: ...curl measurement chart in this guide If the print curl on the printed paper measures between 1 and 2 do not change the decurler setting If the curl is between 2 and 3 or 3 and 4 refer to the procedure Adjusting the decurler lever in this secton NOTE Superior performance for greater than substance 32 120 g m2 can be achieved between 1 and 1 curl ...

Page 86: ...Routine maintenance 5 44 DocuTech 61xx Operator Guide ...

Page 87: ...erator Guide 5 45 RECOMMENDED CAUTION NOTE Corners of the sheets of paper should not exceed the curl shown in this chart See the example above Note Image Move Green Decurler lever left Move Green Decurler lever right 4 3 2 1 FLAT 1 2 3 4 ...

Page 88: ...figure 5 46 Figure 5 46 Locating the decurler lever 3 If the print curl is 2 or more move the green decurler lever to the right 4 If the print curl is 3 or more move the green decurler lever to the left 5 If the decurler adjustment does not eliminate the paper curl problem or for other curl problems turn the stack of paper over in the paper tray 6 If there is still a curl problem perform steps 1 t...

Page 89: ...cluded are detailed procedures that are required to resolve some of the problems If you are not able to correct a problem or you have a question about system operation you should call the Customer Support Center If the Customer Support Representative cannot solve your problem over the phone a Service Representative will be dispatched How problems are displayed Hardware problems show themselves by ...

Page 90: ... the printer an indicator will appear on the DocuSP Print Services window and a Printer Faults message will appear NOTE The printers also have an attention light on top of the finisher module A flashing light indicates a fault requiring immediate attention a steady light indicates a fault that can be cleared at a later time Refer to the on line help or System Guide for additional information on pr...

Page 91: ... of paper tears when being removed ensure that you have removed all of the sheet pieces Ensure that the paper path baffles are in the correct seated position Ensure that the stock is loaded properly in the trays with the rear and side guides against the stack Ensure that the stock is not loaded above the bottom of the red line in the paper tray Ensure that the stock has no bent corners or tears an...

Page 92: ...tched by pressing down on the green dot inside the tray Fan the stock at all four corners Change it if it has uneven edges or if it was not drilled properly The stock should be kept in the original wrapper and stored correctly Refer to the Technical information chapter Ensure that the stock is within the limits described in the Technical information chapter Missing sheets in a set immediately afte...

Page 93: ...ble in the Lead Edge Screening feature Use the Off setting when it is necessary to print all of the document Use the Standard setting when the documents have narrow black lines or no dark areas on the lead edge This is the system default setting and is the recommended setting Use the Stress setting when the system is experiencing fuser jams and the Standard option is selected Use the Erase All Edg...

Page 94: ...ector did not trip in this section 4 Press the reset button on the processor ground fault protector If the red light switches off proceed with step 5 If the red light does not switch off or immediately switches on again refer to the procedure Calling for assistance in this guide 5 Switch the white handled circuit breakers near the protector to the on up position If the power comes on proceed with ...

Page 95: ... Include inserts and covers when considering the output capacity of the bindexer 125 sheets of substance 20 75 g m2 is equal to approximately 104 sheets of substance 24 90 g m2 78 sheets of substance 32 120 g m2 47 sheets of substance 110 200 g m2 Check that the sets in the bindexer are less than 0 5 inch 13 mm thick If the set exceeds 0 5 inch 13 mm thickness reprogram the job for fewer sheets or...

Page 96: ...ape storage information in this guide Refer to the binder cleaning information in this guide Refer to information on calling the Customer Support Center in this guide Stitcher fault codes displayed in the fault frame Fault Code P12 218 Fault Code P12 219 Select the Finishing button on the Printer Manager window Deselect Stitcher on the Finishing window and refer to the procedure Calling for assist...

Page 97: ...17 label and remove all paper 6 Ensure that area 17 is clear of all binder tape adhesive If the area is not clear clean the binder using the procedure Cleaning the binder in this guide Sheets are spilling out of the top tray The capacity of the top tray is 500 sheets of substance 20 75 g m2 or 2 inches 51 mm in height When intermixed stock or paper heavier than substance 20 75 g m2 is being run th...

Page 98: ... 11 Ensure that area 18 is clear of all binder tape adhesive If it is not clean the binder using the procedure Cleaning the binder in the Routine maintenance chapter 12 Close the finisher doors 13 Close the top cover Clearing a stitcher spool A fault Repeated jams in area 17 may be caused by the following problems Stitcher wire not feeding properly A kink in the stitcher wire 1 Open the finisher d...

Page 99: ...release handle 5 Remove the stitcher wire plug a The stitcher wire plug is located above the binder area as shown in figure 6 2 b Press and hold down the release clip c Pull the plug out of the stitcher head Figure 6 2 Removing the stitcher wire plug 6 Remove any damaged wire ...

Page 100: ...g b The wire cutter tool needed to perform this procedure is located next to stitcher spool B as shown in the lower left corner of figure 6 1 c Cut the wire carefully leaving approximately 2 inches 50 mm of wire extending from the stitcher plug as shown in figure 6 3 Figure 6 3 Cutting the wire 7 Insert the plug into the measuring bracket as shown in figure 6 4 ...

Page 101: ...e touches the back of the measuring bracket 9 Remove any stitcher wire fragments a Fold a piece of copy paper in half lengthwise Place the folded sheet of copy paper under the stitcher head as shown in figure 6 5 b Pull out the stitcher knob and allow it to snap back into place to free any stitcher wire fragments ...

Page 102: ...t 12 Insert the plug into the stitcher head until the plug snaps into place NOTE Ensure that the wire cutters are not touching the stitcher spools This can prevent the stitcher wire from feeding properly 13 Place the wire cutters in the storage bracket NOTE Ensure that the stitcher panel has been lowered The stacker will not deliver printed sets if the stitcher panel is left in the up position 14 ...

Page 103: ...ng surfaces Cleaning the Q861 sensor Cleaning the Q861 sensor should be performed only when a Customer Support Center Representative asks you to do so Perform the following when it is necessary to clean the Q861 sensor 1 Open the processor doors 2 Locate and raise the area 4 green handle until it locks into place as shown in figure 6 6 Figure 6 6 Area 4 green handle 3 Locate the Q861 sensor as sho...

Page 104: ...se the processor doors Cleaning the Q1009 sensor and mirror Cleaning the Q1009 sensor and mirror should be performed only when directed by a Customer Support Center Representative Perform the following when it is necessary to clean the Q1009 sensor 1 Open the processor doors 2 Locate the Q1009 sensor as shown in figure 6 8 ...

Page 105: ...inisher sensors Clearing the finisher sensors should be performed only when directed by a Customer Support Center Representative NOTE The finisher sensors are located under the processor top cover under the finisher top cover and behind the finisher and bindexer doors Use the following procedure to clear any obstructions from the finisher sensors Perform the following when it is necessary to clean...

Page 106: ...tions in the following sensor areas Clearing the Q1201 sensor Clearing the Q1201 sensor should be performed only when directed by a Customer Support Center Representative 1 Open the processor top cover NOTE The Q1201 sensor is located under the processor top cover on the right side 2 Locate the Q1201 sensor as shown in figure 6 10 ...

Page 107: ...r under the sensor to clear any obstructions 4 Close the processor cover Clearing the Q1202 and Q1203 sensors Clearing the Q1202 and Q1203 sensors should be performed only when directed by a Customer Support Center Representative 1 Open the finisher top cover 2 Locate the Q1202 and Q1203 sensors as shown in figure 6 11 ...

Page 108: ...rator Guide Figure 6 11 Locating the Q1202 and Q1203 sensors 3 Brush a folded sheet of paper under each sensor to clear any obstructions as shown in figure 6 12 Figure 6 12 Clearing the Q1202 and Q1203 sensors 4 Close the finisher top cover ...

Page 109: ...d by a Customer Support Center Representative Perform the following when it is necessary to clean the Q1222 and the Q1210 sensors 1 Open the finisher top cover 2 Look down at the rear section of the tilt bed area as shown in figure 6 13 to view the sensors Figure 6 13 Locating the Q1222 and Q1210 sensors 3 Locate the Q1222 and Q1210 sensors as shown in figure 6 14 ...

Page 110: ...oth to clean them 5 Close the finisher top cover Clearing the Q1205 Q1206 and Q1207 sensors Clearing the Q1205 Q1206 and Q1207 sensors should be performed only when directed by a Customer Support Center Representative 1 Open the finisher front doors 2 Open the bindexer door 3 Locate the Q1205 Q1206 and Q1207 sensors as shown in figure 6 15 ...

Page 111: ...rected by a Customer Support Center Representative NOTE Perform the following when it is necessary to clear the Q1213 sensor 1 Open the finisher doors WARNING The top of the binder is approximately 425 F 218 C Do not touch the heated areas or you may get burned If the binder has been in a Ready condition allow it to cool for at least 1 hour before continuing the procedure 2 Grasp the green handle ...

Page 112: ...r any obstruction 5 Close the binder drawer and the finisher doors Clearing the Q1221 Q1218 and Q1227 sensors Clearing the Q1221 Q1218 and Q1227 sensors should be performed only when directed by a Customer Support Center Representative 1 Open the finisher front doors 2 Locate the Q1221 Q1218 and Q1227 sensors as shown in figure 6 17 ...

Page 113: ... and the sensor detector 3 Brush a folded sheet of paper across the sensor to clear any obstruction 4 Close the finisher doors Clearing the camming motor Clearing the camming motor should be performed only when directed by a Customer Support Center Representative NOTE The fuser camming motor may stall during operation due to a system crash or system power failure The camming motor must then be man...

Page 114: ...n figure 6 18 b Pull the fuser drawer out until it stops Figure 6 18 Opening the fuser drawer WARNING There are moving parts in the fuser drawer To avoid injury touch only the brake release when performing this procedure 3 Locate the camming motor on the back of the fuser drawer as shown in figure 6 18 4 Locate the camming motor brake release under the camming motor as shown in figure 6 19 5 Push ...

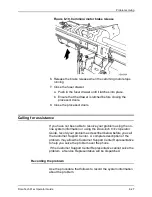
Page 115: ...ou have not been able to resolve your problem using the on line system information or using the DocuTech 61xx Operator Guide record your problem as described below before you call the Customer Support Center A complete description of the problem may allow the Customer Support Center Representative to help you solve the problem over the phone If the Customer Support Center Representative cannot sol...

Page 116: ...yed on the screen which you may need to give to the support center Host Name Host ID IP Address Phone Number Software Level Software License Number Service Option and Printer Serial Number 3 Record any codes appearing on the screen 4 Record the current problem that caused you to call for assistance 5 If image quality is the problem take a print to the phone with you 6 Save the print for the Servic...

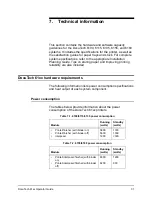
Page 117: ...are also included DocuTech 61xx hardware requirements The following information lists power consumption specifications and heat output of each system component Power consumption The tables below provide information about the power consumption of the DocuTech 61xx printers Table 7 1 6100 6115 6135 power consumption Module Running watts Standby watts Printer finisher with binder on Printer finisher ...

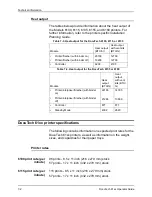
Page 118: ...er minute 96 prints 8 5 x 11 inch 216 x 279 mm stock 57 prints 17 x 11 inch 432 x 279 mm stock 6115 print rate per minute 115 prints 8 5 x 11 inch 216 x 279 mm stock 57 prints 17 x 11 inch 432 x 279 mm stock Table 7 3 Heat output for the DocuTech 6100 6115 or 6135 Module Heat output BTU hr Heat output with vent kits BTU hr Printer finisher with binder on Printer finisher with binder off 20100 1920...

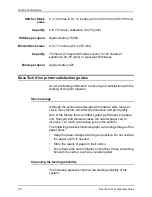
Page 119: ... minute 180 prints 8 5 x 11 inch 216 x 279 mm 8 5 x 14 inch 216 x 254 mm and A4 stock 77 prints 17 x 11 inch 432 x 279 mm or A3 stock 103 128 or 154 prints custom stock depending upon the size specified for the stock Performance can be less than optimal for the some unique stock sizes For example for stock having a process direction dimension that is equal to or greater than 8 6 inches 218 mm and ...

Page 120: ...heets substance 20 75 g m2 Tray 3 Stock sizes US Letter 8 1 2 x 11 inches US Legal 8 1 2 x 14 inches US Ledger 17 x 11 inches 9 x 11 inches A3 A4 8 1 2 x 13 inches 223 x 297 mm ISO B4 JIS B4 Custom Width 8 to 17 inches 203 to 432 mm Length 10 to 14 33 inches 254 to 364 mm Capacity 2600 sheets substance 20 75 g m2 Tray 4 Stock sizes US Letter 8 1 2 x 11 inches US Legal 8 1 2 x 14 inches US Ledger 1...

Page 121: ...SO B4 JIS B4 Custom Width 8 to 17 inches 203 to 432 mm Length 10 to 14 33 inches 254 to 364 mm Capacity 2600 sheets substance 20 75 g m2 pre or post process Additional paper capacities Inverter Stock sizes or duplex tray 8 x 10 inches to 17 x 11 inches 203 x 254 mm to 432 x 279 mm Top tray Stock sizes 8x10 inches to 17 x 11 inches 203 x 254 mm to 432 x 279 mm Capacity 500 sheets substance 20 75 g ...

Page 122: ...e print material Stock storage Although the system was designed to handle a wide range of stock many factors can affect performance and print quality One of the factors that can affect system performance is paper curl Humidity and moisture cause the natural paper curl to increase Too much curl causes jams in the system The following practices minimize paper curl during storage of the paper stock K...

Page 123: ...sed on the number of prints required When paper is taken from a storage area with a different humidity or temperature keep it in the room where it will be used for at least 48 hours before loading the paper into the system To make adjustments to the DocuTech 61xx for the curl in the paper refer to the Routine maintenance and Problem solving sections of this guide ...

Page 124: ...s substance 20 75 g m2 Tray 2 600 sheets substance 20 75 g m2 For greater capacity use Tray 3 Type or condition Xerographic bond paper in good condition Drilled stock fanned thoroughly Tab stock in perfectly flat condition Slightly curled paper Intermixed weights Transparencies Label stock Adhesive drafting film Paper with reinforced edges Do not use excessively curled paper Substance 110 200 g m2...

Page 125: ...t tabs use tray 1 or 2 Transparencies with a white stripe use tray 1 or 2 Freshly printed offset prints use tray 3 Refer to the Using various stocks section for any stock not defined in this guide Table 7 7 Satisfaction guide for paper tray 4 Stock Reliable feeds may be expected Less reliable feeds may be expected Suggested alternatives Size 8 x 10 inches to 17 x 11 inches 203 x 254 mm to 432 x 27...

Page 126: ...mmended Substance 110 200 g m2 must be long grain except 17 x 11 inch 432 x 279 mm substance 110 200 g m2 which must be short grain Capacity 2600 sheets substance 20 75 g m2 Type or condition Xerographic bond paper in good condition Drilled stock fanned thoroughly Slightly curled paper Intermixed weights Xerox vellum Full cut tabs Label stock Adhesive drafting film Paper with reinforced edges Do n...

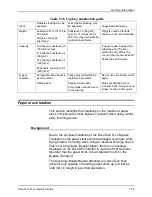
Page 127: ... sided printing Stock Reliable feeds may be expected Less reliable feeds may be expected Suggested alternatives Table 7 10 Satisfaction guide for various stocks Stock type Instructions for use Substance 13 49 g m2 paper Use trays 3 4 or 5 Do not run 2 sided prints Load the paper with seam side down into tray 3 Optimum satisfaction can be expected with 8 5 x 11 inch 216 x 279 mm or larger paper Sub...

Page 128: ...by a Customer Service Representative Up to 500 sheets can be placed in the tray Load the paper into all trays with holes to the left reinforced side down Select Properties on the Trays pull down menu On the Stock window under Type select Drilled Image quality problems may occur near the reinforcement with side 2 printing Remove the paper immediately before use to ensure that prints stay flat Print...

Page 129: ...1 with the printed side down top edge to the front of the tray Load the paper into trays 1 and 2 side 1 up with the top edge to the front of the tray Do not use freshly preprinted paper in trays 1 and 2 Textured paper Heavily textured paper may produce prints with a ragged character appearance or deletions To test run a proof print Window stock Run if the window is 2 2 to 4 inches 57 to 102 mm fro...

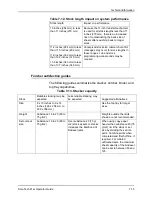
Page 130: ... malfunction for example fuser jams Running stock wider than 9 inches 229 mm other than 17 x 11 inches or A3 may increase the risk of misregistration skew and tray 3 elevator problems No performance impact for the 6155 and 6180 printer Table 7 12 Stock length impact on system performance Stock length Impact on performance Over 11 inches 279 mm to less than 11 7 inches 297 mm Over 11 7 inches 279 m...

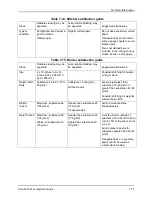
Page 131: ...ck programming work arounds may be required Table 7 12 Stock length impact on system performance Stock length Impact on performance Table 7 13 Stacker capacity Stock Reliable stacking may be expected Less reliable stacking may be expected Suggested alternatives Size 8 x 10 inches to 9 x 14 inches 203 x 254 mm to 229 x 356 mm Use the top tray for larger sizes Weight Substance 16 to 20 60 to 75 g m2...

Page 132: ...y be expected Less reliable stacking may be expected Suggested alternatives Size 8 x 10 inches to 9 x 14 inches 203 x 254 mm to 229 x 356 mm Use the top tray for larger sizes Weight Substance 16 to 110 60 to 200 g m2 Weights outside the limits shown are not recommended Set size limit due to copy paper weight Collated Up to 65 sheets of substance 20 75 g m2 or 0 28 inch 7 mm thick sets Uncollated 5...

Page 133: ... 75 to 90 g m2 Substance 16 60 g m2 Without covers Avoid weights less than substance 16 60 g m2 or greater than substance 24 90 g m2 Consider stitching for weights outside these limits Weight Covers Maximum substance 65 176 g m2 Heavier than substance 65 176 g m2 Transparencies Avoid removable stripe transparencies Weight Insert Maximum substance 65 176 g m2 Minimum substance 20 75 g m2 Heavier th...

Page 134: ...inserts Stacker capacity Delivers 12 sets inboard and 12 sets outboard To allow continuous run unload outer stack before inner stack reaches capacity Type or condition Xerographic bond paper in good condition Drilled paper Slightly curled paper Avoid the following Coated papers Drilled stock with reinforced edges Transparencies as inserts Excessively curled paper Never tear paper Stock not defined...

Page 135: ... portrait orientation Weight Substance 16 to 110 60 to 200 g m2 Weights cannot be intermixed Substance 16 60 g m2 over 9 x 14 inches 229 x 356 mm may yield stacking registration problems Weights outside the limits shown are not recommended Capacity 500 sheets substance 20 75 g m2 or less 415 sheets substance 24 90 g m2 310 sheets substance 32 120 g m2 225 sheets substance 110 200 g m2 If using a p...

Page 136: ...must be within the paper stock size parameters of the DocuTech 61xx printer paper trays Refer to the DocuSP controller on line help system for information on setting finisher devices and finisher profiles to enable rotation to a third party finisher Table 7 17 Common US paper sizes Common size name Inches x inches Millimeter equivalent Diagonal in inches Can be rotated Comment similar to or the sa...

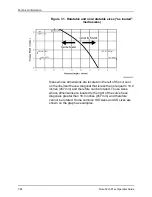
Page 137: ...da etc Common size name Millimeters Inches equivalent Diagonal in millimeters Can be rotated Comment similar to or the same as ISO A4 210 x 297 8 27 x 11 69 364 YES 2 up of ISO A5 216 x 330 8 5 x 13 0 394 YES ISO Foolscap 216 x 356 8 5 x 14 0 416 YES US 8 5 x 14 in Legal ISO B4 250 x 353 9 84 x 13 9 433 YES 2 up of ISO B5 JIS B4 257 x 364 10 12 x 14 33 446 YES 2 up of JIS B5 ISO A3 297 x 420 11 69...

Page 138: ...d on the left of the curve or on the line itself have a diagonal that is less than or equal to 18 0 inches 457 mm and therefore can be rotated Those sizes whose dimensions are located to the right of the curve have diagonals greater than 18 0 inches 457 mm and therefore cannot be rotated Some common ISO sizes and US sizes are shown on the graph as examples ...

Page 139: ...resentative before the last item is used CAUTION Do not use any supplies not approved by Xerox You can damage the system by using supplies other than those recommended Supplies ordered from the Supply Order Representative Paper in various sizes weights and colors Developer Dry ink Fuser agent Stitcher wire Binder tape Dry ink waste container Supplies ordered from the Parts Marketing Representative...

Page 140: ...this toll free number 1 800 828 5881 Monday through Friday between 8 00 a m and 8 00 p m In Canada call telemarketing for consumable supplies non paper English 1 800 668 0199 French 1 800 668 0133 Fax 1 416 733 3086 Toronto only 733 9400 In Xerox Europe and other countires contact your local Representative Give the Representative the following information Your Xerox customer number Your system mod...

Reviews: