background image

Summary of Contents for 701P91273

Page 1: ...XPrint UNIX System Printer Driver Installation SOLARIS 1 X SUN OS SOLARIS 2 X XPrint Color Series 701P91273 May 1996...

Page 2: ...the Xerox Corporation Other company trademarks are also acknowledged PCL is a trademark of the Hewlett Packard Company This printer contains an emulation of the Hewlett Packard PCL 5 command language...

Page 3: ...cript Print Tool Installation Floppy Disk ________ 7 1 Overview ________________________________ ________________________________ ___7 1 Setup ________________________________ ________________________...

Page 4: ...________________________________ ____________13 13 14 Troubleshooting______________________________________ 14 1 TCP IP communication problems ________________________________ ________________ 14 1 X...

Page 5: ...XPrint UNIX SYSTEM PRINTER DRIVER INSTALLATION v...

Page 6: ......

Page 7: ...eference to 49XX 49XX is generic When you see this substitute the actual model name of your XPrint printer This would be ONE of the following 4915 4920 4925 FTP sites where this document is available...

Page 8: ...XPrint UNIX SYSTEM PRINTER DRIVER INSTALLATION 1 2...

Page 9: ...ork Interface Guide 2 Assign XPrint printer an IP Address at the control panel See Appendix B 3 Add your XPrint printer s TCP IP address and hostname to your NIS database For non NIS networks add the...

Page 10: ...k ENTER cd tmp ENTER cp floppy floppy0 setup ENTER setup ENTER 8 Follow setup instructions to install the XPrint PostScript Print Tool 9 When installation is complete setup will automatically launch t...

Page 11: ...work Interface Guide 2 Assign XPrint printer an IP Address at the control panel See Appendix B 3 Add your XPrint printer s TCP IP address and hostname to your NIS database For non NIS networks add the...

Page 12: ...sitive 49XX_hostname is host entry for the 49XX 49XX lp rm 49XX_hostname rp ps sd var spool 49XX System 5 UNIX Use the following lp command sequence as root Use ps for Remote Printer entry case sensit...

Page 13: ...ter driver on server or station by ONE of the following methods Floppy Disk Install Details in Chapter 7 Network Install Details in Chapter 9 4 Configure your UNIX workstation for any of the following...

Page 14: ...XPrint UNIX SYSTEM PRINTER DRIVER INSTALLATION 4 2...

Page 15: ...5 1 5 Installation Overview for NON SOLARIS Workstations 1 Verify physical cable connections from your printer to the network 2 Configure your TCP IP environment and the XPrint printer so they can co...

Page 16: ...XPrint UNIX SYSTEM PRINTER DRIVER INSTALLATION 5 2...

Page 17: ...Default Gateway are optional if you are not communicating to your XPrint printer over a WAN The default is 000 000 000 000 We recommend that you set both of these parameters if the XPrint printer is o...

Page 18: ...XPrint UNIX SYSTEM PRINTER DRIVER INSTALLATION 6 2...

Page 19: ...or standalone workstations without a network connection For greater number of installations or simplicity reasons use the network installation option of XPrint described in Chapter 8 Setup NOTE Read t...

Page 20: ...loppy floppy0 setup ENTER setup ENTER 5 From the Install Print Driver and Utilities menu Install Print Driver and Utilities 1 Install Driver and Utilities 2 Create an installation site 3 Create Instal...

Page 21: ...t You may have to mount the remote directory and then run setup 2 TYPE cd installation directory ENTER setup ENTER installation directory is the shared directory where the XPrint software was installe...

Page 22: ......

Page 23: ...functioning network Setup NOTE The following instructions assume you have correctly completed the XPrint PostScript Print Tool installation NOTE Read the Installation Overview for your variety of UNIX...

Page 24: ...TYPE 1 ENTER 3 From the Add or Update a Printer menu select option2 until it indicates workstation to printer 1 Enter a menu option number to toggle through the available settings When the desired se...

Page 25: ...ty SEE Chapter titled Printing Model Print Server to printer for this procedure The 49XX remoter spooler spools jobs to a direct connected or network connected 49XX printer Setup NOTE The following in...

Page 26: ...ting printer e Exit Existing printer list Enter option TYPE 1 ENTER 3 From the Add or Update a Printer menu select option 2 until it indicates workstation to print server 4 Enter a menu option number...

Page 27: ...nected parallel port or to a network connected 49XX printer Setup NOTE The following instructions assume you have correctly completed the XPrint 49XX PostScript Print Tool installation NOTE You will n...

Page 28: ...TYPE 1 ENTER 3 From the Add or Update a Printer menu select option2 until it indicates print server to printer 4 Enter a menu option number to toggle through the available settings When the desired se...

Page 29: ...ectly completed the XPrint 49XX PostScript Print Tool installation You will need to know the complete path to the installation directory or have added it to your search path to continue 1 Become super...

Page 30: ...on Overview TCP IP and lpr on the 49XX can be administrated in a number of different ways Telnet PC XPrint Printer Services MAC XPrint Printer Services 49XX Control panel It is up to you and your envi...

Page 31: ...d disabled LPR Banner Pages yes no Enable Disables LPR banner pages IPX Netware Enables Disables IPX Pserver Ethernet Type IPX packet frametype settings Primary Netware Server NetWare server storing 4...

Page 32: ...d disabled Card Address TokenRing physical address can be set Reset Printer yes no resets NIC and enables any NIC changes Reset network card settings to factory defaults yes no resets NIC to default s...

Page 33: ...ETTINGS page for review of your printer s IP address If necessary see Appendix B to set your printer s IP address Starting TELNET from UNIX At the Command prompt TYPE telnet XXX XXX XXX XXX 2002 ENTER...

Page 34: ...ntenance port 2002 real time status can be viewed remotely in the Telnet console screen If the printer is idle you can poll the printer by typing s at the Telnet console Example In the following examp...

Page 35: ...n maintenance mode by typing h at the maintenance mode main menu Note You MUST reset the NIC in the printer after going into maintenance mode You can do this in Telnet by using theR option Maintenance...

Page 36: ...ing is an example of entering maintenance mode then getting help At the Command prompt TYPE telnet XXX XXX XXX XXX 2002 ENTER The system will attempt to connect to the host You will see TYPE ENTER War...

Page 37: ...umber L Limit Access by IP number IP security currently disabled enabled IP security option 1 Delete entry 2 Add address 3 Add subnet 4 Done N Set Network Protocol options Network Protocols Menu A Set...

Page 38: ...Netbios yes or no y or n y n Set PC network Netbeui Group 1 No 2 Yes Set PC network Netbeui Name 1 No 2 Yes Set PC network Netbeui Service 1 No 2 Yes Set PC network Netbeui Description 1 No 2 Yes Set...

Page 39: ...network specific administration tasks is available in the Network Interface Guide supplied either with your printer or with your network interface card MAC XPrint Printer Services Full information is...

Page 40: ......

Page 41: ...pinging the 49XX using its hostname If ping is successful with the 49XX s TCP IP address then you have a local workstation or NIS configuration problem Add the 49XX printer hostname to your local hos...

Page 42: ...or This person should be able to verify the correctness of the settings IP address Subnet Mask Default Gateway NOTE Any one of these important TCP IP parameters if set incorrectly can cause TCP IP com...

Page 43: ...n problems section and continue your diagnostics there 3 If you are using indirect spooling to print to the 49XX verify that the remote workstation is up and running and can communicate with the 49XX...

Page 44: ...e using indirect spooling to print to the 49XX verify that the remote workstation is up and running and can communicate with the 49XX NIC 4 If you are spooling directly to the 49XX verify that you can...

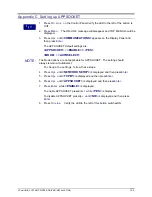
Page 45: ...On Line on the Control Panel Verify that the LEDto the left of the button is OUT 2 Press Menu The ON LINE message disappears and TOP MENU is displayed 3 Press Up until PRINT appears on the Display Pa...

Page 46: ...p until TCP IP is displayed and then pressEnter 6 Press Enter while IP ADDRESS is displayed 7 Press Enter while DYNAMIC is displayed 8 Press Up until NO is displayed and then pressEnter 9 Press Enter...

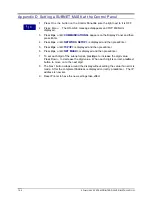
Page 47: ...E YES MODE AUTOSELECT The Mode options are not applicable for APPSOCKET The setting should always remain at AutoSelect To change the settings follow these steps 4 Press Up until NETWORK SETUP is displ...

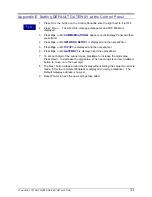
Page 48: ...is displayed and then pressEnter 5 Press Up until TCP IP is displayed and then pressEnter 6 Press Up until NET MASK is displayed and then pressEnter 7 To set each digit of the subnet mask press Up to...

Page 49: ...splayed and then pressEnter 5 Press Up until TCP IP is displayed and then pressEnter 6 Press Up until GATEWAY is displayed and then pressEnter 7 To set each digit of the subnet mask press Up to increa...

Page 50: ...It allows the user to view the current job list for XPrint print queues This program executes and continues to run and update the screen until you exit by typing C Control key C XPQ can be used by any...

Page 51: ...ing lprm run the XPrint utility lpq for the desired queue and note the job number of the print job you want to delete XPRM can be used by the ROOT user to delete ANY print jobs XPRM can be used by any...

Page 52: ...ny user to administer ONLY their print jobs Usage xpmv source_queue_name dest_queue_name job_number Where source_queue_name Queue where the print job to be moved exists dest_queue_name Queue where the...

Reviews: