background image


AccXES Account Management Tool Administrator’s Guide 

13 


Tutorial  

NOTE: 

To view any help screens while still interacting with the Account 

Management Tool, select Help > Default Web Browser. To view this tutorial 
electronically, select Help > Help Topics > Tutorial. Then minimize the Tutorial to 
see the AMT screens.


Before Using the Account Management Tool 

1.  Turn on each printer and scanner with which the Account Management Tool 

will be interacting. 

2.  Enable job accounting at each printer as follows.  

Ÿ 

Open your web browser, such as Microsoft Internet Explorer.   

Ÿ 

In the Address field, type in your printer’s IP address, such as 
13.10.144.8.  This will open the Web PMT software, which manages 
the printer settings. 

Ÿ 

In the Web PMT, select 

Session Setup

.   

Ÿ 

Enter your password, or 

0

 as the default password. 

Ÿ 

Press the 

Submit

 button. 

Ÿ 

Click on 

ACCOUNTING

 to display the Accounting Page. 

Ÿ 

Copy down the Machine Name, which will be needed later in this 
tutorial. 

Ÿ 

Click on the 

Enabled

 or 

Optional

 radio button. Selecting Enabled will 

require every user to enter an Account ID and User ID into the scanner 
or Document Submit Tool before every print or scan job.  Selecting 
Optional gives each user the choice of using, or not using, an Account 
ID and User ID.  When these identifiers are not used, the job 
accounting data will be logged in the controller’s job log file as 
GenericAccountID and GenericUserID.  

Ÿ 

Press the 

Update Printer

 button to set the mode. The Controller will 

send a message back indicating the success of your request. 

NOTE:

 Job Accounting can also be enabled on the scanner, or on the 

printer user interface. See 

Appendix 1

 for details.


3.  Save the data from each printer controller's job log file that is using pre- 7.0 

AccXES firmware, or the data will be lost when AccXES firmware 7.0, or 
greater, is loaded. If you do not need to do this, go to the step entitled “Install 
the 8.0 AccXES firmware”. 

Ÿ 

On the Web PMT Main Menu toolbar, select 

ACCOUNTING

Ÿ 

Select 

Reports

Ÿ 

On the Reports Page put in the account and sub-account for which you 
want to retrieve media usage data. To retrieve system account data, 

Summary of Contents for 850DP - Phaser Color Solid Ink Printer

Page 1: ...AccXES Account Management Tool Administrator s Guide Version 10 0 701P41531 May 2004...

Page 2: ...PORATION InstallAnywhere is a registered trademark of Zero G Software Inc Mac OS X is a registered trademark of Apple Computer Inc Pentium is a registered trademark of the Intel Corporation Red Hat Li...

Page 3: ...an Installation 12 Tutorial 13 Before Using the Account Management Tool 13 Using the Account Management Tool 14 Accounts Tab 23 Overview 23 How to Use the Accounts Tab 23 Add an account to the Account...

Page 4: ...ws 34 How to Connect Accounts Printers Users on the Edit Account Associations Dialog 35 Printer Job Accounting Tab 37 Overview 37 How to Use the Printer Job Accounting Tab 37 Importing Data from print...

Page 5: ...Enabling Job Accounting 54 From the Web PMT 54 From the AccXES Compliant Scanner 54 From the Printer User Interface 8825 8830 8850 54 2 Saving Each Printer s Media Usage Data to a File Before Loading...

Page 6: ...AMT Administrator links specific users and printers to the defined accounts The associations are stored in the Associations table NOTE The maximum number of AMT records allowed are 9999 accounts 9999...

Page 7: ...Account Management Tool Administrator s Guide 7 unique name If the same file name already exists instead of replacing the file it appends to the existing file See Appendix 2 for a list of the AMT data...

Page 8: ...based PC Pentium 1 Ghz or greater Red Hat Linux Apple G3 G4 G5 MacOS X 10 2 x Sun w SPARC processor minimum 333 MHz Solaris Version 2 6 2 7 2 8 NOTE Windows 95 98 are no longer officially supported M...

Page 9: ...ollows Go to http www xerox com Choose Support Drivers Go to the Wide Format section Select the hyperlink that refers to AccXES 88xx X2 Tech 510 721P Under your type of driver select Drivers Downloads...

Page 10: ...he version that you have on your machine is too old to get updated then an Update Failed screen will appear You will need to select the Done button to stop the installation See the Uninstalling page o...

Page 11: ...acOSX 10 3 x RedHat 1 To install an application on a RedHat 8 system insert the CD ROM into the CD ROM drive and enter the following commands cd AccXES InstData Linux VM install bin or cd setup bin 2...

Page 12: ...tabase files on a regular basis The names of the AMTdatabase files are AccXESjadb backup AccXESjadb data AccXESjadb script AccXESjadb properties In the Windows environment the default location of thes...

Page 13: ...k on the Enabled or Optional radio button Selecting Enabled will require every user to enter an Account ID and User ID into the scanner or Document Submit Tool before every print or scan job Selecting...

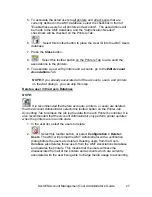
Page 14: ...nts on the Account Tab as follows Select the Accounts Tab Select this toolbar button or select Configuration Add Account You will be creating accounts on the Add Accounts dialog NOTE It is easiest for...

Page 15: ...e Close button The Account ID and Creation Date will become visible on the Accounts Tab list 4 Add Users on the Users Tab Select the Users Tab Select this toolbar button or select Configuration Add Us...

Page 16: ...sh and period symbols are allowed Duplicate printer names are not allowed Add your Printer Description into the 80 character text field The field may be left blank Duplicate descriptions are allowed A...

Page 17: ...t whose associations you want to edit The first account that you selected will now appear in the Account ID field In the Printers window click on the printers that you wish to associate with this acco...

Page 18: ...mark will be removed from the Printers Status column It will also be removed from the Authorization Needed column on the Printers Tab Select the Close button to close out of this screen Go to the Prin...

Page 19: ...printer the Authorization Needed box will be empty and the Last Authorized date will be modified on the Printers Tab If there is a checkmark in the Purge Needed column then select this toolbar button...

Page 20: ...ntroller to delete purge the original data If you go to the Printers Tab there will be no checkmark in the Purge column See Appendix 2 for the meaning of the data fields 10 Repeat the above process in...

Page 21: ...ounting Tab A message will appear at the bottom of the screen showing how many records are in the Raw and Tallied Job Accounting Databases WARNING You can only generate a tally of the data that is cur...

Page 22: ...o a File dialog select Save to confirm your choice NOTE Be sure to save your newly tallied data to a new file This will avoid overwriting the previously saved data file which contains different values...

Page 23: ...y can become part of the Account ID For example if you want to add account 3 and sub account 2 you would type in 3 2 as the Account ID Lower case characters are converted to upper case letters on entr...

Page 24: ...ecommended that before accounts printers or users are deleted that the Account Administrator selects this toolbar button on the Printer Job Accounting Tab to retrieve the job log file data from each P...

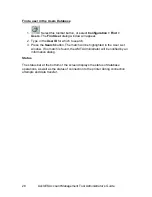
Page 25: ...og window will appear 2 Type in the Account ID to search for that account in the AMT Accounts Database and press the Search button The located Account will show as highlighted on the Accounts Tab Stat...

Page 26: ...t this toolbar button or select Configuration Add Users 2 In the Add Users dialog type the user name into the User ID field The User ID is an alphanumeric character string A Z 0 9 with a maximum of 32...

Page 27: ...dd dialogs you can skip this step Delete a user in the Users Database NOTE It is recommended that before accounts printers or users are deleted that the Account Administrator selects this toolbar butt...

Page 28: ...Type in the User ID for which to search 3 Press the Search button The match will be highlighted in the User List window If no match is found the AMT Administrator will be notified by an information d...

Page 29: ...on the Edit Account Associations Tab The maximum number of printers supported by the AccXES AMT is 999 For system performance reasons it is recommended that the AMT Administrator limit the number of...

Page 30: ...printer s authorized accounts and users The authorization command will be sent to each of the AMT defined printers whose Authorization Needed field shows a checkmark and whose Unvalidated box does not...

Page 31: ...nters are deleted This dialog warns the AMT Administrator to collect the printers job log file prior to deleting the printer Deleting a printer removes it from the AMT Printers Database and it will no...

Page 32: ...log file Select this toolbar button to send the Job Options to the printers controllers Authorization Needed Column A change has been made in the AMT Master Database printer s associations but it has...

Page 33: ...command that defined accounts and users was sent to the printer This field will be blank for printers that have not been issued the authorization command for example after printer creation but prior...

Page 34: ...allowed Once accounts are selected their currently defined associations will be displayed in the Current associations window Users window This is a scrolling list window that contains all of the User...

Page 35: ...r in the Database Status box to indicate that the associations that you just made have not yet been placed into the AMT Associations Database The checkmark in the Printers Status column means that the...

Page 36: ...retrieve the job log file data from each Printer s controller Exiting the dialog without updating the printers will generate a warning message but won t cause loss of data In this case the next time y...

Page 37: ...media square area field and scan usage records that are currently in the Raw Job Accounting Database at the time of the tally If metric units is selected on the Job Options dialog the raw database un...

Page 38: ...ed This is a numeric 2 character field to indicate the number of days to keep the data in the Raw Job Accounting Database The minimum keep interval is 1 day 24 hours and the maximum keep interval is 9...

Page 39: ...in the Raw Job Accounting Database at the time of the tally Accounts and Users that show zero media usage will be listed with zeros in the tallied data If an account or user is defined on more than o...

Page 40: ...layed Data to a File CAUTION After exporting the tallied data the same data will be exported again if the records are not deleted first from the Raw Job Accounting Database before being re tallied Dat...

Page 41: ...re received by the printers controllers NOTE The same job options are sent to additional printers when you add them to AMT The setting selections are described below Select the following Job Accountin...

Page 42: ...uration is sent to the printers after you select the Set the Printers Job Accounting Options toolbar button CAUTION New job accounting data will not be saved in the printer controller s job log file u...

Page 43: ...eCollect the Job Accounting Data toolbar button on the Printer Job Accounting Tab This is a numeric 2 character field The minimum keep interval is 1 day 24 hours and the maximum keep interval is 90 da...

Page 44: ...s and 25 users on one printer or 100 accounts and 25 users on 2 printers there will be 5000 associations created if you select the global associations feature If AMT is reaching its associations limit...

Page 45: ...net area data cannot be imported 1 Select this toolbar button on the Printer Job Accounting Tab or select File Import Accounting File 2 On the Import Accounting File dialog select Import pre 7 5 AccXE...

Page 46: ...ou can view the Account IDs on the Accounts Tab the User IDs on the Users Tab and the accounting data on the Printer Job Accounting Tab NOTE If erroneous data is found in the import file that data wil...

Page 47: ...d become Users in the AMT database Example of import user data format Select Import Accounts and Users if both accounts and users are being imported from the file They are treated as pairs the first i...

Page 48: ...you did not select the Create global associations feature before importing your file you will next need to associate each Account ID and User ID with the printers that you have defined in the AMT See...

Page 49: ...e file name already exists instead of replacing the file it appends to the existing file CAUTION After exporting the AMT data the same data will be exported again if the records are not deleted first...

Page 50: ...rted file or select the Browse button On the Save Account Information screen in the Look In field double click on the directory where you want the data saved In the File Name field type in the file na...

Page 51: ...ted in the AMTdatabase folder The default location of this folder is in C Program Files AccXES AMTdatabase WARNING If you accidentally manually delete the saved AMT database files they cannot be recov...

Page 52: ...ools Read the above warning message about losing your AMT data files if you manually remove files Mac OS X To uninstall the application on a UNIX system execute the following commands cd application i...

Page 53: ...placed the Java application Note that these commands may differ from that shown above depending on the version of Linux is used The commands shown here are for a RedHat 8 0 system NOTES Uninstaller d...

Page 54: ...ontrol panel Press the Next key until SYSTEM ADMINISTRATION is displayed Press the Entry key Enter the administrator password Press the Next key until JOB ACCOUNTING is displayed Press the Enter key P...

Page 55: ...em account data 0 for the account number and 1 for the sub account number Putting 1 in the Account field will display all accounting data Select if the display values should be in square decimeters or...

Page 56: ...k from printer controllers N5T CNG or VP8 Check that a floppy disk drive exists on the printer s controller If yes do the following Ensure that a 3 5 inch floppy disk with MS DOS formatting is availab...

Page 57: ...sent to the printer s controller Only AMT defined users can use an AMT defined Account ID when interacting with the defined printer scanner The Account ID field is input on the Add Accounts dialog Wh...

Page 58: ...If multiple media types or media sizes are used for the same job the first will be listed on the Raw Job Accounting Data list on the Printer Job Accounting Tab However if you double click on the row i...

Page 59: ...date and time that the Job Options were sent to the printers This shows on the Printers Tab The Job Options are made on the Select Job Accounting Options dialog which the AMT Administrator accesses fr...

Page 60: ...counting Database is the printer name set by the Web PMT or by a PJL command Record ID This is the Raw Job Accounting data record identifier that is generated by the Account Management Tool Scan Desti...

Page 61: ...he Raw or Tallied Database User ID Alphanumeric character string A Z 0 9 maximum 32 characters This is defined in the AMT by the AMT Administrator A decimal point and minus sign are allowed Lower case...

Page 62: ...data from each AccXES AMT defined printer s job log file which is located in each printer s controller The data will remain in the database until it is manually deleted or until the Keep Raw Printer...

Page 63: ...nd Users that show zero media usage will not be listed in the tallied data If an account or user is defined on more than one machine a line for each machine s accounts and users appears in the tallied...

Page 64: ...nts View the currently defined list of AccXES AMT job accounts Users View the currently defined list of AccXES AMT job accounting users Printers View the currently defined list of AccXES printer copie...

Page 65: ...m the printers whose Purge Needed field is checked on the Printers Tab Collect Job Accounting Data from the Printers Collects the controller s job log file data from each of the defined printers and p...

Page 66: ...eld Accounts Tab Add an Account Add a Printer Add a User Appendix 1 Appendix 2 Appendix 3 Associations to edit Authorization Needed C Configuration Menu Commands Configuration Needed D Delete an Accou...

Page 67: ...orting Data From Printers Using Less Than 7 0 AccXES Firmware Installing the AccXES Account Management Tool IP Address of the Printer J Job Accounting Enabling Job Completion Time Job ID Job Name Job...

Page 68: ...ave Pre 7 0 Firmware Media Usage Data Scan Destination Scan File Size Scan Media Length Scan Media Width Scanned to Net Count Scan Time Sets Completed see Job Sets System Requirements T Table of Conte...

Page 69: ...AccXES Account Management Tool Administrator s Guide 69 V View Defined Accounts View Defined Printers View Defined Users View Menu Commands...

Page 70: ...ips Road Building 845 17S Webster New York 14580 9791 USA Printed in the United States of America AccXES is a trademark of the Xerox Corporation 2004 All other product names mentioned herein are trade...

Reviews: